编译php vld扩展
wget http://pecl.php.net/get/vld-0.12.0.tgz
tar zxf vld-0.12.0.tgz
phpize
./configure
make && make install

# vim /usr/local/php/etc/php.ini
# extension=vld.so

# 查看扩展是否已经加载
php -m | grep vld

# 试一试
php -dvld.active=1 test.phpwget http://pecl.php.net/get/vld-0.12.0.tgz
tar zxf vld-0.12.0.tgz
phpize
./configure
make && make install
# vim /usr/local/php/etc/php.ini
# extension=vld.so
# 查看扩展是否已经加载
php -m | grep vld
# 试一试
php -dvld.active=1 test.php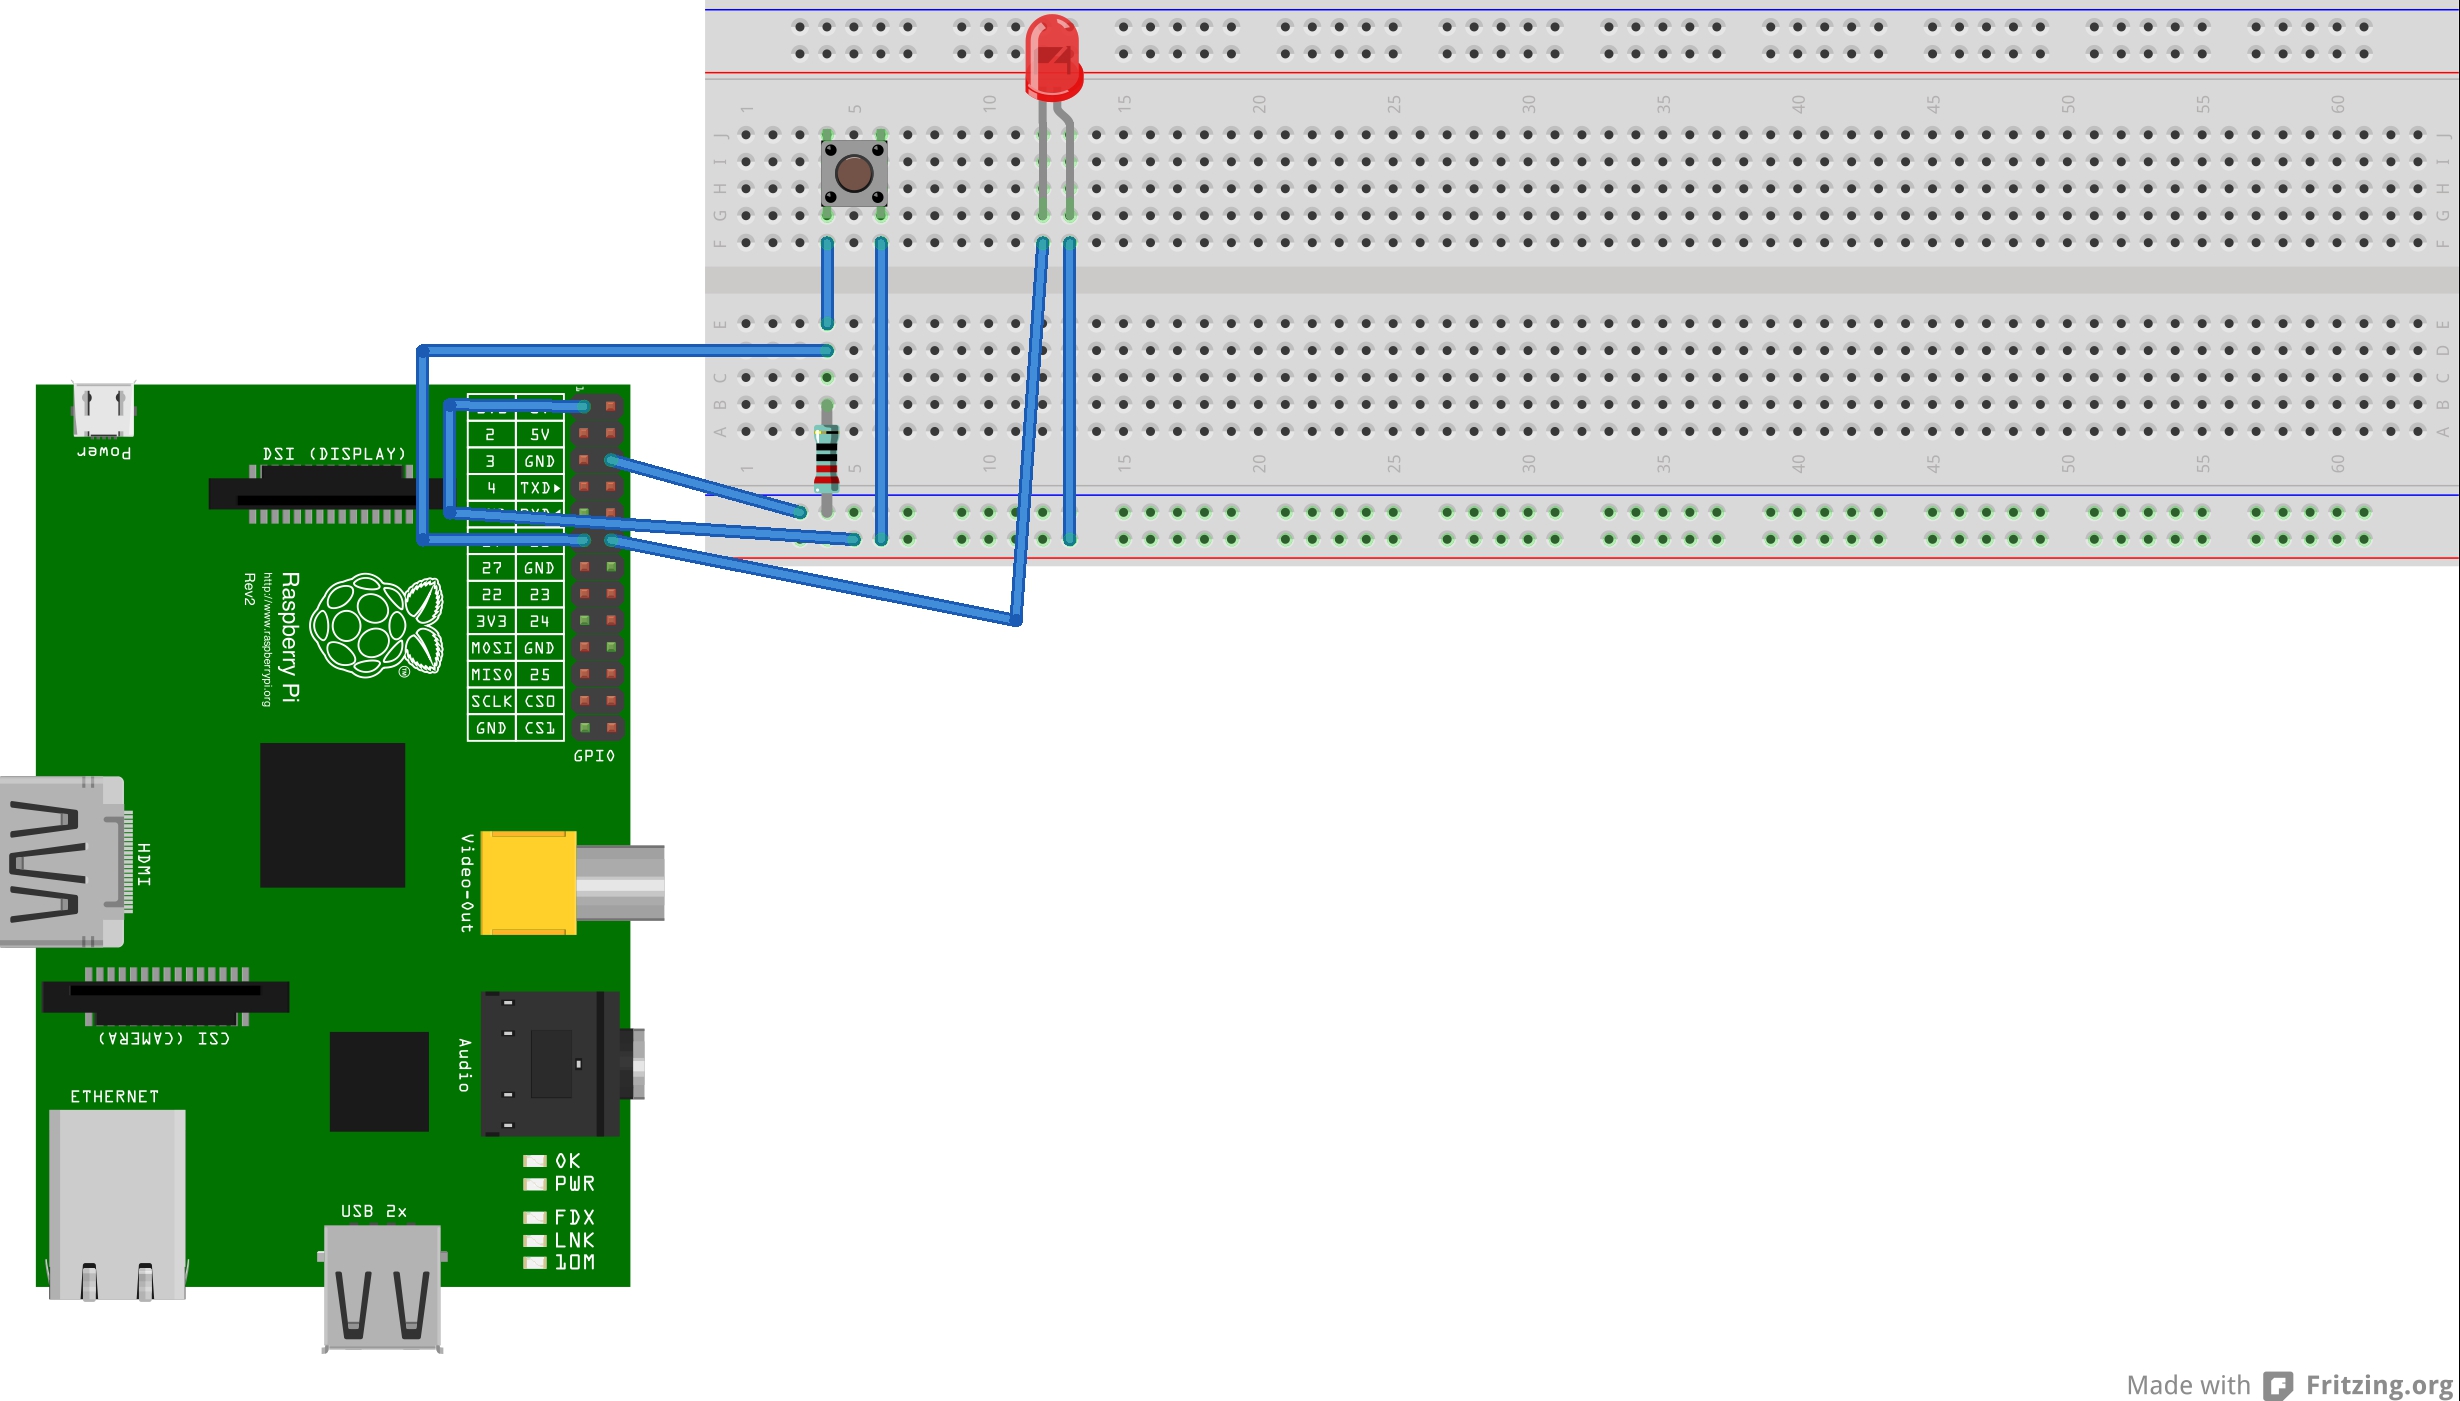
通过读取GPIO PIN的值,在按钮按下并松开之后更改LED的状态;从而进行灯的亮灭的切换。
#!/usr/local/env python
# encoding: utf-8

import RPi.GPIO as GPIO
import time

GPIO.setmode(GPIO.BCM)
GPIO.setup(18, GPIO.OUT)
GPIO.setup(17, GPIO.IN)

light = False

while 1:
	i = GPIO.input(17)
	if i:
		print('检测到按钮按下')
		while 1:
			i = GPIO.input(17)
			if not i:
				print('检测到按钮松开')
				GPIO.output(18, light)
				light = not light
				break
	time.sleep(.2)

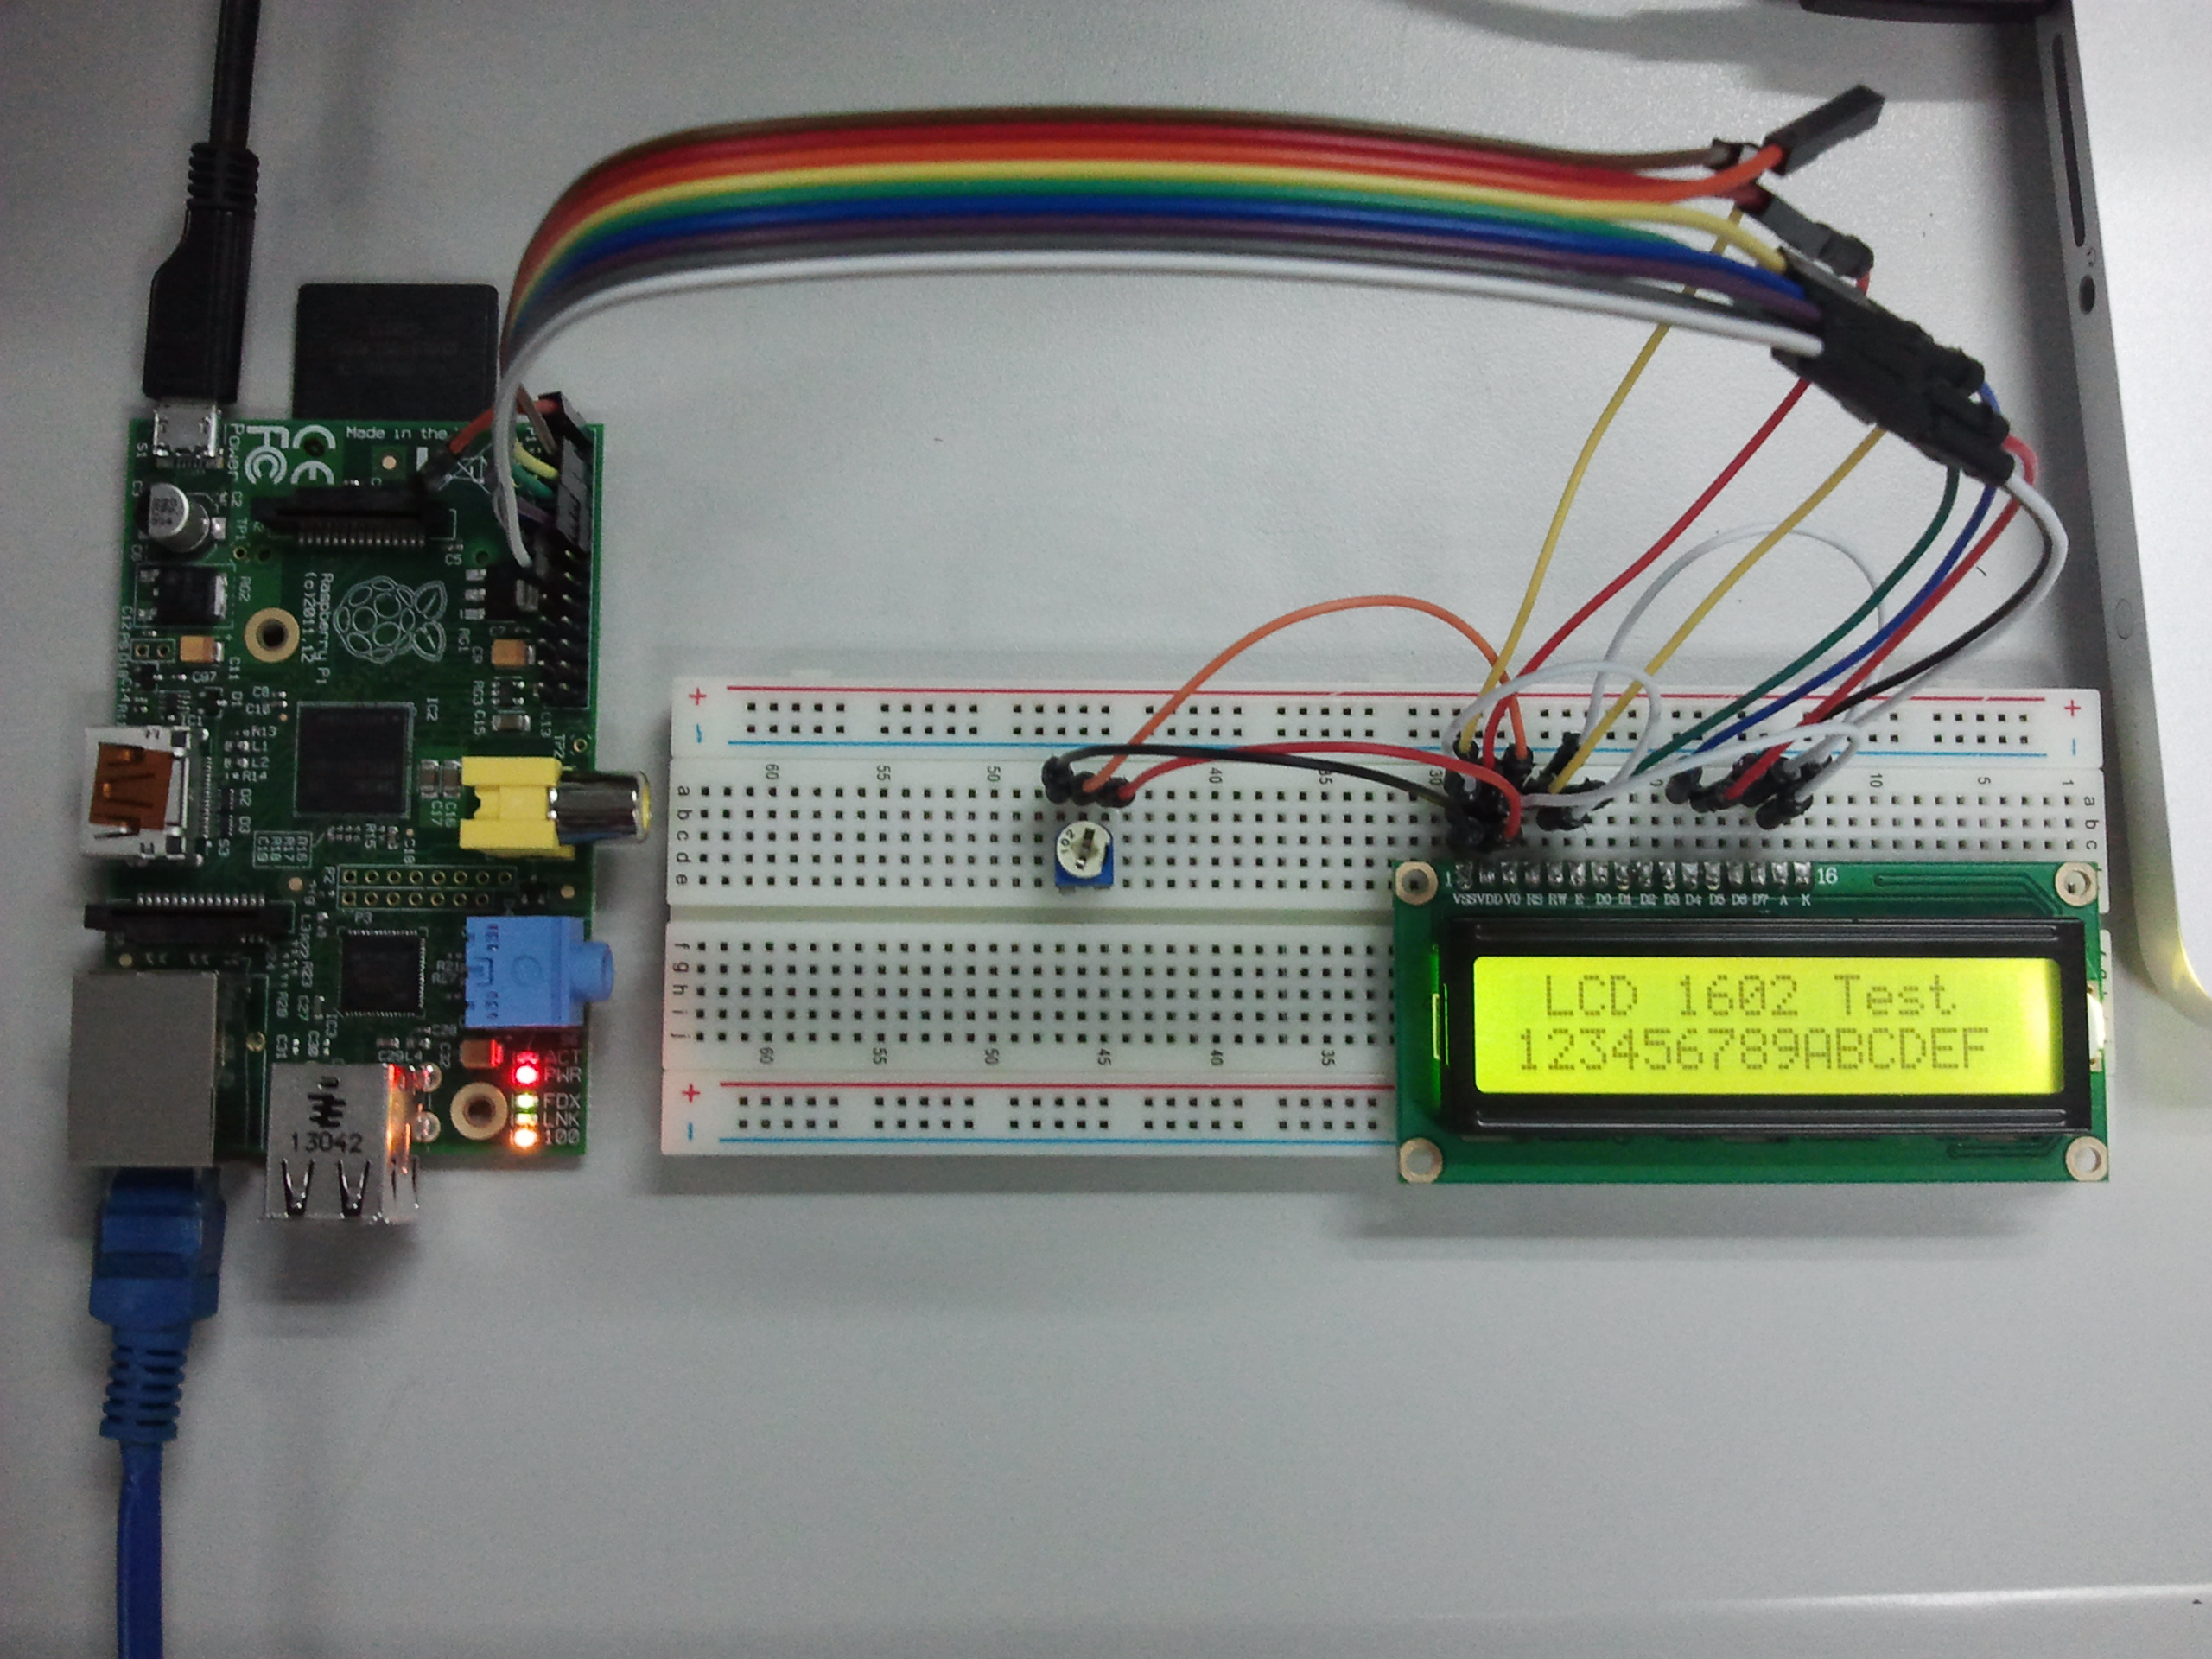
+接个3.3v的电源,-接18口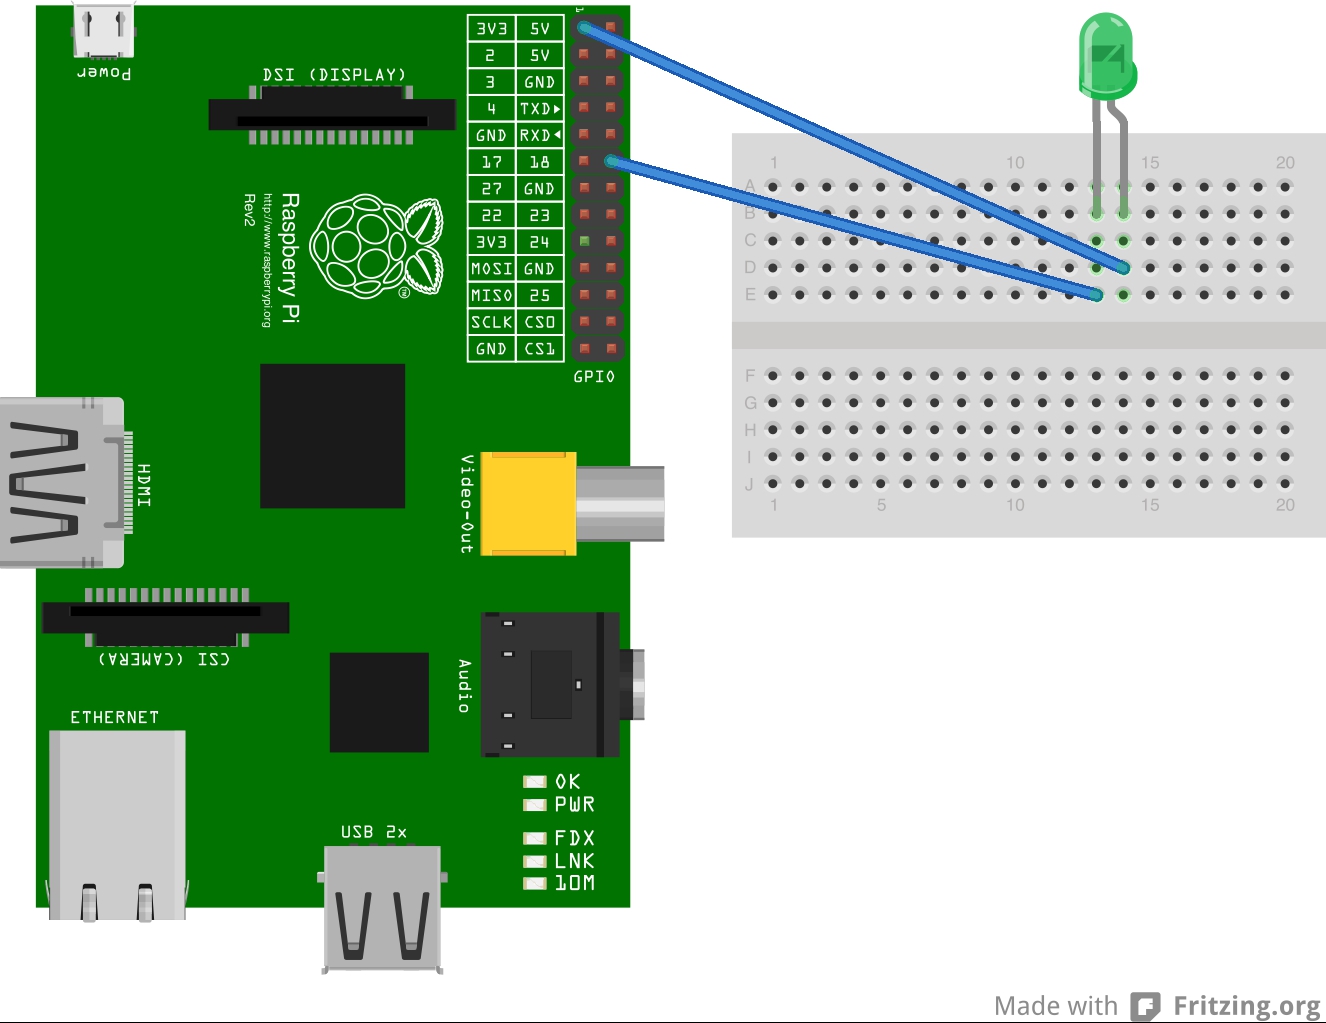
#!/usr/bin/env python
# encoding: utf-8

import RPi.GPIO
import time
# 正常呼吸为3s一次,深呼吸6s一次
'''
RPi.GPIO.setmode(RPi.GPIO.BOARD)
RPi.GPIO.setup(12, RPi.GPIO.OUT)

pwm = RPi.GPIO.PWM(12, 50)
pwm.start(0)
'''
RPi.GPIO.setmode(RPi.GPIO.BCM)
RPi.GPIO.setup(18, RPi.GPIO.OUT)

pwm = RPi.GPIO.PWM(18, 50)
pwm.start(0)
try:
	while True:
		for i in xrange(0, 101, 2):
			pwm.ChangeDutyCycle(i)
			time.sleep(.03)
		for i in xrange(100, -1, -2):
			pwm.ChangeDutyCycle(i)
			time.sleep(.03)
except KeyboardInterrupt:
	pass

pwm.stop()

RPi.GPIO.cleanup()VCC -> 2(物理) GND -> 6(物理) OUT -> 7(物理)
#!/usr/bin/env python
# encoding: utf-8
# @author xiaozi <245565986@qq.com>

import RPi.GPIO as GPIO
import time

# pin: 物理7 -> 4

GPIO.setmode(GPIO.BCM)
GPIO.setup(4, GPIO.IN)

while 1:
    # 0是有声音,1是没声音
    print(GPIO.input(4))
time.sleep(0.001)需要一个 http服务器提供访问,还需要一个 websocket吐服务器数据,至于怎么编译nginx这边就不讲了
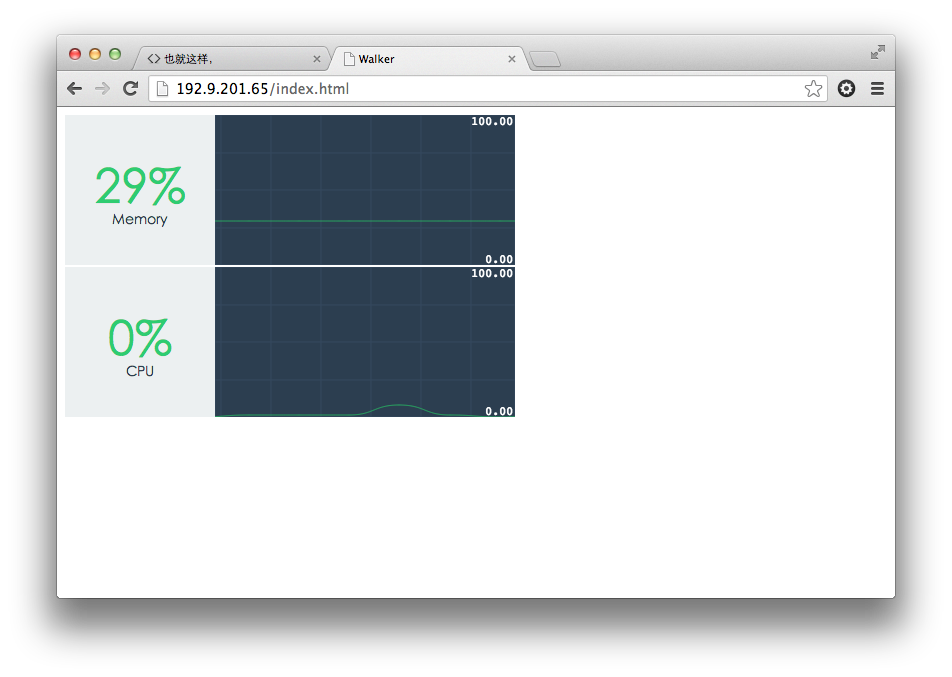
这里主要给出后端python的代码,前端主要是用backbone + smoothiecharts实现
#!/usr/bin/env python
# encoding: utf-8

import tornado.web
import tornado.websocket
import tornado.ioloop
import subprocess, threading, json, re

def vmstat():
	memoryKey = ['swpd', 'free', 'buff', 'cache', 'total']
	cpuKey = ['us', 'sy', 'id', 'wa']
	space = re.compile('\s+')
	memTotal = subprocess.check_output("cat /proc/meminfo | grep MemTotal | sed 's/\\w*:\\s*\\([0-9]*\\).*/\\1/'", shell = True).strip()
	# print(memTotal)
	# 这个地方要使用 shell = True 的话,需要记得退出的时候关闭子进程
	p = subprocess.Popen(['vmstat', '1', '-n'], stdout = subprocess.PIPE)
	io_loop = tornado.ioloop.IOLoop.instance()
	p.stdout.readline()
	p.stdout.readline()
	for line in iter(p.stdout.readline, ''):
		# print(line)
		fields = space.split(line.strip())
		memoryVal = fields[2: 6]
		memoryVal.append(memTotal)
		result = dict(memory=dict(zip(memoryKey, memoryVal)), cpu=dict(zip(cpuKey, fields[12: 16])))
		result = json.dumps(result)
		print(result)
		for waiter in MonitorHandler.waiters:
			io_loop.add_callback(waiter.write_message, result)

class MonitorHandler(tornado.websocket.WebSocketHandler):
	waiters = set()
	def open(self):
		MonitorHandler.waiters.add(self)
		print('waiters: ', len(MonitorHandler.waiters))
	def on_message(self, message):
		pass

	def on_close(self):
		MonitorHandler.waiters.remove(self)
		print('waiters: ', len(MonitorHandler.waiters))

class Application(tornado.web.Application):
	def __init__(self):
		handlers = [
			('/', MonitorHandler)
		]
		super(Application, self).__init__(handlers)

def main():
	app = Application()
	app.listen(8888)
	t = threading.Thread(target=vmstat)
	t.daemon = True
	t.start()
	print('Starting the server...')
	tornado.ioloop.IOLoop.instance().start()


if __name__ == '__main__':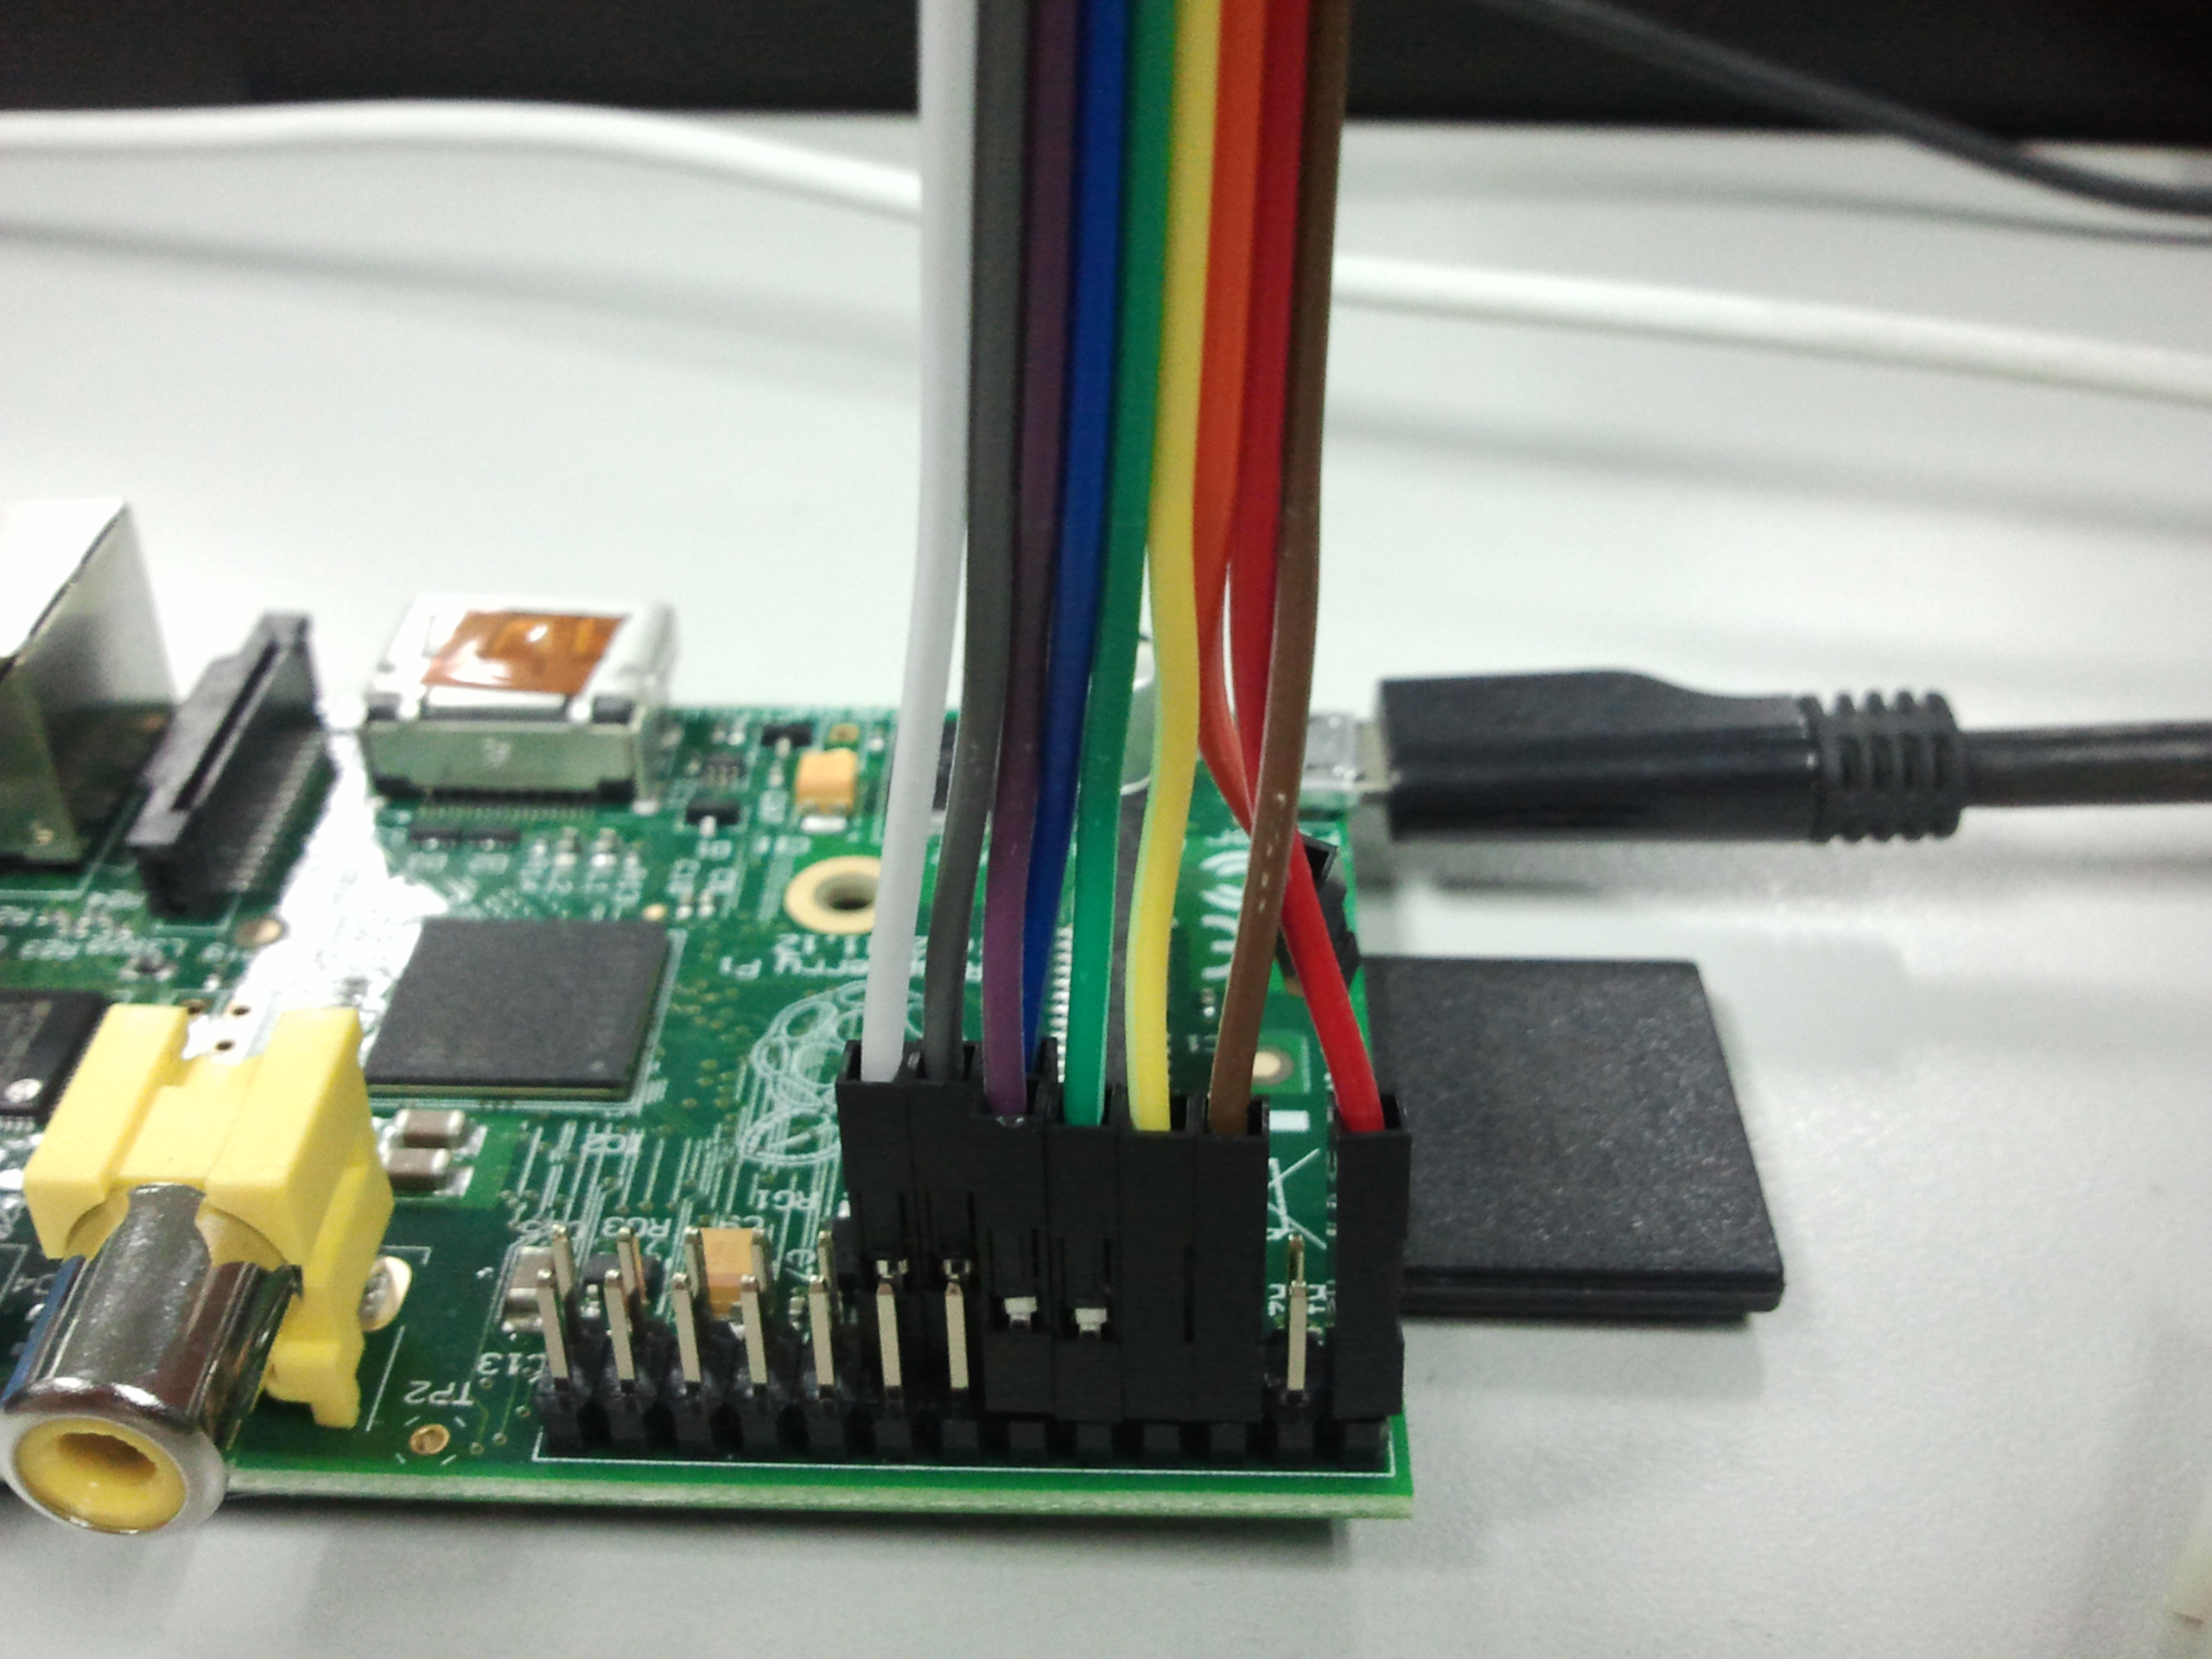
main()网上找的,就属这张图清晰了。
由于我使用的是pidora, 所以很多库默认都没装(貌似是没wheezy方便,不过习惯了centos)
yum -y install alsa-utils alsa-lib-devel至于TTS嘛,木有,就自己从网上下载了几段,然后拼起来播放。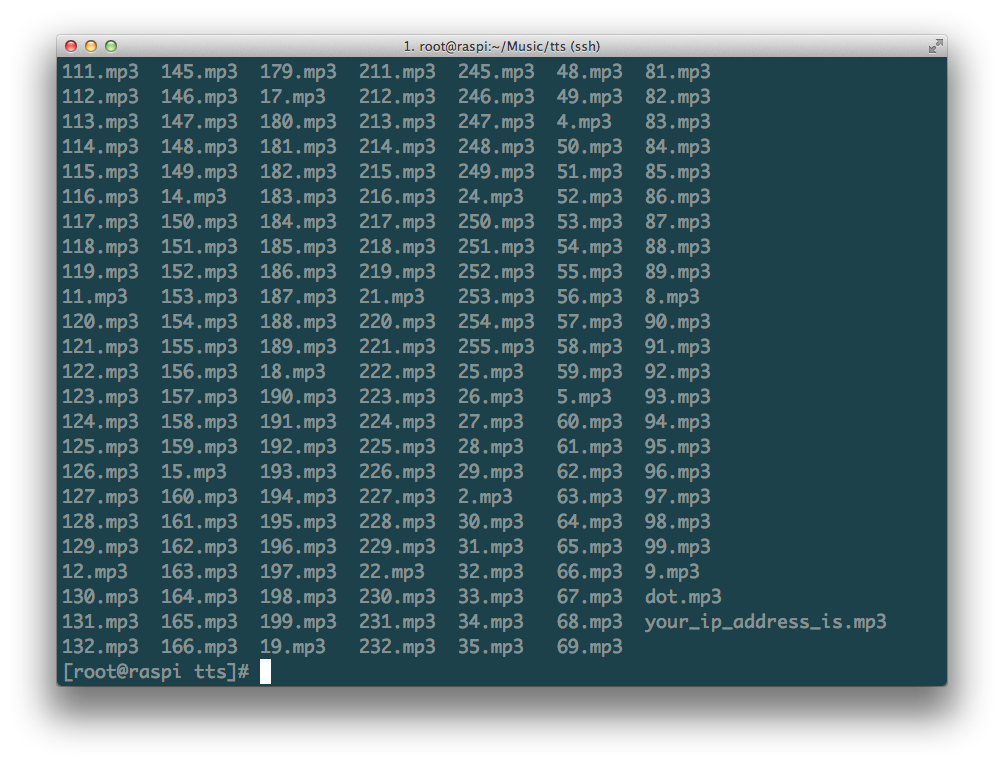
for i in {0..255}; do wget -O $i.mp3 http://tts-api.com/tts.mp3?q=$i; done#!/usr/bin/env python
# encoding: utf-8
import Adafruit_CharLCD
import subprocess, time, datetime, math, signal, sys, os
def get_ip(device):
ip = subprocess.check_output("ip -4 addr show " + device + " | grep inet | awk '{print $2}' | cut -d/ -f1", shell = True).strip()
return ip
def main():
last_ip = ip = ''
maxLen = 16
while True:
ip = get_ip('eth0')
if ip == last_ip:
time.sleep(10)
continue
last_ip = ip
sounds = ' /root/Music/tts/dot.mp3 '.join(['/root/Music/tts/' + i + '.mp3' for i in last_ip.split('.')]).split(' ')
spaceLen = maxLen - len(ip)
ip = int(math.floor(spaceLen / 2)) * ' ' + ip
lcd.clear()
lcd.message(' Raspberry Pi \n')
lcd.message(ip)
subprocess.call(['madplay', '/root/Music/tts/your_ip_address_is.mp3'] + sounds)
time.sleep(10)
# + chr(0xdf) + 'C'
# while True:
# time.sleep(1)
# lcd.clear()
# lcd.message(datetime.datetime.now().strftime(' %I : %M : %S \n%a %b %d %Y'))
def onShutdown(sig, id):
lcd.clear()
time.sleep(.1)
sys.exit(0)
if __name__ == '__main__':
pid = os.fork()
if pid == 0:
signal.signal(signal.SIGTERM, onShutdown)
lcd = Adafruit_CharLCD.Adafruit_CharLCD()
main()
else:
sys.exit(0)我在centos上安装的phantomjs,然后截图的时候,中文不显示,于是安装中文字体,最后貌似没有任何反映;于是又搜到网上说要安装所有的字体`yum -y install *-fonts-*`,安装完之后貌似是好了,但是中文的大小不一很难看,于是我又删掉了这些字体;最后发现只要安装了Arial字体就正常了。
# 拷贝字体到 /usr/share/fonts 或者 在下面建立一个目录(便于管理)
mkfontscale
mkfontdir
fc-cache -fv
至此,中文的问题就没了。但貌似效果还是没有mac或者pc上面的好。
修改/etc/postfix/master.cf
myhook unix - n n - - pipe
  flags=F user=nobody argv=/usr/bin/python /path/to/script.py ${sender} ${size} ${recipient}
# 第二行前面一定要有空格修改/etc/postfix/transport
example.com myhook:
# 最后是冒号执行命令postmap /etc/postfix/transport
修改/etc/postfix/main.cf
transport_maps = hash:/etc/postfix/transport这里我用的是python
#!/usr/bin/env python

import sys, smtplib, re

content = sys.stdin.read()
# 如果postfix设置了virtual,${sender}将不是我们所需要的,所以这里从mail的内容中获取
froms = re.findall('^From:\s+(.*?)\n', content, re.I | re.M)
tos = re.findall('^To:\s+(.*?)\n', content, re.I | re.M)
subjects = re.findall('^Subject:\s+(.*?)\n', content, re.I | re.M)

msg = 'From: %s\r\nTo: %s\r\nReply-To:%s\r\n\r\n' % (tos[0], froms[0], froms[0])

msg += 'this is a test reply.'

mail = smtplib.SMTP('localhost')
mail.sendmail(tos[0], froms[0], msg)
mail.quit()
设置svn目录
/project
├── trunk
├── tags
├── branches
[groups]
g_super = aaa
g_manager = bbb
g_developer = ccc,ddd
g_packer = eee


[project:/]
@g_super = r
@g_manager = rw
* =

[project:/trunk]
@g_super = r
@g_manager = rw
@g_developer = rw
* =

[project:/branches]
@g_super = r
@g_manager = rw
@g_developer = rw
* =

[project:/tags]
@g_super = r
@g_manager = rw
@g_developer = r
@g_packer = r
* =expect可以自动化执行需要交互的命令。
yum -y install expect创建一个文件test.exp
#!/usr/bin/env expect
spawn php go-pear.phar
expect ":"
send "\n"
interact
expect test.exppip install pexpect#!/usr/bin/env python
# encoding: utf-8
import pexpect
cmd = 'php go-pear.phar'
child = pexpect.spawn(cmd, timeout=None)
child.expect(':')
child.sendline('')
# child.interact()
child.close()Openfire是IM的服务器端,下载地址:http://www.igniterealtime.org/downloads/index.jsp,选择linux rpm包下载
rpm -ivh openfire-3.7.1-1.i386.rpm首先在mysql里面建立一个数据库openfire,访问9090端口,进入网页进行初始化配置,增加一个用户,下面的err配置的时候会用到
err是一个IM机器人,项目地址:https://github.com/gbin/err,最简单的安装方法easy_install
easy_install err建立几个需要用到的文件夹
mkdir -p /var/www/err
mkdir -p /var/log/err
mkdir -p /var/lib/err

chmod -R 777 /var/www/err
chmod -R 777 /var/log/err
chmod -R 777 /var/lib/err

cp /usr/lib/python2.6/site-packages/err-1.6.7-py2.6.egg/errbot/config-template.py /var/www/err/config.py

cd /var/www/err/

# 按照自己的要求修改吧,把上面配置的用户加到这个里面
vi config.py
err.py命令启动的时候,可能还会报其他的模块不存在,直接easy_install好了
关于机器人插件的开发,可以参考项目主页上的wiki
# 查看内核是否支持inotify机制
grep INOTIFY_USER /boot/config-$(uname -r)# https://github.com/rvoicilas/inotify-tools/
wget ...
tar zxf ...
# 若是没有configure文件,先运行
# ./autogen.sh
./configure --prefix=/usr/local/inotify
make && make install
inotifywait -rme modify,attrib,move,close_write,create,delete,delete_self /etc/asterisk大概三个月前,在公司做了个系统管理的程序(时间设置,网卡设置,系统时间设置,等等),现在记录下这些文件的路径,备忘。
# 网络默认参数
/etc/sysconfig/network

# dns
/etc/resolv.conf

# 单个网卡
/etc/sysconfig/network-scripts/ifcfg-eth*

# 登录系统时的提示信息
/etc/issue

# 登陆后的提示信息
/etc/motd

# 系统版本
/etc/redhat-release

# 时区
/etc/localtime
/usr/share/zoneinfo/*

/etc/sysconfig/clock
# 安装
easy_install supervisor
# 生成默认配置文件
echo_supervisord_conf > /etc/supervisord.conf
mkdir /etc/supervisord.conf.d
include区段修改为
[include]
files = /etc/supervisord.conf.d/*.conf
如需要访问web控制界面,inet_http_server区段修改为
[inet_http_server]
port=0.0.0.0:9001
username=username ; 你的用户名
password=password ; 你的密码
每个需要管理的进程分别写在一个文件里面,放在/etc/supervisord.conf.d/目录下,便于管理。例如:test.conf
[program:sqlparse]
directory = /var/www/python
command = /bin/env python test.py
将supervisord加入系统服务,以下代码来自gist,文件:/etc/init.d/supervisord
#!/bin/sh
#
# /etc/rc.d/init.d/supervisord
#
# Supervisor is a client/server system that
# allows its users to monitor and control a
# number of processes on UNIX-like operating
# systems.
#
# chkconfig: - 64 36
# description: Supervisor Server
# processname: supervisord

# Source init functions
. /etc/init.d/functions

RETVAL=0
prog="supervisord"
pidfile="/tmp/supervisord.pid"
lockfile="/var/lock/subsys/supervisord"

start()
{
        echo -n $"Starting $prog: "
        daemon --pidfile $pidfile supervisord -c /etc/supervisord.conf
        RETVAL=$?
        echo
        [ $RETVAL -eq 0 ] && touch ${lockfile}
}

stop()
{
        echo -n $"Shutting down $prog: "
        killproc -p ${pidfile} /usr/bin/supervisord
        RETVAL=$?
        echo
        if [ $RETVAL -eq 0 ] ; then
                rm -f ${lockfile} ${pidfile}
        fi
}

case "$1" in

  start)
    start
  ;;

  stop)
    stop
  ;;

  status)
        status $prog
  ;;

  restart)
    stop
    start
  ;;

  *)
    echo "Usage: $0 {start|stop|restart|status}"
  ;;

esac
chmod +x /etc/init.d/supervisord
chkconfig supervisord on
service supervisord start