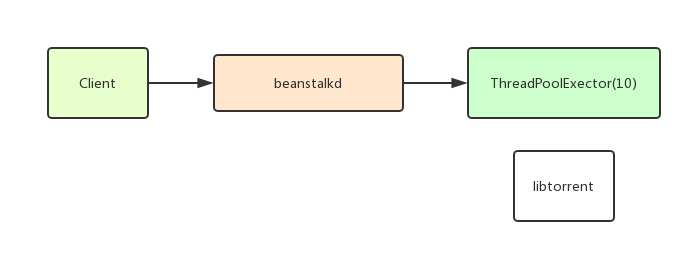
整体流程

requirement
# 安装virtualenv
pip install virtualenv
# 创建虚拟环境
virtualenv env
# source
. ./env/bin/activate

安装依赖包
pip install beanstalkc
Client
实现往beanstalkd里面塞hash
import beanstalkc
import sys

if __name__ == '__main__':
    if len(sys.argv) < 2:
        print("usage: %s <hash>" % sys.argv[0])
        sys.exit(1)
    if len(sys.argv[1]) != 40:
        print("hash code is error.")
        sys.exit(1)
    beanstalk = beanstalkc.Connection(host = "localhost", port = 11300)
    beanstalk.put(sys.argv[1])
    print("hash has put")
server
依赖libtorrent下载torrent
wget https://github.com/arvidn/libtorrent/releases/download/libtorrent-1_0_10/libtorrent-rasterbar-1.0.10.tar.gz
tar zxf libtorrent-rasterbar-1.0.10.tar.gz
cd libtorrent-rasterbar-1.0.10
./configure --enable-python-binding PYTHON=`which python` --prefix=$VIRTUAL_ENV LIBS='-liconv'
make -j2 && make install
依赖beanstalkd队列
mkdir /usr/local/beanstalkd/bin
wget https://github.com/kr/beanstalkd/archive/v1.10.tar.gz
tar zxf v1.10.tar.gz
cd beanstalkd-1.10/
make
mv beanstalkd /usr/local/beanstalkd/bin

mkdir /data/beanstalkd/
# /usr/local/beanstalkd/bin/beanstalkd -b /data/beanstalkd/
使用supervisor管理beanstalkd
[program:beanstalkd]
directory = /data/beanstalkd/
command = /usr/local/beanstalkd/bin/beanstalkd -b /data/beanstalkd/
Python2.7 支持 ThreadPoolExecutor 的话还需要 futures 包
pip install futures
上Server端代码
import time
import tempfile
import libtorrent
import os
import os.path as path
import shutil
from concurrent import futures
import beanstalkc

def hash2torrent(torrent_hash, timeout = None):
    torrent_hash = torrent_hash.lower()
    print("start download: %s" % (torrent_hash))
    magnet = "magnet:?xt=urn:btih:" + torrent_hash

    directory = path.join("torrents", torrent_hash[0:2], torrent_hash[-2:])
    output = path.join(directory, torrent_hash + ".torrent")

    if not path.exists(directory):
        os.makedirs(directory)

    if path.exists(output):
        print('Already exists.')
        return output

    tempdir = tempfile.mkdtemp()
    session = libtorrent.session()

    session.add_dht_router('router.bittorrent.com', 6881)
    session.add_dht_router('router.utorrent.com', 6881)
    session.add_dht_router('router.bitcomet.com', 6881)
    session.add_dht_router('dht.transmissionbt.com', 6881)
    session.add_dht_router("dht.aelitis.com", 6881)
    session.start_dht()

    params = {
        'save_path': tempdir,
        # 'storage_mode': libtorrent.storage_mode_t(2),
        # 'paused': False,
        # 'auto_managed': True,
        'duplicated_is_error': True
    }

    handle = libtorrent.add_magnet_uri(session, magnet, params)

    cost = 0
    while not handle.has_metadata():
        if timeout is not None and cost > timeout:
            print("Timeout.")
            # session.pause()
            session.remove_torrent(handle)
            shutil.rmtree(tempdir)
            return None
        time.sleep(1)
        cost = cost + 1
    # session.pause()
    print("Downloaded. %d" % (cost))

    # print 'got metadata, starting torrent download...'
    # while handle.status().state != libtorrent.torrent_status.seeding:
    #     s = handle.status()
    #     state_str = ['queued', 'checking', 'downloading metadata', 'downloading', 'finished', 'seeding', 'allocating']
    #     print '%.2f%% complete (down: %.1f kb/s up: %.1f kB/s peers: %d) %s %.3f' % (s.progress * 100, s.download_rate / 1000, s.upload_rate / 1000, s.num_peers, state_str[s.state], s.total_download/1000000)
    #     time.sleep(3)

    torrent_info = handle.get_torrent_info()
    torrent_file = libtorrent.create_torrent(torrent_info)

    torrent_content = libtorrent.bencode(torrent_file.generate())

    with open(output, "wb") as f:
        f.write(torrent_content)
        f.close()

    session.remove_torrent(handle)
    shutil.rmtree(tempdir)
    return output

if __name__ == '__main__':
    beanstalk = beanstalkc.Connection(host='localhost', port=11300)
    timeout = None
    with futures.ProcessPoolExecutor(10) as executor:
        while True:
            job = beanstalk.reserve()
            torrent_hash = job.body
            job.delete()
            executor.submit(hash2torrent, torrent_hash, timeout)
实测,平均每个种子的下载时间需要 15 分钟左右。


