小子 发布的文章

发布jar包之后的依赖解决

使用脚本获取所有依赖jar包 -cp

java --cp $(JARS=("$LIB"/*.jar); IFS=:; echo "${JARS[*]}") -jar you-project-jar.jar

直接将依赖jar包打包在要发布的jar中

pom.xml

<project xmlns="http://maven.apache.org/POM/4.0.0" xmlns:xsi="http://www.w3.org/2001/XMLSchema-instance"
         xsi:schemaLocation="http://maven.apache.org/POM/4.0.0 http://maven.apache.org/xsd/maven-4.0.0.xsd">
    <modelVersion>4.0.0</modelVersion>

    <groupId>com.tool.js</groupId>
    <artifactId>js-tool</artifactId>
    <version>1.0</version>
    <packaging>jar</packaging>

    <name>js-tool</name>
    <url>http://tool.lu</url>

    <properties>
        <project.build.sourceEncoding>UTF-8</project.build.sourceEncoding>
    </properties>

    <dependencies>
        <dependency>
            <groupId>org.apache.thrift</groupId>
            <artifactId>libthrift</artifactId>
            <version>0.9.1</version>
        </dependency>
        <dependency>
            <groupId>com.google.javascript</groupId>
            <artifactId>closure-compiler</artifactId>
            <version>v20140407</version>
        </dependency>
        <dependency>
            <groupId>org.slf4j</groupId>
            <artifactId>slf4j-log4j12</artifactId>
            <version>1.7.7</version>
        </dependency>
        <dependency>
            <groupId>log4j</groupId>
            <artifactId>log4j</artifactId>
            <version>1.2.17</version>
        </dependency>
        <dependency>
            <groupId>junit</groupId>
            <artifactId>junit</artifactId>
            <version>4.11</version>
            <scope>test</scope>
        </dependency>
    </dependencies>
    <build>
        <plugins>
            <plugin>
                <artifactId>maven-assembly-plugin</artifactId>
                <configuration>
                    <archive>
                        <manifest>
                            <mainClass>com.tool.js.App</mainClass>
                        </manifest>
                    </archive>
                    <descriptorRefs>
                        <descriptorRef>jar-with-dependencies</descriptorRef>
                    </descriptorRefs>
                </configuration>
                <executions>
                    <execution>
                        <id>make-assembly</id>
                        <phase>package</phase>
                        <goals>
                            <goal>single</goal>
                        </goals>
                    </execution>
                </executions>
            </plugin>
        </plugins>
    </build>
</project>
Nginx的常用配置

www跳转到主域名

server {
    listen 80;
    server_name www.tool.lu;

    access_log off;
    error_log off;

    return 301 http://tool.lu$request_uri;
}

http跳转到https

server {
    listen      80;
    server_name tool.lu;
    return 301 https://tool.lu$request_uri;
}

fastcgi

    location ~ \.php$ {
        try_files $uri =404;
        fastcgi_pass 127.0.0.1:9000;
        fastcgi_index index.php;
        fastcgi_param SCRIPT_FILENAME $document_root$fastcgi_script_name;
        include fastcgi_params;
    }

cdn

server {
    listen 80;
    server_name s1.tool.lu s2.tool.lu s3.tool.lu s4.tool.lu;

    root /data/html/tool.lu/static;
    index index.html;

    access_log off;
    error_log off;

    location / {
        concat on;
        concat_types text/css application/javascript;
        # 解决js语句不以分号结尾的第三方库
        concat_delimiter "\n\n";
        concat_max_files 20;

        expires 7d;
    }
}

参考

  1. Pitfalls - Nginx Community

python 魔术函数调用的实现

场景

实现一个python调用java接口的功能,java接口是以http方式提供的。为了实现比较舒服的调用的方式,我不准备以send({"method": "echo"})这种方式调用,而是api.echo()

但是python里面并没有提供类似php的__call__callStatic的函数

根据python的__getattr__来实现一个,但是这个解决方案不完美,有局限性。

实现

# encoding: utf-8

import json
import urllib, urllib2

class OPS(object):
    s = None

    def __init__(self, s):
        self.s = s

    def sendRequest(self, msg):
        postData = json.dumps(msg)
        print(postData)
        req = urllib2.Request(self.s, postData)
        try:
            resp = urllib2.urlopen(req)
        except Exception as e:
            return False
        cnt = resp.read()
        try:
            cnt = json.loads(cnt)
        except Exception as e:
            pass
        return cnt

    def __getattr__(self, name):
        def func(*args, **kwargs):
            # args 不处理 (由于是序列化成json传输的,python的dict是无序的,抛弃对list的处理)
            data = {
                'method': name,
                'parameter': kwargs
            }
            return self.sendRequest(data)
        return func

if __name__ == '__main__':
    ops = OPS('你的http接口调用地址')
    print(ops.hello(word="你好"))

关于MySQL的几个函数

find_in_set

+----+-----------+
| id | extra_ids |
+----+-----------+
| 1  | 1,2,3     |
| 2  | 4,5,6,1,3 |
| 3  | 7,3,1,2,5 |
+----+-----------+
-- 看到有人是用like做的,虽然这两种都会全表扫描,这样用会比like好。
select * from test where find_in_set(5, extra_ids);

group_concat

+----+----------+
| id | group_id |
+----+----------+
| 1  | 1        |
| 2  | 1        |
| 3  | 2        |
+----+----------+
-- group_concat(id)
select group_concat(id order by id desc separator '|') as ids from test group by group_id;
+-----+----------+
| ids | group_id |
+-----+----------+
| 2|1 | 1        |
| 3   | 2        |
+-----+----------+

tool.lu技术架构

背景

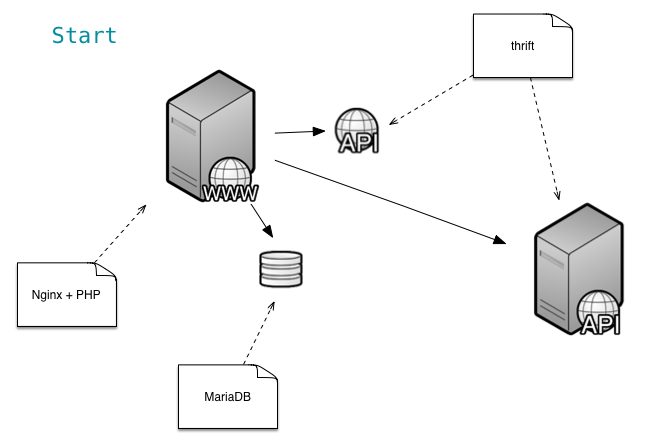
一个字,穷!在小流量的情况下,这个应该算是比较经济的解决方案了吧(各种容灾都没有,监控没有,服务的吞吐测试没有)。哈哈哈...

后端的业务处理和服务

整个的网站都放在aliyun的VPS上。

由于工具网站的后端处理比较耗资源,于是将业务处理服务部署到了两台VPS上。(aliyun +1 & 美国 +1)

Redis只是做了少量的缓存作用,所以图中并未给出。

Untitled.png

面对前端的一些优化

cdn 现在全部都放在aliyun的VPS上。

  1. 使用nginx的 nginx-http-concat 扩展合并多个文件请求。
  2. http_image_filter_module 进行一些图片的实时压缩计算

域名分别为 s1.tool.lu, s2.tool.lu, s3.tool.lu

爬虫

现在所有的爬虫均基于Scrapy编写,全部部署在 美国的vps上;数据储存在MariaDB。

虚拟化

主要用于一些不可信任代码的执行。

选型Docker,可限制CPU和Mem,不能限制Disk,但是Docker在CentOS6.x下的问题较多,各种坑;最近使用CentOS7搭建之后貌似很Happy。

jQuery data函数的坑

这个函数

<div id="test" data-id="1e3"></div>
<script>
console.log($('#test').data('id'));
// 1e3  jQuery 1.9.1
// 1000  jQuery 1.7.2
</script>

Every attempt is made to convert the string to a JavaScript value (this includes booleans, numbers, objects, arrays, and null). A value is only converted to a number if doing so doesn't change the value's representation. For example, "1E02" and "100.000" are equivalent as numbers (numeric value 100) but converting them would alter their representation so they are left as strings. The string value "100" is converted to the number 100.

When the data attribute is an object (starts with '{') or array (starts with '[') then jQuery.parseJSON is used to parse the string; it must follow valid JSON syntax including quoted property names. If the value isn't parseable as a JavaScript value, it is left as a string.

To retrieve the value's attribute as a string without any attempt to convert it, use the attr() method.

2014-07-16 23:02 更新

这个还是要看具体的jQuery版本而定的

jQuery.fn.jquery

我这测试,1.7.2 的是会自动转换的,1.9.1 是不会自动转换

而官方的文档的更新函数中,貌似并没有提及这一点

CodeMirror绑定快捷键

自定一个命令

CodeMirror.commands.runcode = function (cm) {
    // you can do something here.
};

绑定快捷键

// 判断是否为Mac
var mac = CodeMirror.keyMap.default == CodeMirror.keyMap.macDefault;
var runKey = (mac ? "Cmd" : "Ctrl") + "-Enter";
var extraKeys = {};
extraKeys[runKey] = "runcode";

初始化CodeMirror

CodeMirror.fromTextArea(code, {
    extraKeys: extraKeys
});

supervisor的管理下运行nodejs

背景

supervisor的管理下运行ruby,也是服务的迁移。

而supervisor管理的时候是不会加载/etc/profile的,所以要手动指定环境变量。

解决

设置环境变量

cat /etc/supervisord/htaccess.conf

[program:htaccess]
directory = /data/thrift/Rewrite2Nginx/Server
command = /usr/local/node/bin/node Server.js
environment = NODE_PATH=/usr/local/node/lib/node_modules

supervisor的管理下运行ruby

背景

上周六,准备从杭州去苏州的时候,坐在咖啡馆开始了 tool.lu 的迁移(美国VPS -> 阿里云)。

就在对 ruby工具 后台服务迁移的时候,supervisor管理的ruby服务就是起不来。

解决

一般情况下,我们会这样:

which ruby
# /usr/local/rvm/rubies/ruby-1.9.3-p545/bin/ruby

事实上,上面的路径在美国的VPS上是好的,但是迁到阿里云上的时候就出了问题,最后将ruby的路径改为了wrappers下面的,问题便圆满解决了!
cat /etc/supervisord/ruby.conf

[program:ruby]
directory = /data/thrift/RubyBeauty/Server
command = /usr/local/rvm/wrappers/ruby-1.9.3-p545/ruby /data/thrift/RubyBeauty/Server/Server.rb

php中nbsp的trim

non-breaking space

此处所指的nbsp是实体,而不是nbsp四个字符

$str = "&nbsp;abc"; 
$converted = strtr($str, array_flip(get_html_translation_table(HTML_ENTITIES, ENT_QUOTES)));
var_dump($converted); // 这儿才是要处理的字符串,上面的都是准备工作

在处理此问题的时候,经历了一番波折,先是var_dump出来,但是和正常的字符串无异。
后来又使用escape尝试输出,发现是\xa0,于是就想trim($converted, "\xa0"),无果。

最后在php手册的trim函数下的第一个评论发现了解决方案。

var_dump(trim($converted, chr(0xc2) . chr(0xa0)));

分析某手机号码归属地储存结构

逛v2ex的时候看到个手机号码归属地的开源项目,于是便分析了一下他的数据文件结构,与纯真IP数据库的结构无异。

lovedboy/phone

phone.dat

+------------------------------------+
| version(4 char) | start index(int) |
+------------------------------------+
                            |
                            v
                  +------------------------------------------------+
                  | phone(int) | record offset(int) | corp(1 char) |
                  +------------------------------------------------+
                                          |
                                          v
                  +------------------------------------------------+
                  | record detail                                  |
                  +------------------------------------------------+

与垃圾评论的斗争

我确定我不会和某大厂的员工一样把重要信息写在里面,所以相关参数需要替换一下

# 取出垃圾评论的IP,并从数据库删除
mysql -u[mysql用户名] -p[mysql密码] --database=[typecho数据库] -e "SELECT DISTINCT ip FROM tp_comments WHERE status='spam'" --batch --skip-column-names >> banned_tmp.txt
mysql -u[mysql用户名] -p[mysql密码] --database=[typecho数据库] -e "DELETE FROM tp_comments WHERE status='spam'"
# 阻止ip
cat banned_tmp.txt | while IDF= read -r ip; do /sbin/iptables -I INPUT -s "$ip" -j DROP; done
# 保存路由
service iptables save
# 输出所有blocked ip
sed -n "/-j DROP/p" /etc/sysconfig/iptables | cut -d' ' -f4 | cut -d'/' -f1 > banned.txt