fastjson处理Map的 key 为 int 的bug
JSON 中的 MAP 是不支持 int 为 key 的;
Map<Integer, String> map = new HashMap<>();
map.put(1, "one");
map.put(2, "two");
System.out.println(JSON.toJSONString(map));
// {1:"one",2:"two"}
标准的json规范中,要求对象的key必须为string
JSON 中的 MAP 是不支持 int 为 key 的;
Map<Integer, String> map = new HashMap<>();
map.put(1, "one");
map.put(2, "two");
System.out.println(JSON.toJSONString(map));
// {1:"one",2:"two"}标准的json规范中,要求对象的key必须为string
import com.yahoo.platform.yui.compressor.CssCompressor;
import org.apache.commons.io.IOUtils;
import java.io.*;

public class YUIProcessor {
    public String compressCss(String code) {
        Reader in = new InputStreamReader(IOUtils.toInputStream(code));
        try (Writer out = new StringWriter()) {
            CssCompressor compressor = new CssCompressor(in);
            compressor.compress(out, -1);
            out.flush();
            return out.toString();
        } catch (IOException e) {
            e.printStackTrace();
        }
        return "";
    }
}
追加:
yui compresser 很久没有更新,有很多的不足,已经废弃使用。
图中的黑色位都可以不关注,然后基本原理就是这样的 (以8位作为例子)
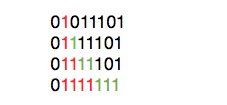
0x55555555
    01010101010101010101010101010101
0x33333333
    00110011001100110011001100110011
0xf0f0f0f
    00001111000011110000111100001111
0x3f
    00000000000000000000000000111111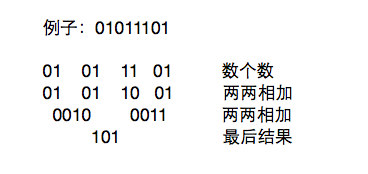
先来个 Apache Commons 里面没有的
/*
[
    {id: 1, name: "name1", gender: 1},
    {id: 2, name: "name2", gender: 1},
    {id: 3, name: "name1", gender: 2},
]
*/

/*
[1, 2]
*/
CollectionUtils.pluck(persons, "id", new ArrayList<Integer>())

/*
{
    1: [
        {id: 1, name: "name1", gender: 1},
        {id: 2, name: "name2", gender: 1},
    ],
    2: [
        {id: 3, name: "name1", gender: 2},
    ]
}
*/
CollectionUtils.groupBy(persons, "gender", Integer.class)

/*
去重
*/
CollectionUtils.unique(integers, new ArrayList<Integer>())
Apache Commons 里面的
StringUtils.isEmpty(); // null 和 空字符串
StringUtils.isBlank(); // null 和 空字符串 和 全空白字符串
StringUtils.trim(); // 截取掉字符串两侧的空格
StringUtils.strip(); // 截取掉字符串两侧的空白字符串
StringUtils.equalsIgnoreCase(); // 忽略大小写的比较
StringUtils.indexOf(); // 字符/字符串在指定字符串中第一次出现的位置
StringUtils.indexOfIgnoreCase();
StringUtils.lastIndexOf();
StringUtils.contains(); // 是否包含子符串
StringUtils.left();
StringUtils.right();
StringUtils.mid(); // 截取字符串
StringUtils.split(); // 分割字符串
StringUtils.join(); // join数组为字符串
StringUtils.repeat(); // 重复输出字符串
StringUtils.leftPad();
StringUtils.rightPad(); // 填充字符串
StringUtils.lowerCase();
StringUtils.upperCase();
StringUtils.capitalize(); // 大写首字母
StringUtils.reverse(); // 倒转字符串
额,大多数提供的都跟PHP里面一样
CollectionUtils.union(); // 并集
CollectionUtils.intersection(); // 交集
CollectionUtils.containsAny(); // 是否存在交集
CollectionUtils.disjunction(); // 交集的补集
CollectionUtils.subtract(); // 差集
CollectionUtils.filter(); // 过滤
空List的返回
// new ArrayList<>();
Collections.emptyList();检测端口可用,(绑定,并关掉),来自 Canal
public static boolean isAvailablePort(int port) {
    ServerSocket ss = null;
    try {
        ss = new ServerSocket(port);
        ss.bind(null);
        return true;
    } catch (IOException e) {
        return false;
    } finally {
        if (ss != null) {
            try {
                ss.close();
            } catch (IOException e) {
            }
        }
    }
}
利用字符串标记,优雅解决内外配置文件的加载
// ...
private static final String CLASSPATH_URL_PREFIX = "classpath:";
// ...
    String conf = System.getProperty("canal.conf", "classpath:canal.properties");
    Properties properties = new Properties();
    if (conf.startsWith(CLASSPATH_URL_PREFIX)) {
        conf = StringUtils.substringAfter(conf, CLASSPATH_URL_PREFIX);
        properties.load(CanalLauncher.class.getClassLoader().getResourceAsStream(conf));
    } else {
        properties.load(new FileInputStream(conf));
}目录结构如下
.
├── main
│   ├── java
│   │   └── lu
│   │       └── tool
│   │           └── jar
│   │               ├── InterfaceRunner.java
│   │               └── Loader.java
│   └── resources
└── test
    ├── java
    └── resources
InterfaceRunner.java 为挂载 jar 中类的实现接口
Loader.java 为jar的加载器和执行器
所有第三方包的jar路径,通过 web 界面管理,然后存储在一个文件中,这里不实现 web 的管理。
InterfaceRunner.java:
package lu.tool.jar;

/**
 * Created by xiaozi on 11/29/14.
 */
public interface InterfaceRunner {

    public void fire();

}
Loader.java
package lu.tool.jar;

import java.io.*;
import java.net.URL;
import java.net.URLClassLoader;

/**
 * Created by xiaozi on 11/29/14.
 */
public class Loader {

    public static void main(String[] args) {
        String configFile = System.getProperty("jar.conf");
        if (configFile == null || configFile.isEmpty()) {
            System.exit(1);
        }
        System.out.println(configFile);
        File file = new File(configFile);
        try {
            BufferedReader in = new BufferedReader(new FileReader(file));
            String s;
            while ((s = in.readLine()) != null) {
                if (s.isEmpty()) continue;
                System.out.println(s);
                URL url = new URL(s);
                URLClassLoader myClassLoader = new URLClassLoader(new URL[] {url}, Thread.currentThread().getContextClassLoader());
                Class<?> myClass = myClassLoader.loadClass("lu.tool.jar.Runner");
                InterfaceRunner action = (InterfaceRunner) myClass.newInstance();
                // 达到指定条件的时候触发,这里仅是个演示
                // 在没有优先级的执行条件下应该使用子进程的方式,防止其中的一个crash掉
                action.fire();
                myClassLoader.close();
                System.out.println("done");
            }
        } catch (FileNotFoundException e) {
            e.printStackTrace();
        } catch (IOException e) {
            e.printStackTrace();
        } catch (ClassNotFoundException e) {
            e.printStackTrace();
        } catch (InstantiationException e) {
            e.printStackTrace();
        } catch (IllegalAccessException e) {
            e.printStackTrace();
        }
    }

}
jar.conf 存放 jar 的本地的绝对路径
file:///Users/xiaozi/Documents/testrunner/out/artifacts/testrunner_jar/testrunner.jar被挂载jar包中的类实现
package lu.tool.jar;

/**
 * Created by xiaozi on 11/29/14.
 */
public class Runner implements InterfaceRunner {

    @Override
    public void fire() {
        System.out.println("Hello, I'm in another jar!");
    }

}由于 tool.lu 的流量还不是很大,所以我把每次的访问记录都存到了MySQL(如果流量大,这么做是作死的节奏)
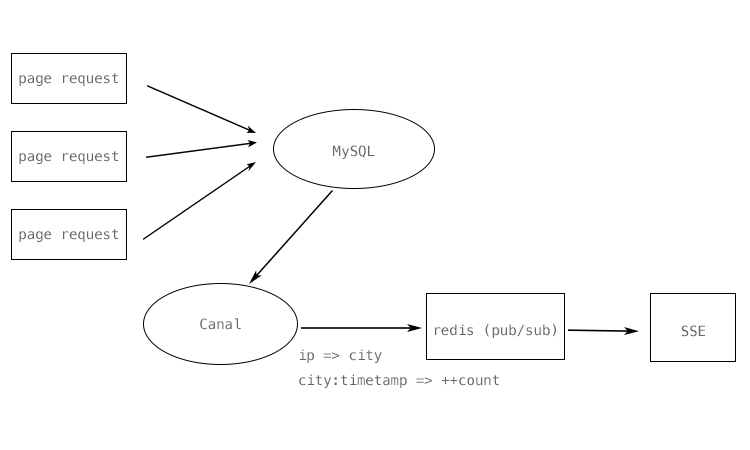
使用canal做异步处理,主要是因为
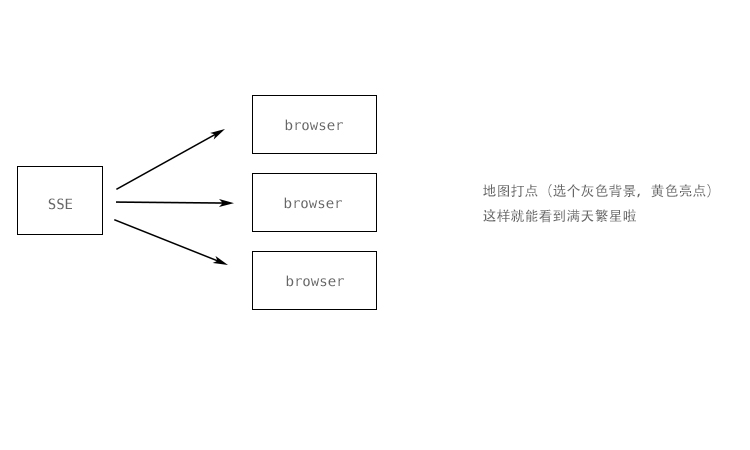
其中cannal分发的数据处理是用的java,本打算sse也用java的netty来实现了,惭愧,尝试未果后就放弃了,最后用golang实现的。
这样做不会太耗性能,而且每秒钟往客户端传输一次数据,但是由于 vps 的内存有限,java 又比较吃内存,所以上线之后就直接下线了。
newCachedThreadPool();
newFixedThreadPool();
newScheduledThreadPool();
newSingleThreadExecutor();
ScheduledThreadPool使用优先级队列进行排序(距离下次调度间隔短的任务排在前面)
DelayedWorkQueue
package lu.tool.demo;

import java.util.concurrent.*;

/**
 * Created by xiaozi on 14-8-28.
 */
public class CachedThreadPoolDemo {

    public static void main(String[] args) {
        ExecutorService es = Executors.newCachedThreadPool();
        ThreadPoolExecutor tpe = (ThreadPoolExecutor) es;

//        tpe.setMaximumPoolSize(100);

        Future<?> future = null;
//        for (int i = 1; i < 8000; i++) {
        for (int i = 1; i < 100; i++) {
            future = tpe.submit(new TaskDemo());
        }

        System.out.println("largest pool size: " + tpe.getLargestPoolSize());
        System.out.println("task count: " + tpe.getTaskCount());

        if (future != null) {
            try {
                future.get();
            } catch (InterruptedException e) {
                e.printStackTrace();
            } catch (ExecutionException e) {
                e.printStackTrace();
            }
        }

//        tpe.shutdown();
    }
}
package lu.tool.demo;
import java.util.concurrent.ExecutorService;
import java.util.concurrent.Executors;
import java.util.concurrent.ThreadPoolExecutor;
/**
* Created by xiaozi on 14-8-28.
*/
public class FixedThreadPoolDemo {
public static void main(String[] args) {
ExecutorService es = Executors.newFixedThreadPool(100);
ThreadPoolExecutor tpe = (ThreadPoolExecutor) es;
for (int i = 1; i < 8000; i++) {
tpe.submit(new TaskDemo());
}
tpe.shutdown();
}
}package lu.tool.demo;
import java.util.concurrent.*;
/**
* Created by xiaozi on 14-8-28.
*/
public class ScheduledThreadPoolDemo {
public static void main(String[] args) {
ScheduledExecutorService es = Executors.newScheduledThreadPool(100);
for (int i = 1; i < 8000; i++) {
es.schedule(new TaskDemo(), 3, TimeUnit.SECONDS);
}
// scheduleAtFixedRate
// scheduleWithFixedDelay
es.shutdown();
}
}package lu.tool.demo;
import java.util.concurrent.ExecutorService;
import java.util.concurrent.Executors;
/**
* Created by xiaozi on 14-8-28.
*/
public class SingleThreadExecutorDemo {
public static void main(String[] args) {
ExecutorService es = Executors.newSingleThreadExecutor();
for (int i = 1; i < 8000; i++) {
es.submit(new TaskDemo());
}
es.shutdown();
}
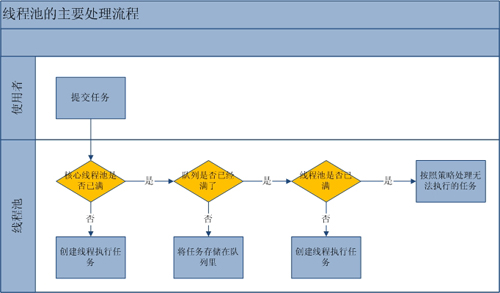
}ThreadPoolExecutor(int corePoolSize,
int maximumPoolSize,
long keepAliveTime,
TimeUnit unit,
BlockingQueue<Runnable> workQueue,
RejectedExecutionHandler handler);| 参数 | 解释 |
|---|---|
| corePoolSize | 线程池维护线程的最少数量 |
| maximumPoolSize | 线程池维护线程的最大数量 |
| keepAliveTime | 线程池维护线程所允许的空闲时间 |
| unit | 线程池维护线程所允许的空闲时间的单位 |
| workQueue | 线程池所使用的缓冲队列 |
| handler | 线程池对拒绝任务的处理策略 |
package lu.tool.demo;


import java.util.concurrent.ArrayBlockingQueue;
import java.util.concurrent.ThreadPoolExecutor;
import java.util.concurrent.TimeUnit;

/**
 * Created by xiaozi on 14-8-29.
 */
public class ThreadPoolExecutorDemo {

    public static void main(String[] args) {
        ThreadPoolExecutor tpe = new ThreadPoolExecutor(3, 5, 60,
                                                        TimeUnit.SECONDS, new ArrayBlockingQueue<Runnable>(10),
                                                        new ThreadPoolExecutor.CallerRunsPolicy());

        for (int i = 1; i < 8000; i++) {
            tpe.submit(new TaskDemo());
        }

        tpe.shutdown();
    }
}ArrayBlockingQueu // 有界
LinkedBlockingQueue // 无界
SynchronousQueue
PriorityBlockingQueuebeforeExecute(Thread t, Runnable r)
afterExecute(Runnable r, Throwable t)
executor.getTaskCount();
executor.getCompletedTaskCount();
executor.getLargestPoolSize();
executor.isShutdown();
executor.isTerminated();锁
| 线程池 | 队列 | 锁 | |
|---|---|---|---|
| ScheduledThreadPool | DelayedWorkQueue | ReentrantLock.newCondition | available |
| FixedThreadPool | LinkedBlockingQueue | ReentrantLock.newCondition | put, take |
| CachedThreadPool | SynchronousQueue | ReentrantLock | |
| SingleThread | LinkedBlockingQueue | ReentrantLock.newCondition | put, take |
java --cp $(JARS=("$LIB"/*.jar); IFS=:; echo "${JARS[*]}") -jar you-project-jar.jarpom.xml
<project xmlns="http://maven.apache.org/POM/4.0.0" xmlns:xsi="http://www.w3.org/2001/XMLSchema-instance"
         xsi:schemaLocation="http://maven.apache.org/POM/4.0.0 http://maven.apache.org/xsd/maven-4.0.0.xsd">
    <modelVersion>4.0.0</modelVersion>

    <groupId>com.tool.js</groupId>
    <artifactId>js-tool</artifactId>
    <version>1.0</version>
    <packaging>jar</packaging>

    <name>js-tool</name>
    <url>http://tool.lu</url>

    <properties>
        <project.build.sourceEncoding>UTF-8</project.build.sourceEncoding>
    </properties>

    <dependencies>
        <dependency>
            <groupId>org.apache.thrift</groupId>
            <artifactId>libthrift</artifactId>
            <version>0.9.1</version>
        </dependency>
        <dependency>
            <groupId>com.google.javascript</groupId>
            <artifactId>closure-compiler</artifactId>
            <version>v20140407</version>
        </dependency>
        <dependency>
            <groupId>org.slf4j</groupId>
            <artifactId>slf4j-log4j12</artifactId>
            <version>1.7.7</version>
        </dependency>
        <dependency>
            <groupId>log4j</groupId>
            <artifactId>log4j</artifactId>
            <version>1.2.17</version>
        </dependency>
        <dependency>
            <groupId>junit</groupId>
            <artifactId>junit</artifactId>
            <version>4.11</version>
            <scope>test</scope>
        </dependency>
    </dependencies>
    <build>
        <plugins>
            <plugin>
                <artifactId>maven-assembly-plugin</artifactId>
                <configuration>
                    <archive>
                        <manifest>
                            <mainClass>com.tool.js.App</mainClass>
                        </manifest>
                    </archive>
                    <descriptorRefs>
                        <descriptorRef>jar-with-dependencies</descriptorRef>
                    </descriptorRefs>
                </configuration>
                <executions>
                    <execution>
                        <id>make-assembly</id>
                        <phase>package</phase>
                        <goals>
                            <goal>single</goal>
                        </goals>
                    </execution>
                </executions>
            </plugin>
        </plugins>
    </build>
</project>关于jalopy的资料,我在他的官网上也没发现多少,于是自己看着他的那个主文件,写了个简单的调用出来。
import de.hunsicker.jalopy.Jalopy;

public class Call {
	public static String format(String code) {
		Jalopy codeFormatter = new Jalopy();
		String path = "input.java";
		StringBuffer output = new StringBuffer();
		codeFormatter.setInput(code, path);
		codeFormatter.setOutput(output);
		codeFormatter.format();

		return output.toString();
	}
	public static void main(String[] args) {
		System.out.println(format("public class Test {\n"
+ "			public static void main() {\n"
+ "\n"
+ "			}\n"
+ "		}"));
	}
}本来是用命令行的方式调用google closure compiler,可是效率不如人意;于是网上查找了些资料,实践了一下。
import com.google.javascript.jscomp.CompilationLevel;
import com.google.javascript.jscomp.Compiler;
import com.google.javascript.jscomp.CompilerOptions;
import com.google.javascript.jscomp.JSSourceFile;

public class CallCompile {
	public static String compile(String code) {
		Compiler compiler = new Compiler();
		CompilerOptions options = new CompilerOptions();
		CompilationLevel.ADVANCED_OPTIMIZATIONS.setOptionsForCompilationLevel(options);

		JSSourceFile external = JSSourceFile.fromCode("external.js", "");
		JSSourceFile primary = JSSourceFile.fromCode("primary.js", code);

		compiler.compile(external, primary, options);

		return compiler.toSource();
	}

	public static void main(String[] args) {
		System.out.println(compile("console.log('hello world.')"));
	}
}
编译执行命令
# Windows下
javac -cp ".;./compiler.jar" CallCompile.java
java -cp ".;./compiler.jar" CallCompile

# Linux下
javac -cp ".:./compiler.jar" CallCompile.java
java -cp ".:./compiler.jar" CallCompile最新的closure compiler有所更新,示例代码修改成如下:
import com.google.javascript.jscomp.Compiler;
import com.google.javascript.jscomp.CompilerOptions;
import com.google.javascript.jscomp.CompilationLevel;
import com.google.javascript.jscomp.SourceFile;

// import java.util.logging.Level;

public class Test {

	public static void main(String[] args) {
		// Compiler.setLoggingLevel(Level.OFF);
		Compiler compiler = new Compiler();
		CompilerOptions options = new CompilerOptions();
		CompilationLevel.ADVANCED_OPTIMIZATIONS.setOptionsForCompilationLevel(options);
		SourceFile extern = SourceFile.fromCode("extern", "");
		SourceFile primary = SourceFile.fromCode("primary", "(function(){console.log('test')})();");
		compiler.compile(extern, primary, options);
		System.out.println(compiler.toSource());
		System.exit(0);
	}
}