分类 Linux 下的文章

sqlite3导入到mysql

背景

使用magenetico抓取磁力链接,由于它使用的是sqlite3, 文件会越来越大,而且不支持分布式;所以需要将其改造成MySQL,在迁移之前需要将已经抓取的15G数据导入到MySQL

从sqlite3文件dump出sql

sqlite3 database.sqlite3
sqlite3> .output /path/to/dump.sql
sqlite3> .dump
sqlite3> .exit

切分文件

文件比较大的时候,很有导入到一半的时候失败,这个时候需要从失败的行开始切分出一个新的sql文件来

awk '{if (NR>=6240863) print $0>"dump_part.sql"}' dump.sql

mysql参数修改

[mysqld]
max_allowed_packet = 100M

sql兼容, 符号替换

# 1. 删除不包含 INSERT INTO 的行
# 2. 替换表名 wrap
# 3. 替换 hex
sed '/INSERT INTO/!d;s/"table1"/`table1`/;s/"table2"/`table2`/;s/,X/,/' dump.sql

导入到MySQL

# 加上 force 参数, 防止部分有问题的sql阻止导入
mysql -uroot -p -f magnet < dump.sql

引用

How To Use The SQLite Dump Command

页面静态化

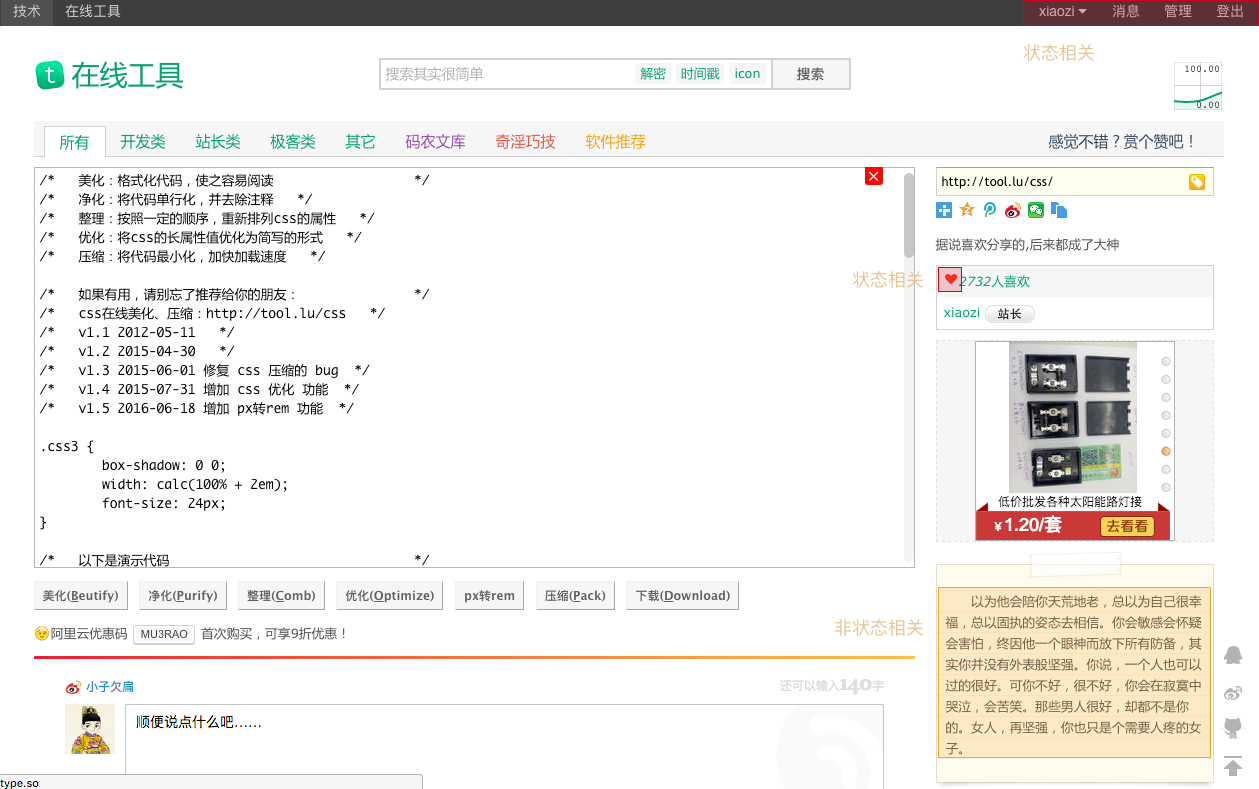
页面内容的拆分

Artboard 1.png

  1. 静态内容
  2. 非状态相关的动态内容
  3. 状态相关的动态内容

HInclude CSI

用于pc或者h5页面

<hx:include src="/_fragment?path="></hx:include>

Varnish ESI

多用于app api的接口返回

vcl 4.0;

import directors;

backend server1 {
    .host = "10.162.110.168";
    .port = "80";
}

acl local {
    "localhost";
}

sub vcl_init {
    new director = directors.round_robin();
    director.add_backend(server1);
}

sub vcl_recv {
    set req.backend_hint = director.backend();

    if (req.method == "PURGE") {
        if (client.ip ~ local) {
            return (purge);
        } else {
            return (synth(405));
        }
    }

    if (req.http.Accept == "text/event-stream") {
        return (pipe);
    }

    if (req.http.upgrade ~ "(?i)websocket") {
        return (pipe);
    }

    if (req.method != "GET" && req.method != "HEAD") {
        return (pass);
    }

    set req.http.Surrogate-Capability = "abc=ESI/1.0";
    if (req.http.X-Forward-For) {
        set req.http.X-Forward-For = req.http.X-Forward-For + "," + client.ip;
    } else {
        set req.http.X-Forward-For = client.ip;
    }
    return (hash);
}

sub vcl_backend_response {
    if (beresp.http.Surrogate-Control ~ "ESI/1.0") {
        unset beresp.http.Surrogate-Control;
        set beresp.do_esi = true;
    }

    if (bereq.uncacheable) {
        return (deliver);
    }

    set beresp.grace = 30s;

    # 302 5xx no cache
    if (beresp.status == 302 || beresp.status >= 500) {
        set beresp.uncacheable = true;
        set beresp.ttl = 120s;
        return (deliver);
    }

    if (beresp.status == 301 || (beresp.status >= 400 && beresp.status < 500)) {
        set beresp.ttl = 120s;
    } else {
        set beresp.ttl = 2400s;
    }

    unset beresp.http.Set-Cookie;
    return (deliver);
}

sub vcl_pipe {
    if (req.http.upgrade) {
        set bereq.http.upgrade = req.http.upgrade;
    }
    return (pipe);
}

sub vcl_deliver {
    set resp.http.X-Age = resp.http.Age;
    unset resp.http.Age;
    unset resp.http.Via;
    unset resp.http.X-Powered-By;
    unset resp.http.X-Varnish;

    if (obj.hits > 0) {
        set resp.http.X-Cache="HIT from " + server.hostname;
    } else {
        set resp.http.X-Cache="MISS";
    }

    return (deliver);
}

workflow

  1. varnish 接收到请求后,增加 Surrogate-Capability:abc=ESI/1.0 头,打到后端
  2. 后端判断Surrogate-Capability决定是否要使用esi标签来返回 (即判断这个请求是不是从varnish过来的)
  3. 返回内容时判断是否含有 <esi:include,增加 Surrogate-Control:content="ESI/1.0"
  4. varnish 判断 Surrogate-Control 头,决定是否要启用 esi 替换

后端应用中的处理

  1. 生成路由url /_fragment?path=

    • <hx:include src="/_fragment?path="></hx:include>
    • <esi:include src="/_fragment?path="></esi:include>
  2. 注册处理 /_fragment 路由

wrk中的lua脚本

wrk是一款现代化的http压测工具,提供lua脚本的功能可以满足每个请求或部分请求的差异化。

wrk中执行http请求的时候,调用lua分为3个阶段,setup,running,done,每个wrk线程中都有独立的脚本环境。
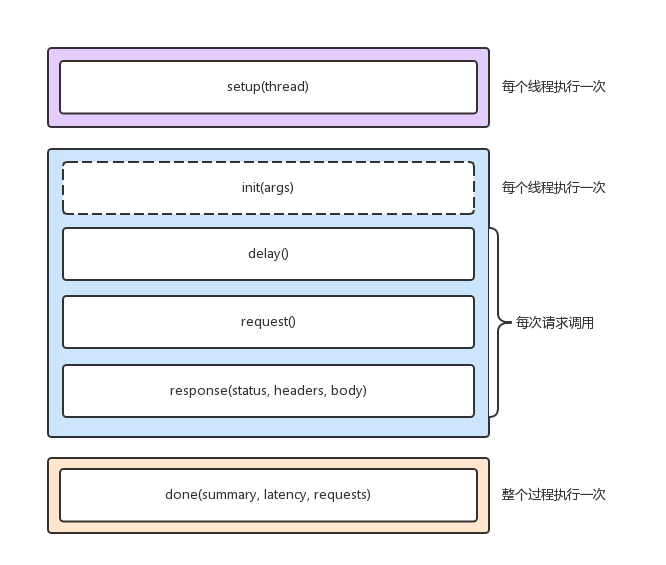
wrk.png

wrk的全局属性

wrk = {
  scheme  = "http",
  host    = "localhost",
  port    = nil,
  method  = "GET",
  path    = "/",
  headers = {},
  body    = nil,
  thread  = <userdata>,
}

wrk的全局方法

-- 生成整个request的string,例如:返回
-- GET / HTTP/1.1
-- Host: tool.lu
function wrk.format(method, path, headers, body)

-- 获取域名的IP和端口,返回table,例如:返回 `{127.0.0.1:80}`
function wrk.lookup(host, service)

-- 判断addr是否能连接,例如:`127.0.0.1:80`,返回 true 或 false
function wrk.connect(addr)

Setup阶段

setup是在线程创建之后,启动之前。

function setup(thread)

-- thread提供了1个属性,3个方法
-- thread.addr 设置请求需要打到的ip
-- thread:get(name) 获取线程全局变量
-- thread:set(name, value) 设置线程全局变量
-- thread:stop() 终止线程

Running阶段

function init(args)
-- 每个线程仅调用1次,args 用于获取命令行中传入的参数, 例如 --env=pre

function delay()
-- 每个线程调用多次,发送下一个请求之前的延迟, 单位为ms

function request()
-- 每个线程调用多次,返回http请求

function response(status, headers, body)
-- 每个线程调用多次,返回http响应

Done阶段

可以用于自定义结果报表,整个过程中只执行一次

function done(summary, latency, requests)


latency.min              -- minimum value seen
latency.max              -- maximum value seen
latency.mean             -- average value seen
latency.stdev            -- standard deviation
latency:percentile(99.0) -- 99th percentile value
latency(i)               -- raw value and count

summary = {
  duration = N,  -- run duration in microseconds
  requests = N,  -- total completed requests
  bytes    = N,  -- total bytes received
  errors   = {
    connect = N, -- total socket connection errors
    read    = N, -- total socket read errors
    write   = N, -- total socket write errors
    status  = N, -- total HTTP status codes > 399
    timeout = N  -- total request timeouts
  }
}

例子

表单的提交

wrk.method = "POST"
wrk.body = "" -- 直接写死,如果不需要请求数据的差异化
wrk.headers["Content-Type"] = "application/x-www-form-urlencoded"

-- 如果要实现每次都不一样的表单内容
local queries = {
    "language=php",
    "language=java",
    "language=lua"
}
local i = 0
request = function()
    local body = wrk.format(nil, nil, nil, queries[i % #queries + 1])
    i = i + 1
    return body
end
搭建私有播放服务

背景

由于很多时候,视频资源下载很慢,需要用自己的电脑挂机;又或是国外的资源被墙,无法观看;所以需要一个可以挂机下载的服务器。

离线下载这步做到之后,又由于download到自己电脑上还需要一段时间,而且有些资源可能是不需要的, 所以又有了在线观看的需求。

使用到的软件/框架

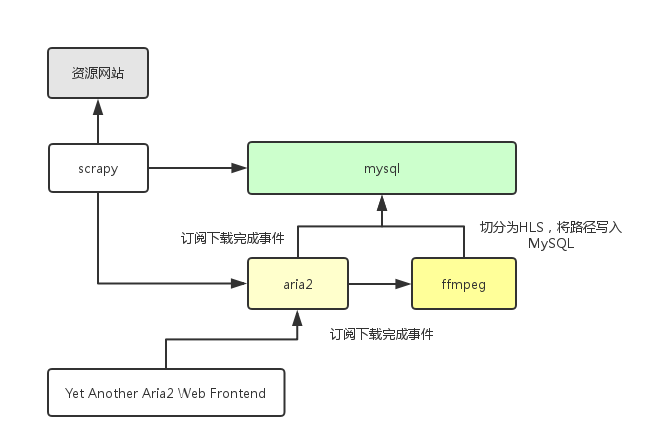
  1. Scrapy
  2. MySQL
  3. Aria2
  4. Ffmpeg
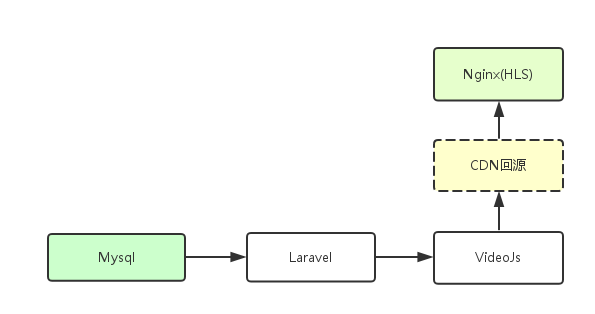
  5. Nginx
  6. Laravel
  7. Videojs

流程图

下载流程

downloader.png

展示流程

player.png

痛点

其实正常的开发流程一般遵照网上的教程或者官方文档就可以很容易的解决;这边讲讲一些需要费一些精力才能解决的问题

被js加密过的下载地址

一般都是使用eval来执行加密过的字符串,只要先将eval里面的参数给解密出来,然后使用正则匹配解密之后的字符串里面的下载地址就可以了

p = re.compile(ur'eval\((.*)')
m = p.search(response.body)
if not m:
    print('---- not match ----')
    return
jsctx = PyV8.JSContext(PyV8.JSClass())
jsctx.enter()
jsctx.eval(r"var a = new String(" + m.group(1))
print(jsctx.locals.a)
content = jsctx.locals.a

p1 = re.compile('(http://[^"]+)')
m1 = p1.search(content)

if not m1:
    print('---- cannot find url in js content ----')
    return

videoUrl = m1.group(1)

python和aria2的交互

# encoding: utf-8
import xmlrpclib

class Pipeline(object):
    def __init__(self):
        self.s = xmlrpclib.ServerProxy('http://localhost:6800/rpc')

    def init_hook(self):
        self.s.aria2.onDownloadStart(self.onDownloadStart)
        self.s.aria2.onDownloadError(self.onDownloadError)
        self.s.aria2.onDownloadComplete(self.onDownloadComplete)

    def onDownloadStart(self, event):
        pass

    def onDownloadError(self, event):
        pass

    def onDownloadComplete(self, event):
        pass

    def process_item(self, item, spider):
        # ...
        gid = self.s.aria2.addUri([item['video_url']], {"out": path})
        # ...

ffmpeg将mp4拆分为HLS

命令如下,注意替换<>之间的内容

ffmpeg -i <ccc.mp4> -vf scale=-2:360 -profile:v baseline -level 3.0 -start_number 0 -hls_time 10 -hls_list_size 0 -f hls <ccc.m3u8>

ffmpeg截取部分视频为gif

注意替换命令中的两个变量

ffmpeg -ss 00:00:10 -t 5 -i "$filename" -vf scale=360:-1 -b 2048k "$dirname".gif

videojs播放HLS

默认情况之下videojs是不支持播放HLS的,需要引入 videojs-contrib-hls.min.js

videojs.options.flash.swf = "/js/video-js/video-js.swf";
videojs('main_video').ready(function() {
  this.hotkeys({
    volumeStep: 0.1,
    seekStep: 5,
    enableMute: true,
    enableFullscreen: true,
    enableNumbers: true
  });
});

casperjs兼容reactjs截图

由于phantomjs使用的webkit内核版本较低,不支持es5;自然phantomjs无法正常打开reactjs的页面;这里可以使用es5-shim.js 来兼容。

casperjs是可以使用clientScripts将 es5-shim.js 插入页面中;但是这个插入是在页面的加载完之后;我们需要的是在页面的最前面插入 es5-shim.js;于是:

casper.options.onPageInitialized = function() {
    casper.page.injectJs("es5-shim.js");
};

再谈casperjs截图

遇到了什么问题

一直在使用 casperjs 来做网页截图,http://tool.lu/article

简单的使用是没有问题的,当要给墙外网址截图的时候,那么问题来了。

触发点:

  1. phantomjs 使用 proxy
  2. 要截图的网址是 https 的

现象:
被截取的网页会跳转到about:blank,导致截图空白

Eh, what the fuck?!

怎么解决的

最主要的是 --ssl-protocol=any --ignore-ssl-errors=true

基于之前那些个恶心的问题,然后就有了下面这么长的命令:

LC_CTYPE=en_US.UTF-8 PATH=/usr/local/phantomjs/bin:/usr/bin/usr/local/node/lib/node_modules/casperjs/bin/casperjs --proxy=127.0.0.1:7070 --proxy-type=socks5 --ssl-protocol=any --ignore-ssl-errors=true /data/jobs/webshot/webshot.js --url='https://url/you/want/to/capture/' --target='path/to/store/the/picture.png'

实时的 CPU 占用显示

预览

QQ20141108-1.png

流程

  1. golang 分析 vmstat 1 -n
  2. publish 到 redis
  3. subscribe redis 然后通过 SSE push 到 浏览器

代码

performance.go

go get gopkg.in/redis.v2
package main

import (
    "bufio"
    "fmt"
    "log"
    "io"
    "os/exec"
    "strings"
    "strconv"
    "gopkg.in/redis.v2"
)

var client *redis.Client

func tail(stream io.Reader) {
    scanner := bufio.NewScanner(stream)
    scanner.Scan() // 跳过header1
    scanner.Scan() // 跳过header2
    for scanner.Scan() {
        text := scanner.Text()
        segments := strings.Fields(text)
        if ide, err := strconv.ParseInt(segments[14], 10, 32); err == nil {
            used := 100 - ide
            log.Println(used)
            pub := client.Publish("performance", fmt.Sprintf("%d", used))
            if err := pub.Err(); err != nil {
                log.Println(err)
            }
        }
    }
    if err := scanner.Err(); err != nil {
        // ...
    }
}

func main () {
    client = redis.NewClient(&redis.Options{
        Network: "tcp",
        Addr: "127.0.0.1:6379",
    })
    outReader, outWriter := io.Pipe()
    cmd := exec.Command("vmstat", "1", "-n")
    cmd.Stdout = outWriter
    go tail(outReader)
    cmd.Run()
}

SSE 部分请自行实现 (提示:github上搜一下),使用nginx进行反向代理。

html部分

SmoothieChart
js/widget/performance/main.js

(function ($, SmoothieChart) {
    var chart = new SmoothieChart({
        minValue:0,
        maxValue:100,
        grid:{
            fillStyle:'#FFFFFF',
            strokeStyle:'#CCCCCC',
            sharpLines:true
        },
        labels: {
            fillStyle:'#333333',
        }
    }),
    canvas = document.getElementById('performance-widget'),
    series = new TimeSeries();

    chart.addTimeSeries(series, {lineWidth:2,strokeStyle:'#009A61',fillStyle:'rgba(0,154,97,.1)'});
    chart.streamTo(canvas, 500);

    if (!!window.EventSource) {
        var source = new EventSource('//your/sse/sever/and/path');
        source.addEventListener('performance', function (e) {
            series.append(+new Date(), +e.data);
        }, false);
    }

})(jQuery, SmoothieChart);

PS: Chrome的开发工具暂时无法看到浏览器返回的值,调试的话可以访问:chrome://view-http-cache/http(s)://your/sse/sever/and/path

youtube-dl无法下载的问题

使用youtube-dl下载youtube视频的时候出现下面的错误

ERROR: content too short

进过一番google之后,说是youtube服务器端那边的问题,可能会修复。最简单的解决办法就是更改一个清晰度差点的(默认下载选择的质量最好的那个),于是:

# 列出所有可用的
youtube-dl [url] -F
# format code extension resolution  note
# 139         m4a       audio only  DASH audio   51k , audio@ 48k (22050Hz), 19.03MiB (worst)
# 140         m4a       audio only  DASH audio  130k , audio@128k (44100Hz), 50.81MiB
# 141         m4a       audio only  DASH audio  258k , audio@256k (44100Hz), 102.01MiB
# 160         mp4       256x144     DASH video  122k , video only, 31.80MiB
# 133         mp4       426x240     DASH video  269k , video only, 50.52MiB
# 134         mp4       640x360     DASH video  281k , video only, 57.12MiB
# 135         mp4       854x480     DASH video  716k , video only, 134.81MiB
# 136         mp4       1280x720    DASH video  930k , video only, 104.83MiB
# 17          3gp       176x144
# 36          3gp       320x240
# 5           flv       400x240
# 43          webm      640x360
# 18          mp4       640x360
# 22          mp4       1280x720    (best)

# 选择一个质量稍差的

youtube-dl [url] -f18

使用docker作为沙盒

背景

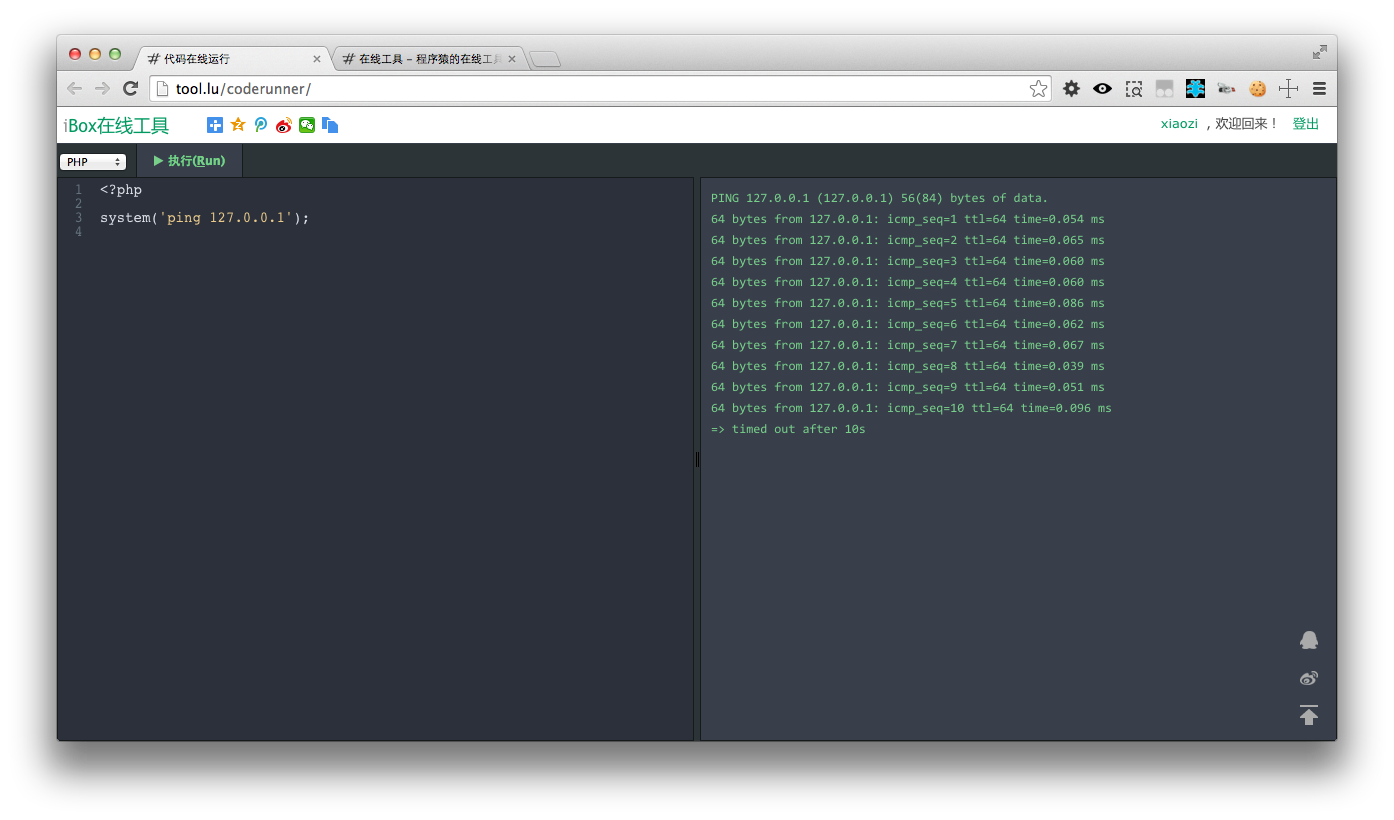
其实早就想做个在线代码运行的,但是 CentOS6 对 Docker 的支持不是很好,坑比较多。待 CentOS7 出来后思考了一段时间,最终还是决定做起来了。

怎么做

最初考虑的时候就是想着可以扩展性比较好的解决方案,建立一个socket sever可以把文件分发到不同的机器上,再后来便想着还是直接用rsync吧,然后...神马都没弄,就直接本地 mount 到 docker container 里面去了,做了个池子,最多只能开50个docker container

Dockerfile

FROM centos:latest

RUN yum install gcc gcc-c++ php golang -y

ADD entrypoint.sh entrypoint.sh
ADD run-code.sh run-code.sh

ENTRYPOINT ["/bin/bash", "entrypoint.sh"]

至于前端的东西,是用的CodeMirror,给他加了个命令和快捷键(mac 和 pc 区分)

preview

代码在线运行

Screenshot 2014-09-21 at 22.22.18.png

嵌入演示

nginx兼容%23

问题起源

在 tool.lu 上,将分享服务改为百度分享的时候,pc 上的分享链接都正常,但是微信二维码扫描之后就会出现下面的 url,%23也就是一个#

http://tool.lu/news/%2310006-weixin-1-6358-0629b82e8bd20c82f766611c23eca2f9

即使是在其提供的 api 中关闭#回流统计的功能,对二维码来说还是不起作用的。为对此url做兼容,修改 nginx 配置文件如下

解决方案

# hack for baidu share weixin
    rewrite ^(.*)\#(.*)$ $1#$2 redirect;
# end hack¬

使用casperjs截出优雅的图片

前言

  1. phantomjs中文问题
  2. phantomjs中文问题 [后续]

优化字体的显示

使用Chrome OS字体来代替serif, sans-serif, sans, monospace字体

/usr/share/fonts/default/truetype/croscorefonts
├── Arimo-BoldItalic.ttf
├── Arimo-Bold.ttf
├── Arimo-Italic.ttf
├── Arimo-Regular.ttf
├── Cousine-BoldItalic.ttf
├── Cousine-Bold.ttf
├── Cousine-Italic.ttf
├── Cousine-Regular.ttf
├── fonts.dir
├── fonts.scale
├── SymbolNeu.ttf
├── Tinos-BoldItalic.ttf
├── Tinos-Bold.ttf
├── Tinos-Italic.ttf
└── Tinos-Regular.ttf

0 directories, 15 files

~/.fonts.conf

<?xml version='1.0'?>
<!DOCTYPE fontconfig SYSTEM 'fonts.dtd'>
<fontconfig>

  <!-- Set preferred serif, sans serif, and monospace fonts. -->
  <alias>
    <family>serif</family>
    <prefer><family>Tinos</family></prefer>
  </alias>
  <alias>
    <family>sans-serif</family>
    <prefer><family>Arimo</family></prefer>
  </alias>
  <alias>
    <family>sans</family>
    <prefer><family>Arimo</family></prefer>
  </alias>
  <alias>
    <family>monospace</family>
    <prefer>
        <family>Meslo LG L DZ</family>
        <family>Cousine</family>
    </prefer>
  </alias>

  <!-- Aliases for commonly used MS fonts. -->
  <match>
    <test name="family"><string>Arial</string></test>
    <edit name="family" mode="assign" binding="strong">
      <string>Arimo</string>
    </edit>
  </match>
  <match>
    <test name="family"><string>Helvetica</string></test>
    <edit name="family" mode="assign" binding="strong">
      <string>Arimo</string>
    </edit>
  </match>
  <match>
    <test name="family"><string>Verdana</string></test>
    <edit name="family" mode="assign" binding="strong">
      <string>Arimo</string>
    </edit>
  </match>
  <match>
    <test name="family"><string>Tahoma</string></test>
    <edit name="family" mode="assign" binding="strong">
      <string>Arimo</string>
    </edit>
  </match>
  <match>
    <!-- Insert joke here -->
    <test name="family"><string>Comic Sans MS</string></test>
    <edit name="family" mode="assign" binding="strong">
      <string>Arimo</string>
    </edit>
  </match>
  <match>
    <test name="family"><string>Times New Roman</string></test>
    <edit name="family" mode="assign" binding="strong">
      <string>Tinos</string>
    </edit>
  </match>
  <match>
    <test name="family"><string>Times</string></test>
    <edit name="family" mode="assign" binding="strong">
      <string>Tinos</string>
    </edit>
  </match>
  <match>
    <test name="family"><string>Courier New</string></test>
    <edit name="family" mode="assign" binding="strong">
      <string>Cousine</string>
    </edit>
  </match>

  <match target="font" >
    <edit mode="assign" name="autohint" >
      <bool>true</bool>
    </edit>
  </match>
  <match target="font" >
    <edit mode="assign" name="rgba" >
      <const>none</const>
    </edit>
  </match>
  <match target="font" >
    <edit mode="assign" name="hinting" >
      <bool>false</bool>
    </edit>
  </match>
  <match target="font" >
    <edit mode="assign" name="hintstyle" >
      <const>hintnone</const>
    </edit>
  </match>
  <match target="font" >
    <edit mode="assign" name="antialias" >
      <bool>true</bool>
    </edit>
  </match>
</fontconfig>
fc-cache -fv
# 查看一下字体是否选择正确
fc-match monospace

js脚本

example.js

var fs = require('fs');

var casper = require('casper').create({
    stepTimeout: 3000
});

var url = casper.cli.get(0);
url = url || 'http://tool.lu/';

casper.start().viewport(1280, 800).thenOpen(url, function () {
    // this.captureSelector('snap.png', '.post');
    var filename = 'snap.png';
    this.capture(filename);
    this.echo(JSON.stringify({url: this.getCurrentUrl(), path : fs.absolute(filename)}));
});

casper.run();
casperjs example.js http://tool.lu/

效果图

snap.png

phantomjs中文问题 [后续]

之前写过一篇文章:phantomjs中文问题

里面的解决办法也是碰巧,如今将解决问题之所在。

# 列出所有已经安装的中文字体,如果还没有安装中文字体,可参考上文提到的文章。
fc-list :lang=zh
# 宋体,SimSun:style=Regular

# 看下字体是怎么走的
fc-match Arial -s
# SimSun.ttf: "SimSun" "Regular"
# n019003l.pfb: "Nimbus Sans L" "Regular"
# cursor.pfa: "Cursor" "Regular"
# d050000l.pfb: "Dingbats" "Regular"
# s050000l.pfb: "Standard Symbols L" "Regular"
# 哎呀,是对的呀,为什么phantomjs不认呢,(ÒωÓױ)

# 查看下本地语言设置
locale
# LANG=zh_CN.UTF-8
# LC_CTYPE=zh_CN.UTF-8
# LC_NUMERIC="zh_CN.UTF-8"
# LC_TIME="zh_CN.UTF-8"
# LC_COLLATE="zh_CN.UTF-8"
# LC_MONETARY="zh_CN.UTF-8"
# LC_MESSAGES="zh_CN.UTF-8"
# LC_PAPER="zh_CN.UTF-8"
# LC_NAME="zh_CN.UTF-8"
# LC_ADDRESS="zh_CN.UTF-8"
# LC_TELEPHONE="zh_CN.UTF-8"
# LC_MEASUREMENT="zh_CN.UTF-8"
# LC_IDENTIFICATION="zh_CN.UTF-8"
# LC_ALL=


# 嗯,据说 QT 在对“宋体,SimSun:style=Regular”处理的时候是有问题的
export LC_CTYPE=en_US.UTF-8
fc-list :lang=zh
# SimSun,宋体:style=Regular
# 换了个顺序,试试...,呵呵,phantomjs中文的问题解决了 - - |||

因为不需要全局修改LC_CTYPE,所以在命令前面加一下就好了。为了方便写个alias

alias casperjs='LC_CTYPE=en_US.UTF-8 casperjs'

Bash杂记

取出文件列表

# 防止WordSplitting,避免使用$(ls *.txt)
for file in *.txt
do
    # 防止文件名以-开头
    cp "./$file" /path/to/target
done

按行读取文件

while read line
do
    echo "$line"
done < text.txt

拷贝文件

cp -- "$file" "$target"
# -- 防止文件名以-开头
# " 防止文件名中含有空格

字符串比较

[[ $foo == "$bar" ]]

cd到目录

# -P prefix
cd -P -- "$(dirname -- "$f")"

数字比较

((foo > 7))
# 或者
[ "$foo" -gt 7 ]

判断文件中是否包含某个字符串

if grep -q fooregex /path/to/file; then
    # do something here
fi

多条件判断

if [ a = b ] && [ c = d ]
# 或者
if [[ a = b && c = d ]]

对文件的修改

先修改到临时文件,再mv回去

多行字符串

# 不要使用echo
cat <<EOF
  Hello world
  How's it going?
EOF

对cd命令是否成功的判断

cd /foo && bar
# 或者有很多依赖于cd之后的命令
cd /foo || exit 1
# ...
# ...
# 或者顺便说点什么 
cd /foo || { echo "hi, man!"; exit 1; }

for循环

for ((i=1; i<=n; i++)); do
    # do something here
done

错误重定向

# 先重定向到文件,再定向到标准输出(标准输出已经到tty了)
somecmd >>logfile 2>&1

Nginx的常用配置

www跳转到主域名

server {
    listen 80;
    server_name www.tool.lu;

    access_log off;
    error_log off;

    return 301 http://tool.lu$request_uri;
}

http跳转到https

server {
    listen      80;
    server_name tool.lu;
    return 301 https://tool.lu$request_uri;
}

fastcgi

    location ~ \.php$ {
        try_files $uri =404;
        fastcgi_pass 127.0.0.1:9000;
        fastcgi_index index.php;
        fastcgi_param SCRIPT_FILENAME $document_root$fastcgi_script_name;
        include fastcgi_params;
    }

cdn

server {
    listen 80;
    server_name s1.tool.lu s2.tool.lu s3.tool.lu s4.tool.lu;

    root /data/html/tool.lu/static;
    index index.html;

    access_log off;
    error_log off;

    location / {
        concat on;
        concat_types text/css application/javascript;
        # 解决js语句不以分号结尾的第三方库
        concat_delimiter "\n\n";
        concat_max_files 20;

        expires 7d;
    }
}

参考

  1. Pitfalls - Nginx Community