分类 Software 下的文章

使用命令行获取app的图标

先在桌面上建一个目标文件夹 mkdir -p ~/Desktop/appIcons/48/

#!/bin/zsh

APPNAME=$1

if [[ -z "$APPNAME" ]]; then
    echo '请先指定一个appname'
    exit 0
fi

# 获取图标名称
ICON=$(/usr/libexec/plistbuddy -c Print:CFBundleIconFile: "/Applications/${APPNAME}.app/Contents/Info.plist")
if [[ -z "$ICON" ]]; then
    echo '找不到icon文件'
    exit 0
fi

if [[ "$ICON" == *.icns ]] ICON=${ICON%.*}
ICONPATH="/Applications/${APPNAME}.app/Contents/Resources/${ICON}.icns"
# 转换格式
sips -s format png "${ICONPATH}" --out ~/Desktop/appIcons/48/"${APPNAME}".png -Z 48

为了方便使用,可以直接闹个别名 alias icon='~/Documents/geticon.sh'

使用命令行创建dmg

自动获取软件版本号

APP_NAME="Soulver"
VERSION=$(/usr/libexec/plistbuddy -c Print:CFBundleShortVersionString: "${APP_NAME}.app/Contents/Info.plist")
DMG_BACKGROUND_IMG="Background.png"

VOL_NAME="${APP_NAME} ${VERSION}"
DMG_TMP="${VOL_NAME}-temp.dmg"
DMG_FINAL="${VOL_NAME}.dmg"
STAGING_DIR="./Install"

创建dmg

# 清理文件夹
rm -rf "${STAGING_DIR}" "${DMG_TMP}" "${DMG_FINAL}"
# 创建文件夹,拷贝,计算
mkdir -p "${STAGING_DIR}"
cp -rpf "${APP_NAME}.app" "${STAGING_DIR}"
SIZE=`du -sh "${STAGING_DIR}" | sed 's/\([0-9\.]*\)M\(.*\)/\1/'` 
SIZE=`echo "${SIZE} + 1.0" | bc | awk '{print int($1+0.5)}'`
# 容错处理
if [ $? -ne 0 ]; then
   echo "Error: Cannot compute size of staging dir"
   exit
fi
# 创建临时dmg文件
hdiutil create -srcfolder "${STAGING_DIR}" -volname "${VOL_NAME}" -fs HFS+ \
      -fsargs "-c c=64,a=16,e=16" -format UDRW -size ${SIZE}M "${DMG_TMP}"
echo "Created DMG: ${DMG_TMP}"

设置dmg

DEVICE=$(hdiutil attach -readwrite -noverify "${DMG_TMP}" | \
         egrep '^/dev/' | sed 1q | awk '{print $1}')
sleep 2
# 增加Applications目录的软链接
echo "Add link to /Applications"
pushd /Volumes/"${VOL_NAME}"
ln -s /Applications
popd
# 拷贝背景图片
mkdir /Volumes/"${VOL_NAME}"/.background
cp "${DMG_BACKGROUND_IMG}" /Volumes/"${VOL_NAME}"/.background/

# 使用applescript设置一系列的窗口属性
echo '
   tell application "Finder"
     tell disk "'${VOL_NAME}'"
           open
           set current view of container window to icon view
           set toolbar visible of container window to false
           set statusbar visible of container window to false
           set the bounds of container window to {400, 100, 938, 432}
           set viewOptions to the icon view options of container window
           set arrangement of viewOptions to not arranged
           set icon size of viewOptions to 72
           set background picture of viewOptions to file ".background:'${DMG_BACKGROUND_IMG}'"
           set position of item "'${APP_NAME}'.app" of container window to {160, 195}
           set position of item "Applications" of container window to {360, 195}
           close
           open
           update without registering applications
           delay 2
     end tell
   end tell
' | osascript

sync
# 卸载
hdiutil detach "${DEVICE}"

压缩dmg

echo "Creating compressed image"
hdiutil convert "${DMG_TMP}" -format UDZO -imagekey zlib-level=9 -o "${DMG_FINAL}"

# 清理文件夹
rm -rf "${DMG_TMP}"
rm -rf "${STAGING_DIR}"

echo 'Done.'
exit
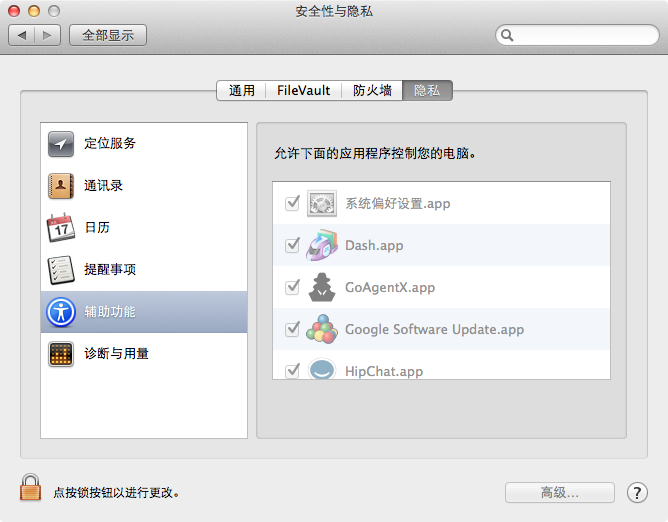
Photoshop不能初始化的问题

不能初始化 Photoshop,因为文件被锁定、您没有必需的访问权限,或者其他程序正在使用该文件。 在 Finder 中使用“简介”命令可解锁文件,让您有权访问该文件。如果问题仍然存在,请将文档存储到其他文件,或将其复制到 Finder 中

打开Photoshop的时候按option+command+shift,删除Adobe Photoshop设置文件后,正常启动。

Vox中文乱码的问题

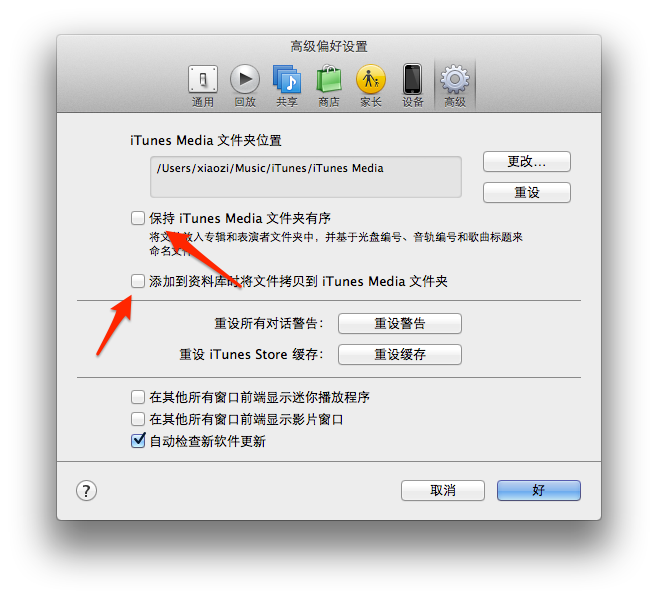
使用iTunes转换歌曲的ID3版本,首先确保下面的设置,否则iTunes的修改不会作用到原文件上面。
Screenshot_2014-04-07_22_41_58.png

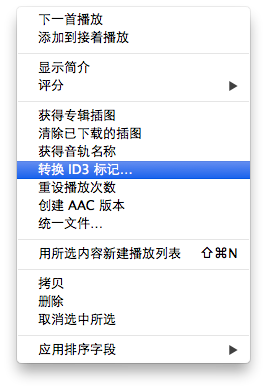
在iTunes的音乐列表里面+a全选,右键:
Screenshot 2014-04-07 22.45.12.png

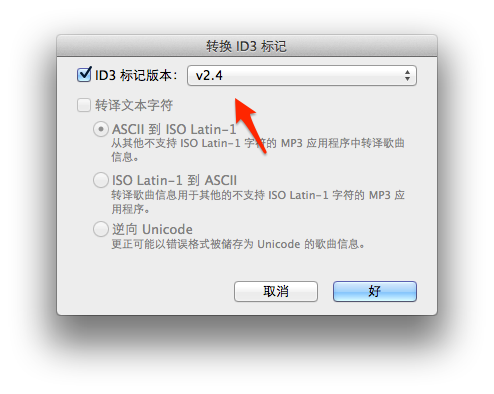
接着选择v2.4,然后在Vox中就不会乱码了
Screenshot_2014-04-07_22_45_02.png

Sequel Pro Bundle修复

Copy as Text Table

这个第三方的bundle,可以将查询到的数据复制为ascii table。但是遇到字段中存在中文的时候,field的宽度就不对了。

// $lenfunc = 'mb_strlen';
$lenfunc = 'mb_strwidth';

将24行的mb_strlen修改为mb_strwidth就可以了。

+----+------+--------------+-------------+
| id | name | displayorder | discription |
+----+------+--------------+-------------+
| 1  | 程序 | 1            | 代码工具    |
| 2  | 生活 | 2            | 生活娱乐    |
+----+------+--------------+-------------+

Windows8修改账户目录

Windows8下的用户目录如果为中文名,可能会造成某些软件不能正常使用。

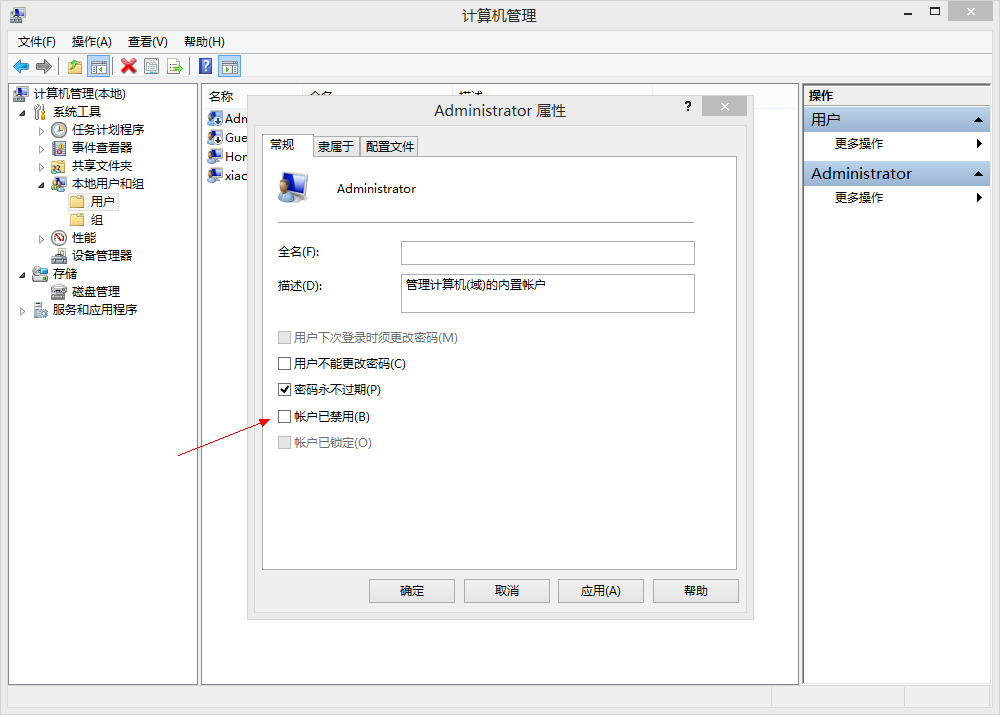
开启Administrator账户

计算机(右键) - 管理 - 本地用户和组 - 用户QQ截图20130528214826.png

更改目录名称和注册表

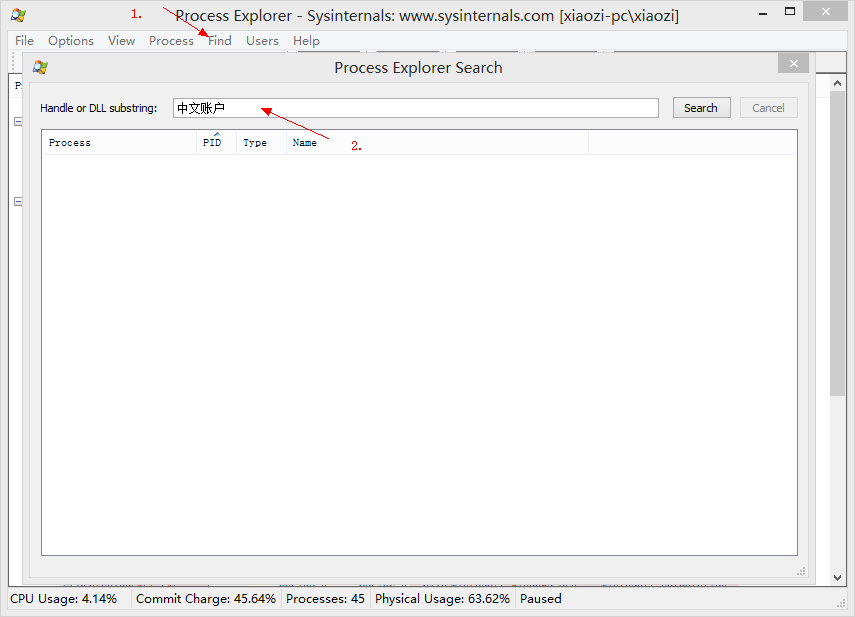
使用Administrator账户登录,修改 /Users/[中文] 为 /Users/[English],若遇到文件夹正在被使用的情况可以使用procexp查出进程并结束。QQ截图20130528214657.png

修改注册表, Win + r , regedit

HKEY_LOCAL_MACHINE\SOFTWARE\Microsoft\Windows NT\CurrentVersion\Profilelist
// 找到下面的 ProfileImagePath 修改成上面刚改过的英文路径。

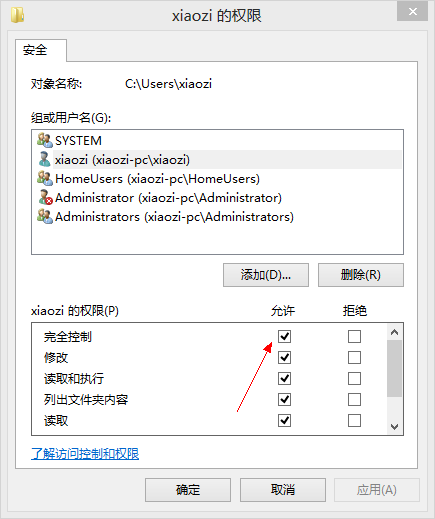
设置权限

/Users/[English] (右键)- 安全 - (选中用户)编辑QQ截图20130528220300.png

至此全部搞定。

自定义url scheme

就是实现类似thunder://svn://tencent://的链接,然后点击链接的时候,会弹出询问是否要启动应用程序。

windows下的实现

google搜索到,windows下只需要修改注册表就可以了,以下是导出的svn的

Windows Registry Editor Version 5.00

[HKEY_CLASSES_ROOT\svn]
@="URL:SVN Protocol"
"URL Protocol"=""

[HKEY_CLASSES_ROOT\svn\DefaultIcon]
@="C:\\Program Files\\TortoiseSVN\\bin\\TortoiseProc.exe"

[HKEY_CLASSES_ROOT\svn\shell]

[HKEY_CLASSES_ROOT\svn\shell\open]

[HKEY_CLASSES_ROOT\svn\shell\open\command]
@="C:\\Program Files\\TortoiseSVN\\bin\\TortoiseProc.exe /command:repobrowser /path:\"%1\""

使用Stylus来写css

less sass stylus都可以用来简化css的书写,我选用stylus主要有以下几点原因:

  • Stylus is "pythonic"
  • stylus的语法看上去更像一门编程语言

其中有一点蛋疼的是,哥没找到怎么设置输出css的缩进字符,个人还是比较喜欢用tab缩进。安装完nodejs后安装stylus和nib

npm install stylus nib

Windows7的都安装到C:\Users\用户名\node_modules\stylus目录下了,使用nib的时候,要

stylus --include C:\\Users\\用户名\\node_modules\\stylus test.styl

nib库中定义好了很多常用的css,可以直接调用,方便很多。

InnoSetup杂记

那些个控件名

// 输出所有控件名
procedure InitializeWizard;
var
	i: integer;
	te: TMemo;
begin
	te := TMemo.Create(WizardForm);
	te.Parent := WizardForm.WelcomeLabel2;

	with WizardForm do
	begin
		for i:= ComponentCount - 1 downto 0 do
		begin
			if Components[i].Name <> '' then
			begin
				te.Text := te.Text + Components[i].Name + #13 + #10;
			end;
		end;
	end;
end;
BeveledLabel
FinishedHeadingLabel
FinishedLabel
YesRadio
NoRadio
RunList
WizardBitmapImage2
FinishedPage
PageNameLabel
PageDescriptionLabel
WizardSmallBitmapImage
MainPanel
InfoAfterClickLabel
InfoAfterMemo
InfoAfterPage
ProgressGauge
StatusLabel
FilenameLabel
InstallingPage
PreparingNoRadio
PreparingYesRadio
PreparingLabel
PreparingErrorBitmapImage
PreparingPage
ReadyLabel
ReadyMemo
ReadyPage
SelectTasksLabel
TasksList
SelectTasksPage
SelectStartMenuFolderLabel
SelectStartMenuFolderBrowseLabel
GroupEdit
GroupBrowseButton
NoIconsCheck
SelectGroupBitmapImage
SelectProgramGroupPage
SelectComponentsLabel
TypesCombo
ComponentsList
ComponentsDiskSpaceLabel
SelectComponentsPage
SelectDirLabel
SelectDirBrowseLabel
DirEdit
DirBrowseButton
DiskSpaceLabel
SelectDirBitmapImage
SelectDirPage
UserInfoNameLabel
UserInfoNameEdit
UserInfoOrgLabel
UserInfoOrgEdit
UserInfoSerialLabel
UserInfoSerialEdit
UserInfoPage
InfoBeforeClickLabel
InfoBeforeMemo
InfoBeforePage
PasswordLabel
PasswordEditLabel
PasswordEdit
PasswordPage
LicenseLabel1
LicenseMemo
LicenseAcceptedRadio
LicenseNotAcceptedRadio
LicensePage
InnerNotebook
Bevel1
InnerPage
WelcomeLabel1
WelcomeLabel2
WizardBitmapImage
WelcomePage
OuterNotebook
BackButton
NextButton
CancelButton
Bevel

注册表

开机启动
HKEY_CURRENT_USER\Software\Microsoft\Windows\CurrentVersion\Run
文件右键使用my software打开
HKEY_CLASSES_ROOT\*\Shell\Open with My Software\command

例子来自Sublime Text 2的安装包

[Registry]
Root: HKCR; Subkey: "*\Shell\Open with Sublime Text 2\command"; ValueType: String; ValueData: "{app}\sublime_text.exe ""%1"""; Tasks: "contextentry"; MinVersion: 0.0,5.0; Flags: uninsdeletekey 
Root: HKCR; Subkey: "*\Shell\Open with Sublime Text 2"; Tasks: "contextentry"; MinVersion: 0.0,5.0; Flags: uninsdeletekey dontcreatekey
[Tasks]
Name: "contextentry"; Description: "Add to explorer context menu"; MinVersion: 0.0,5.0;