小子 发布的文章

订单号的生成规则

背景

防止订单Id号泄露每日流水,暴露商业机密;需要对订单Id号进行相应的处理,但是订单号的生成又需要满足以下条件

  1. 唯一性
  2. 语义性
  3. 考虑分库分表的情况能快速路由到相应的表
  4. 长度

大厂的生成策略

#平台rule来源
1大众点评时间戳+用户标识码+随机数大众点评订单系统分库分表实践
2美团团购单表自增Id * 100 + 买家Id后2位美团团购订单系统优化记
3淘宝发号器Id + 买家Id后4位淘宝在线交易数据演变

其他策略: 生产乱序码和真实的orderId关联

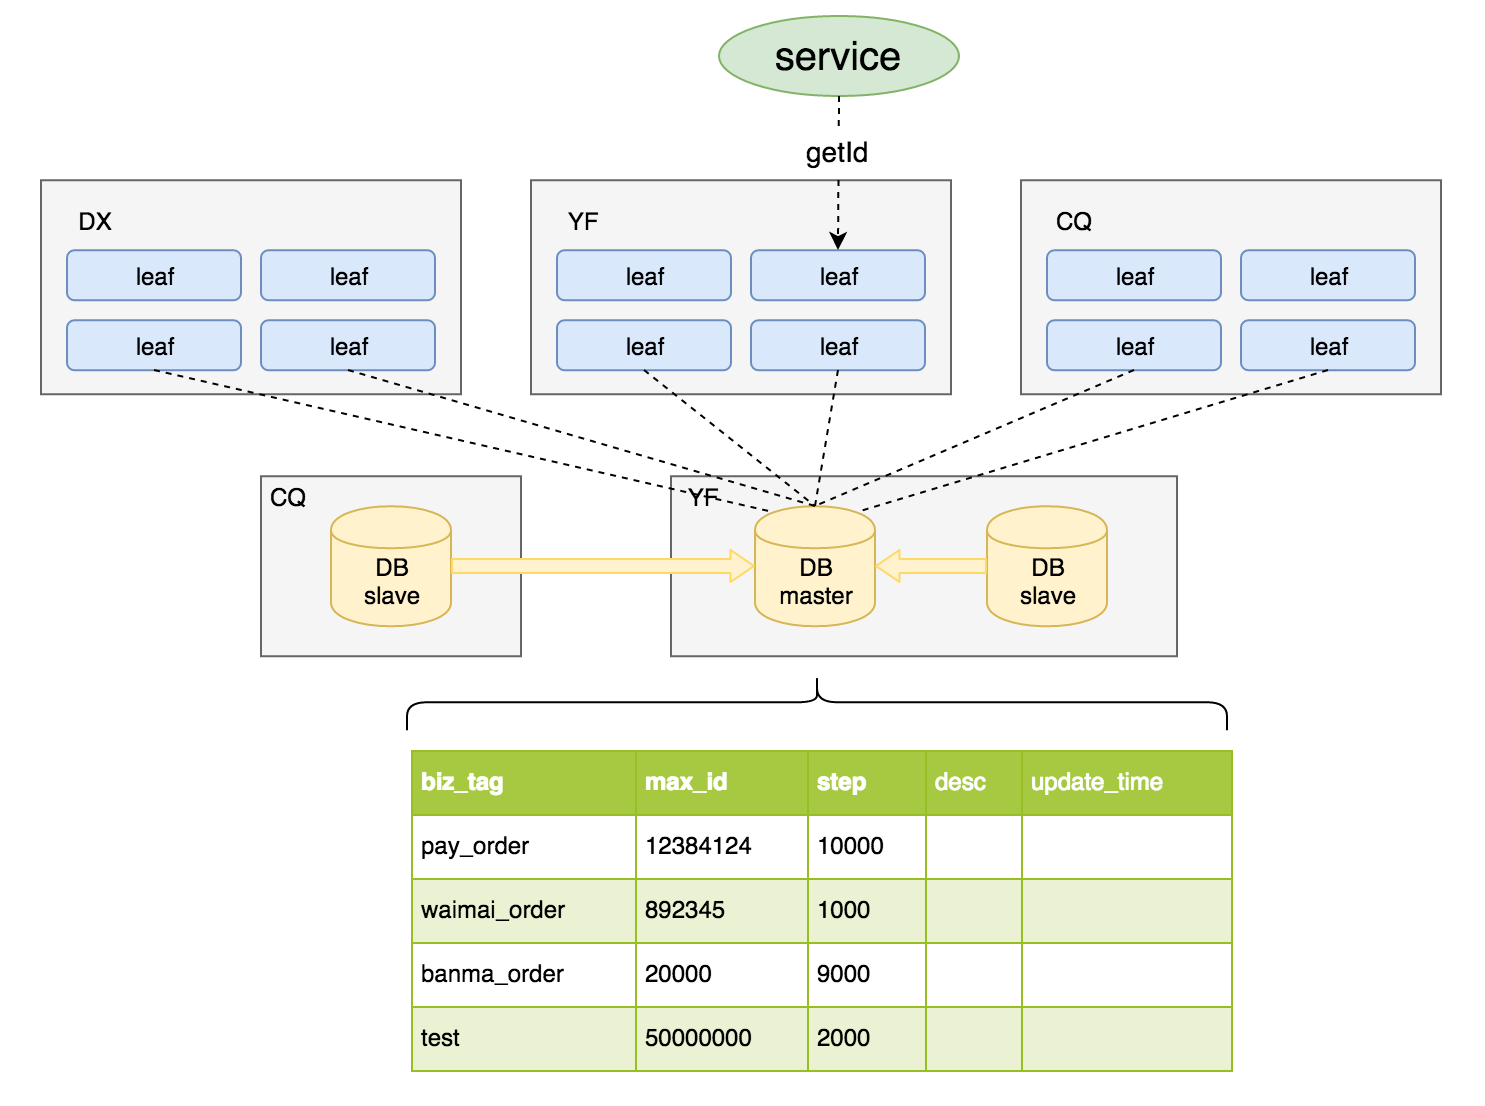
发号器

MTDDL——美团点评分布式数据访问层中间件

Leaf整体架构.png

id和code的转换(Base62)

id.png

版本加密解密的实现

package lib

import (
    "fmt"
    "strconv"
)

func Id2Code(id int, version byte) string {
    var code string = ""
    if version == '1' {
        number := id
        for {
            remain := number % 10000000
            str := Base62Encode(remain)
            code = str + code
            number = number / 10000000
            if number == 0 {
                break
            }
        }
        code = string(version) + code
    }
    return code
}

func Code2Id(code string) int {
    version := code[0]
    code = code[1:]
    if version == '1' {
        var buffer string = ""
        for i := len(code); i > 0; i -= 4 {
            start := i - 4
            if start < 0 {
                start = 0
            }
            seg := code[start:i]
            segId := Base62Decode(seg)
            // 大于7位非法
            if segId >= 100000000 {
                return 0
            }
            buffer += fmt.Sprintf("%07d", Base62Decode(seg))
        }
        result, _ := strconv.Atoi(buffer)
        return result
    }
    return 0
}

Base62加密解密的实现

package lib

import (
    "math"
    "bytes"
)

const dictLength = 62

var dict []byte = []byte{'0', '1', '2', '3', '4', '5', '6', '7', '8', '9', 'a', 'b', 'c', 'd', 'e', 'f', 'g', 'h', 'i', 'j', 'k', 'l', 'm', 'n', 'o', 'p', 'q', 'r', 's', 't', 'u', 'v', 'w', 'x', 'y', 'z', 'A', 'B', 'C', 'D', 'E', 'F', 'G', 'H', 'I', 'J', 'K', 'L', 'M', 'N', 'O', 'P', 'Q', 'R', 'S', 'T', 'U', 'V', 'W', 'X', 'Y', 'Z'}

func Base62Encode(id int) string {
    result := make([]byte, 0)
    number := id
    for number > 0 {
        round := number / dictLength
        remain := number % dictLength
        result = append([]byte{dict[remain]}, result...)
        number = round
    }
    return string(result)
}

func Base62Decode(code string) int {
    var result int = 0
    codeLength := len(code)
    for i, c := range []byte(code) {
        result += bytes.IndexByte(dict, c) * int(math.Pow(dictLength, float64(codeLength - 1 - i)))
    }
    return result
}
建一个socks5代理集群

背景

由于在线工具中部分工具有翻墙的需求,而又没有找到一个稳定的翻墙方案(支持集群),在此背景下产生了这个项目。

架构图

arch.png

功能点

  1. 多账户支持, socks5密码验证
  2. 可用性,集群保证
  3. 流量计算,阈值限制
  4. Custom DNS, 可进行域名白名单的控制
  5. 安全,防止暴力破解socks5密码

表设计

CREATE TABLE `pre_accounts` (
  `id` bigint(20) unsigned NOT NULL AUTO_INCREMENT,
  `accountname` varchar(50) COLLATE utf8mb4_unicode_ci NOT NULL DEFAULT '',
  `password` varchar(64) COLLATE utf8mb4_unicode_ci NOT NULL DEFAULT '',
  `used` int(10) unsigned NOT NULL DEFAULT '0',
  `max` int(10) unsigned NOT NULL DEFAULT '0',
  `created_at` datetime NOT NULL,
  `updated_at` datetime NOT NULL,
  PRIMARY KEY (`id`),
  UNIQUE KEY `idx_accountname` (`accountname`)
) ENGINE=InnoDB AUTO_INCREMENT=2 DEFAULT CHARSET=utf8mb4 COLLATE=utf8mb4_unicode_ci;

Socks5的基础知识

这里就不重复写了,链接到 一个简单的Golang实现的Socks5 Proxy

功能点的实现

多账户支持, socks5密码验证

实现 github.com/armon/go-socks5/credentials.go CredentialStore 接口,进行校验;注意:每次proxy都会进行验证,如果请求量比较大,自行选择缓存方式

可用性,集群保证

每台socks5 server心跳上报到etcd,通过阈值,判断socks5的存活

流量计算,阈值限制

github.com/armon/go-socks5/request.go:358 修改这个函数的调用函数

安全,防止暴力破解socks5密码

使用 ratelimit 来保证,如果错误次数过多,则直接将IP加入黑名单;原理可以看之前写过的一篇文章 使用 redis 做限流

Guava的Strings.repeat

如果要自己实现一个repeat的话,最容易想到的可能会这样(示例不考虑int溢出的情况):

public static String repeat(String string, int count) {
    int length = string.length() * count;
    StringBuilder sb = new StringBuilder(length);
    for (int i = 0; i < count; i++) {
        sb.append(string);
    }
    return sb.toString();
}

用图画出来应该是这个样子的:

guava-strings-repeat (1).png

看到guava的实现,在位运算的时候还是小愣了一下,性能是比上面的实现好多了:

public static String repeat(String string, int count) {
  // 先去掉检测相关的判断,只看核心的实现
  final int len = string.length();
  final long longSize = (long) len * (long) count;
  final int size = (int) longSize;

  final char[] array = new char[size];
  string.getChars(0, len, array, 0);
  int n;
  for (n = len; n < size - n; n <<= 1) {
    System.arraycopy(array, 0, array, n, n);
  }
  System.arraycopy(array, 0, array, n, size - n);
  return new String(array);
}

用图画出来是这个样子的:

guava-strings-repeat.png

重点是这段代码:

  for (n = len; n < size - n; n <<= 1) {
    System.arraycopy(array, 0, array, n, n);
  }
  System.arraycopy(array, 0, array, n, size - n);

看下php的内核实现,其实原理一样,就是把现有的字串翻倍,当 [达到一半的长度, count为偶数] 或者 [刚超过一半的长度时, count为奇数] 做最后一次连接,只是写法不太一样:

// sed -n '5012,5058p' /usr/local/src/php-7.0.9/ext/standard/string.c
PHP_FUNCTION(str_repeat)
{
    zend_string        *input_str;        /* Input string */
    zend_long         mult;            /* Multiplier */
    zend_string    *result;        /* Resulting string */
    size_t        result_len;        /* Length of the resulting string */

    if (zend_parse_parameters(ZEND_NUM_ARGS(), "Sl", &input_str, &mult) == FAILURE) {
        return;
    }

    if (mult < 0) {
        php_error_docref(NULL, E_WARNING, "Second argument has to be greater than or equal to 0");
        return;
    }

    /* Don't waste our time if it's empty */
    /* ... or if the multiplier is zero */
    if (ZSTR_LEN(input_str) == 0 || mult == 0)
        RETURN_EMPTY_STRING();

    /* Initialize the result string */
    result = zend_string_safe_alloc(ZSTR_LEN(input_str), mult, 0, 0);
    result_len = ZSTR_LEN(input_str) * mult;

    /* Heavy optimization for situations where input string is 1 byte long */
    if (ZSTR_LEN(input_str) == 1) {
        memset(ZSTR_VAL(result), *ZSTR_VAL(input_str), mult);
    } else {
        char *s, *e, *ee;
        ptrdiff_t l=0;
        memcpy(ZSTR_VAL(result), ZSTR_VAL(input_str), ZSTR_LEN(input_str));
        s = ZSTR_VAL(result);
        e = ZSTR_VAL(result) + ZSTR_LEN(input_str);
        ee = ZSTR_VAL(result) + result_len;

        while (e<ee) {
            l = (e-s) < (ee-e) ? (e-s) : (ee-e);
            memmove(e, s, l);
            e += l;
        }
    }

    ZSTR_VAL(result)[result_len] = '\0';

    RETURN_NEW_STR(result);
}

https://github.com/jonschlinkert/repeat-string/blob/master/index.js

TOC的生成

TOC是什么

TOC 即 Table of Content,就是将文档中的 h1-h6 抽取出来,并结构化的展示;可以通过链接直接跳转到相应的内容 (这里我使用锚点)

这个本身是没什么好写的,但是涉及到树形的结构化处理,要考虑到怪异的层级问题。

方案

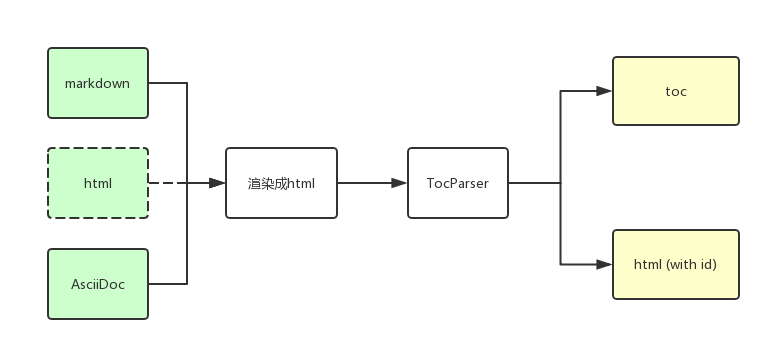
由于原始文档的格式(markdown,html,asciidoc)比较多,但是用于最后展示的还是 html,所以为了方便统一的处理,先将文档都选染成html

toc.png

  1. 使用 ParseDown 渲染markdown
  2. 使用 Crawler 解析html
  3. 提取 h{n},结构化 h{n},并设置html中的 id 属性
  4. 展示树形 TOC

预览

9FBAC831-0717-4728-A06F-CA5CCC4D62AF.png

实现

安装依赖包

composer require erusev/parsedown-extra
composer require symfony/dom-crawler
composer require symfony/css-selector

代码实现

public function getTocAttribute() {
    if ($this->headerNodes) {
        return $this->headerNodes;
    }
    $crawler = new Crawler();
    $crawler->addHtmlContent($this->html, 'utf-8');
    $this->headerNodes = $crawler->filter('h1,h2,h3,h4,h5,h6')->each(function (Crawler $node, $i) {
        $attrId = 'header_' . $i;
        $node->getNode(0)->setAttribute('id', $attrId);
        return [
            'target' => '#' . $attrId,
            'level' => intval(substr($node->nodeName(), 1)),
            'text' => $node->text(),
        ];
    });
    $this->tocedHtml = $crawler->html();
    return $this->headerNodes;
}

树形结构化

class MenuItem {
    public $level;
    public $text;
    public $target;
    public $children = [];
    public function __construct($target, $level, $text) {
        $this->target = $target;
        $this->level = $level;
        $this->text = $text;
    }
}
$rootMenu = new MenuItem(-1, 0, '__root__');
foreach ($wiki->toc as $hn) {
    $menuItem = new MenuItem($hn['target'], $hn['level'], $hn['text']);
    // 每个菜单都从根目录开始寻找
    $lastMenu = $rootMenu;
    while (true) {
        $nestMenu = end($lastMenu->children);
        // 如果比上个层级还大,就挂载到他后面
        if (!$nestMenu && $hn['level'] > $lastMenu->level) {
            $lastMenu->children[] = $menuItem;
            break;
        }
        // 如果循环下来发现没有匹配的层级,则放进根目录
        if ($hn['level'] < $nestMenu->level) {
            $rootMenu->children[] = $menuItem;
            break;
        }
        // 如果和上个层级一样,就赛到上层的children
        if ($nestMenu->level >= $hn['level']) {
            $lastMenu->children[] = $menuItem;
            break;
        }
        $lastMenu = $nestMenu;
    }
}

渲染输出

function tree($menu) {
    $html = '<ul>';
    $html .= '<li><a href="' . $menu->target . '">' . $menu->text . '</a>';
    if ($menu->children) {
        foreach ($menu->children as $subMenu) {
            $html .= tree($subMenu);
        }
    }
    $html .= '</li></ul>';
    return $html;
}
echo '<div class="wiki-index"><div class="wiki-index-header">文章目录</div><div class="wiki-index-body">';
foreach ($rootMenu->children as $menu) {
    echo tree($menu);
}
echo '</div></div>';

阿里云地图流量动画效果的实现分析

预览

阿里云的:
preview1.gif

实验品:
preview2.gif

原理

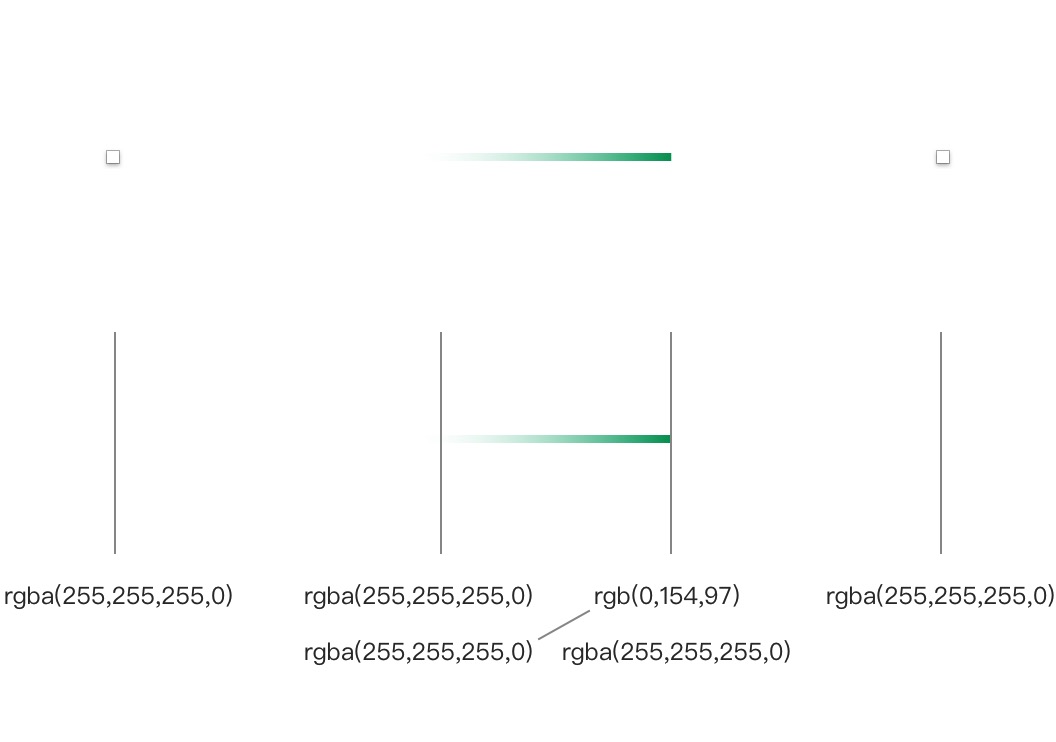
阿里云的流量动画是先画出一条线,然后改变每个关键颜色的offset,实现类似抛投的效果;渐变的结构如下:

7451DFEF-A99C-4777-B035-FB1F501F5093.png

实现

这里只画出一条简单的直线作为例子,如果需要画出曲线,d3的geo相关的函数可以很方便的作出。

C1B9DB0B-3364-404F-BCAE-682BB2FD942D.png

代码如下:

(function () {

    var svg = d3.select("#container")
                .append("svg")
                .attr("width", 500)
                .attr("height", 200);
    var gradient = svg.append("defs")
                      .append("linearGradient")
                        .attr("id", "gradient")
                        .attr("x1", "0%")
                        .attr("x2", "100%");
    var stops = [];
    var stop;
    stop = gradient.append("stop").attr("stop-opacity", 1).attr("offset", "0%")
        .attr("stop-color", "rgba(255, 255, 255, 0)");
    stops.push(stop);

    // start stop
    stop = gradient.append("stop").attr("stop-opacity", 1).attr("offset", "0%")
        .attr("stop-color", "rgba(255, 255, 255, 0)");
    stops.push(stop);

    // start color
    stop = gradient.append("stop").attr("stop-opacity", 1).attr("offset", "0%")
        .attr("stop-color", "rgba(255, 255, 255, 0)");
    stops.push(stop);

    // end color
    stop = gradient.append("stop").attr("stop-opacity", 1).attr("offset", "100%")
        .attr("stop-color", "#009a61");
    stops.push(stop);

    // end stop
    stop = gradient.append("stop").attr("stop-opacity", 1).attr("offset", "100%")
        .attr("stop-color", "rgba(255, 255, 255, 0)");
    stops.push(stop);

    stop = gradient.append("stop").attr("stop-opacity", 1).attr("offset", "100%")
        .attr("stop-color", "rgba(255, 255, 255, 0)");
    stops.push(stop);


    var route = svg.append("line")
                    .attr("x1", 0)
                    .attr("y1", 100)
                    .attr("x2", 500)
                    .attr("y2", 200)
                    .style("stroke", "url(#gradient)")
                    .style("stroke-width", 4)
                    .style("stroke-linecap", "round")
                    .style("fill", "none");

    var myoffset = 0;
    setInterval(function () {
        myoffset += 1;
        stops.slice(1, 3).forEach(function (stop, i) {
            stop.attr("offset", (myoffset - 20) + "%");
        });
        stops.slice(3, 5).forEach(function (stop, i) {
            stop.attr("offset", myoffset + "%");
        });
        if (myoffset >= 100) {
            myoffset = 0;
        }
    }, 100);
})();

typecho代码高亮插件

这是很久之前写的一个typecho代码高亮插件了,由于是自己用的,所以高亮theme之类的都没有弄成可配置的;

自定义修改

需要更改theme的话,可以直接修改 HighLight/Plugin.php 文件里面引用css的代码行

echo '<link rel="stylesheet" href="' . $url . '/styles/solarized_dark.css">' . "\n";

@疯狂的杰作 同学提出是否要分享一下,所以就拿出来了。

安装方法

下载 HighLight.zip,解压

上传到 /path/to/your/typecho/usr/plugins/ 目录下,使用 admin 帐号登录你的 typecho 后台,在插件管理里面启用他就可以啦。

HighLight.zip

正则-编程语言调用代码的生成

演示: 正则表达式测试工具

功能介绍

给定一个正则,生成php的正则调用代码。

一般正则中都会或多或少的包含具体编程语言中的特殊字符,还需要考虑到具体语言中字符串的转义;

下面列出了一些常见的要考虑的情况:

1. 语言是否支持多行字符串?
2. 是否有定界符?
3. 语言的正则引擎是否支持逆序环视?
4. 正则修正符?

具体场景

我们拿PHP做个例子:

写一个特殊字符覆盖比较全的正则,并写出他的PHP匹配代码:

要匹配的内容

<!-- 模拟一个要匹配的字符串, 我们要取出其中的<div/>区块的内容 -->
<article>
  <div class="quote">'引用\/'</div>
</article>

正则

<div class="quote">'(.+?\\/)'</div>

PHP匹配代码

$contents = <<<EOT
<article>
  <div class="quote">'引用\/'</div>
</article>
EOT;

if (preg_match('/<div class="quote">\'(.+?)\\\\\/\'<\/div>/', $contents, $match)) {
    var_dump($match);
}

注意: 上面的正则写到PHP代码中的时候,以下字符进行了转义:

1. ' 单引号
2. / 定界符
3. \ 转义字符,这是个比较特殊的字符

实现思路

要实现一个可用的代码生成,无非就是要把上面提到的特殊字符给转义了;

本想要用正则再对正则的字符串转义,最后发现不太靠谱,越写越复杂;

记起之前看过的redis conf分析相关的代码之后,遂选择逐字判断字符,并对字符转义,效果不错;注意优先级!

public function escape($value)
{
    $chars = str_split($value);
    $len = count($chars);
    $result = '';
    for ($i = 0; $i < $len; $i++) {
        if ($chars[$i] === '\\' && $i < $len - 1) {
            // 转义字符的判断优先级最高,可以避免 \' 正则的重复转义
            $i++; // 跳过后面一个字符
            if ($chars[$i] === '\\') {
                $result .= '\\\\\\\\';
            } else {
                $result .= '\\' . $chars[$i];
            }
        } else if ($chars[$i] === '\'') {
            // 单引号,php字符串边界
            $result .= '\\\'';
        } else if ($chars[$i] === '/') {
            // / php正则定界符
            $result .= '\\/';
        } else {
            $result .= $chars[$i];
        }
    }

    return $result;
}

根据magnet下载torrent

整体流程

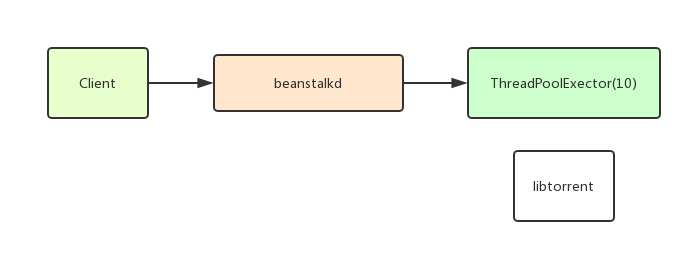
magnet2torrent.png

requirement

# 安装virtualenv
pip install virtualenv
# 创建虚拟环境
virtualenv env
# source
. ./env/bin/activate

安装依赖包
pip install beanstalkc

Client

实现往beanstalkd里面塞hash

import beanstalkc
import sys

if __name__ == '__main__':
    if len(sys.argv) < 2:
        print("usage: %s <hash>" % sys.argv[0])
        sys.exit(1)
    if len(sys.argv[1]) != 40:
        print("hash code is error.")
        sys.exit(1)
    beanstalk = beanstalkc.Connection(host = "localhost", port = 11300)
    beanstalk.put(sys.argv[1])
    print("hash has put")

server

依赖libtorrent下载torrent

wget https://github.com/arvidn/libtorrent/releases/download/libtorrent-1_0_10/libtorrent-rasterbar-1.0.10.tar.gz
tar zxf libtorrent-rasterbar-1.0.10.tar.gz
cd libtorrent-rasterbar-1.0.10
./configure --enable-python-binding PYTHON=`which python` --prefix=$VIRTUAL_ENV LIBS='-liconv'
make -j2 && make install

依赖beanstalkd队列

mkdir /usr/local/beanstalkd/bin
wget https://github.com/kr/beanstalkd/archive/v1.10.tar.gz
tar zxf v1.10.tar.gz
cd beanstalkd-1.10/
make
mv beanstalkd /usr/local/beanstalkd/bin

mkdir /data/beanstalkd/
# /usr/local/beanstalkd/bin/beanstalkd -b /data/beanstalkd/

使用supervisor管理beanstalkd

[program:beanstalkd]
directory = /data/beanstalkd/
command = /usr/local/beanstalkd/bin/beanstalkd -b /data/beanstalkd/

Python2.7 支持 ThreadPoolExecutor 的话还需要 futures 包

pip install futures

上Server端代码

import time
import tempfile
import libtorrent
import os
import os.path as path
import shutil
from concurrent import futures
import beanstalkc

def hash2torrent(torrent_hash, timeout = None):
    torrent_hash = torrent_hash.lower()
    print("start download: %s" % (torrent_hash))
    magnet = "magnet:?xt=urn:btih:" + torrent_hash

    directory = path.join("torrents", torrent_hash[0:2], torrent_hash[-2:])
    output = path.join(directory, torrent_hash + ".torrent")

    if not path.exists(directory):
        os.makedirs(directory)

    if path.exists(output):
        print('Already exists.')
        return output

    tempdir = tempfile.mkdtemp()
    session = libtorrent.session()

    session.add_dht_router('router.bittorrent.com', 6881)
    session.add_dht_router('router.utorrent.com', 6881)
    session.add_dht_router('router.bitcomet.com', 6881)
    session.add_dht_router('dht.transmissionbt.com', 6881)
    session.add_dht_router("dht.aelitis.com", 6881)
    session.start_dht()

    params = {
        'save_path': tempdir,
        # 'storage_mode': libtorrent.storage_mode_t(2),
        # 'paused': False,
        # 'auto_managed': True,
        'duplicated_is_error': True
    }

    handle = libtorrent.add_magnet_uri(session, magnet, params)

    cost = 0
    while not handle.has_metadata():
        if timeout is not None and cost > timeout:
            print("Timeout.")
            # session.pause()
            session.remove_torrent(handle)
            shutil.rmtree(tempdir)
            return None
        time.sleep(1)
        cost = cost + 1
    # session.pause()
    print("Downloaded. %d" % (cost))

    # print 'got metadata, starting torrent download...'
    # while handle.status().state != libtorrent.torrent_status.seeding:
    #     s = handle.status()
    #     state_str = ['queued', 'checking', 'downloading metadata', 'downloading', 'finished', 'seeding', 'allocating']
    #     print '%.2f%% complete (down: %.1f kb/s up: %.1f kB/s peers: %d) %s %.3f' % (s.progress * 100, s.download_rate / 1000, s.upload_rate / 1000, s.num_peers, state_str[s.state], s.total_download/1000000)
    #     time.sleep(3)

    torrent_info = handle.get_torrent_info()
    torrent_file = libtorrent.create_torrent(torrent_info)

    torrent_content = libtorrent.bencode(torrent_file.generate())

    with open(output, "wb") as f:
        f.write(torrent_content)
        f.close()

    session.remove_torrent(handle)
    shutil.rmtree(tempdir)
    return output

if __name__ == '__main__':
    beanstalk = beanstalkc.Connection(host='localhost', port=11300)
    timeout = None
    with futures.ProcessPoolExecutor(10) as executor:
        while True:
            job = beanstalk.reserve()
            torrent_hash = job.body
            job.delete()
            executor.submit(hash2torrent, torrent_hash, timeout)

实测,平均每个种子的下载时间需要 15 分钟左右。

分库分表的策略

1. 主键+业务虚拟键分表

这种方式适合查询比较单一的业务,最大的缺点就是业务对分库分表这层是有感知:

  1. 查询返回的时候需要在接口层拼接业务的真实Id
  2. 根据真实业务Id查询,或者更新数据的时候,需要拆分真实业务Id,路由到数据所在表,再根据数据库Id查询

虚拟场景

假设我们分了1024张表,具体表结构如下:

QQ20160904-0@2x.png

插入流程

1. 插入数据,必须带有userId
2. 根据userId计算出xId
xId = userId % 10000;
3. 根据xId定位数据所在表
tNum = xId % 1024; // 最简单的取模hash(具体策略由中间件决定)
4. 插入数据,返回realId
realId = id + xId;

单条查询流程

1. 根据realId查询, 获取单张表中的Id值
id = realId / 10000; // 整除
2. 获取虚拟键xId
xId = realId % 10000;
3. 根据xId定位数据所在表
tNum = xId % 1024; // 最简单的取模hash(具体策略由中间件决定)
4. 根据表和Id获取单条数据

批量查询流程

基本和单条查询一致,可优化的点:

第3步,根据xId进行分组,将查询同一张表的query放在一次sql的查询语句中

2. 主键/业务外键分表

这种策略对业务代码可以无侵略性, 为避免Id冲突, 使用外部Id生成器, 以下步骤全在中间件中执行:
(根据业务外键的处理同理,查询比较复杂的情况一般都是使用冗余表)

虚拟场景

假设我们分了1024张表,具体表结构如下:

QQ20160904-1@2x.png

插入流程

1. 从Id生成器获取Id
2. 根据Id进行hash (简单的可以使用取模), 获取数据应该插入的表名
tNum = id % 1024;
3. 插入数据表

单条查询流程

1. 根据Id进行hash (简单的可以使用取模), 获取数据所在表名
tNum = id % 1024;
2. 查询数据

批量查询流程

基本和单条查询一致,可优化的点:

第1步,根据Id进行hash后进行分组,将查询同一张表的query放在一次sql的查询语句中

数据的聚合

在批量查询的时候,需要 order by group by distinct 的时候,需要在查询出各分表数据之后,在中间件组件中自行实现对数据的处理

页面静态化

页面内容的拆分

Artboard 1.png

  1. 静态内容
  2. 非状态相关的动态内容
  3. 状态相关的动态内容

HInclude CSI

用于pc或者h5页面

<hx:include src="/_fragment?path="></hx:include>

Varnish ESI

多用于app api的接口返回

vcl 4.0;

import directors;

backend server1 {
    .host = "10.162.110.168";
    .port = "80";
}

acl local {
    "localhost";
}

sub vcl_init {
    new director = directors.round_robin();
    director.add_backend(server1);
}

sub vcl_recv {
    set req.backend_hint = director.backend();

    if (req.method == "PURGE") {
        if (client.ip ~ local) {
            return (purge);
        } else {
            return (synth(405));
        }
    }

    if (req.http.Accept == "text/event-stream") {
        return (pipe);
    }

    if (req.http.upgrade ~ "(?i)websocket") {
        return (pipe);
    }

    if (req.method != "GET" && req.method != "HEAD") {
        return (pass);
    }

    set req.http.Surrogate-Capability = "abc=ESI/1.0";
    if (req.http.X-Forward-For) {
        set req.http.X-Forward-For = req.http.X-Forward-For + "," + client.ip;
    } else {
        set req.http.X-Forward-For = client.ip;
    }
    return (hash);
}

sub vcl_backend_response {
    if (beresp.http.Surrogate-Control ~ "ESI/1.0") {
        unset beresp.http.Surrogate-Control;
        set beresp.do_esi = true;
    }

    if (bereq.uncacheable) {
        return (deliver);
    }

    set beresp.grace = 30s;

    # 302 5xx no cache
    if (beresp.status == 302 || beresp.status >= 500) {
        set beresp.uncacheable = true;
        set beresp.ttl = 120s;
        return (deliver);
    }

    if (beresp.status == 301 || (beresp.status >= 400 && beresp.status < 500)) {
        set beresp.ttl = 120s;
    } else {
        set beresp.ttl = 2400s;
    }

    unset beresp.http.Set-Cookie;
    return (deliver);
}

sub vcl_pipe {
    if (req.http.upgrade) {
        set bereq.http.upgrade = req.http.upgrade;
    }
    return (pipe);
}

sub vcl_deliver {
    set resp.http.X-Age = resp.http.Age;
    unset resp.http.Age;
    unset resp.http.Via;
    unset resp.http.X-Powered-By;
    unset resp.http.X-Varnish;

    if (obj.hits > 0) {
        set resp.http.X-Cache="HIT from " + server.hostname;
    } else {
        set resp.http.X-Cache="MISS";
    }

    return (deliver);
}

workflow

  1. varnish 接收到请求后,增加 Surrogate-Capability:abc=ESI/1.0 头,打到后端
  2. 后端判断Surrogate-Capability决定是否要使用esi标签来返回 (即判断这个请求是不是从varnish过来的)
  3. 返回内容时判断是否含有 <esi:include,增加 Surrogate-Control:content="ESI/1.0"
  4. varnish 判断 Surrogate-Control 头,决定是否要启用 esi 替换

后端应用中的处理

  1. 生成路由url /_fragment?path=

    • <hx:include src="/_fragment?path="></hx:include>
    • <esi:include src="/_fragment?path="></esi:include>
  2. 注册处理 /_fragment 路由

wrk中的lua脚本

wrk是一款现代化的http压测工具,提供lua脚本的功能可以满足每个请求或部分请求的差异化。

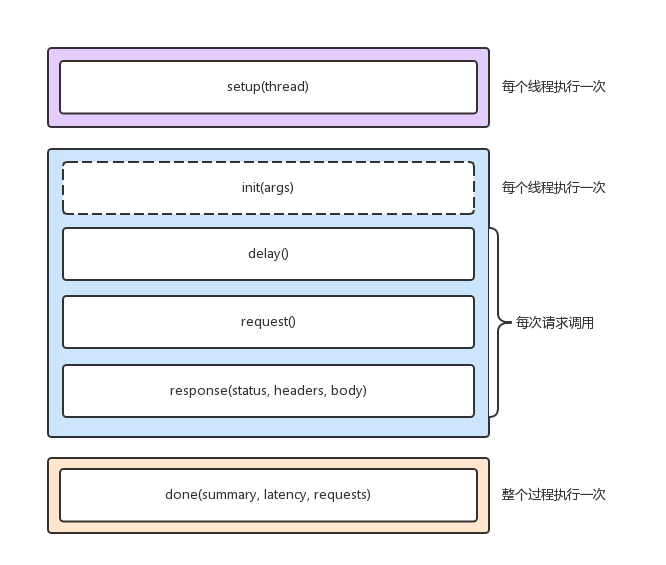
wrk中执行http请求的时候,调用lua分为3个阶段,setup,running,done,每个wrk线程中都有独立的脚本环境。

wrk.png

wrk的全局属性

wrk = {
  scheme  = "http",
  host    = "localhost",
  port    = nil,
  method  = "GET",
  path    = "/",
  headers = {},
  body    = nil,
  thread  = <userdata>,
}

wrk的全局方法

-- 生成整个request的string,例如:返回
-- GET / HTTP/1.1
-- Host: tool.lu
function wrk.format(method, path, headers, body)

-- 获取域名的IP和端口,返回table,例如:返回 `{127.0.0.1:80}`
function wrk.lookup(host, service)

-- 判断addr是否能连接,例如:`127.0.0.1:80`,返回 true 或 false
function wrk.connect(addr)

Setup阶段

setup是在线程创建之后,启动之前。

function setup(thread)

-- thread提供了1个属性,3个方法
-- thread.addr 设置请求需要打到的ip
-- thread:get(name) 获取线程全局变量
-- thread:set(name, value) 设置线程全局变量
-- thread:stop() 终止线程

Running阶段

function init(args)
-- 每个线程仅调用1次,args 用于获取命令行中传入的参数, 例如 --env=pre

function delay()
-- 每个线程调用多次,发送下一个请求之前的延迟, 单位为ms

function request()
-- 每个线程调用多次,返回http请求

function response(status, headers, body)
-- 每个线程调用多次,返回http响应

Done阶段

可以用于自定义结果报表,整个过程中只执行一次

function done(summary, latency, requests)


latency.min              -- minimum value seen
latency.max              -- maximum value seen
latency.mean             -- average value seen
latency.stdev            -- standard deviation
latency:percentile(99.0) -- 99th percentile value
latency(i)               -- raw value and count

summary = {
  duration = N,  -- run duration in microseconds
  requests = N,  -- total completed requests
  bytes    = N,  -- total bytes received
  errors   = {
    connect = N, -- total socket connection errors
    read    = N, -- total socket read errors
    write   = N, -- total socket write errors
    status  = N, -- total HTTP status codes > 399
    timeout = N  -- total request timeouts
  }
}

例子

表单的提交

wrk.method = "POST"
wrk.body = "" -- 直接写死,如果不需要请求数据的差异化
wrk.headers["Content-Type"] = "application/x-www-form-urlencoded"

-- 如果要实现每次都不一样的表单内容
local queries = {
    "language=php",
    "language=java",
    "language=lua"
}
local i = 0
request = function()
    local body = wrk.format(nil, nil, nil, queries[i % #queries + 1])
    i = i + 1
    return body
end

占位图片的优化

背景

在前端开发切图的时候,很多时候示例图片都是不需要的,只需要一个尺寸的图片,还方便后端清晰的知道要输出的图片尺寸。

对于访问时候的优化,有2个方案:

  1. 使用cdn回源 (对于对外开放的服务,自然会在cdn上留下大量一次性的图片)
  2. 在服务器的内存中生成图片返回 (由于只是提供开发者使用,只要对http缓存做好优化,压力不会很大)

大家都知道对于静态图片,nginx对于缓存这些东西都给我们做好了,只需要1~2行的配置就可以搞定;但是注意了,我们这里是在程序中动态生成图片,所以我们需要关心http中浏览器的缓存头

Etag

Expires:
Cache-Control: max-age=3600
Last-Modified:
If-Modified-Since:
ETag:
If-None-Match:

Cache-Control

http-cache-decision-tree.png

这里我采用的是对 text, fg, bg, width, height 进行md5处理,因为这几个值就可以确定唯一的图片

$md5 = md5(json_encode(compact('width', 'height', 'text', 'bg', 'fg')));
$etags = Input::getEtags();
if (isset($etags[0])) {
    $etag = str_replace('"', '', $etags[0]);
    if ($etag === $md5) {
        App::abort(304, '', ['Content-Type' => 'image/png', 'Cache-Control' => 'public, max-age=31536000', 'ETag' => $md5]);
    }
}

YUV 图片文字颜色的获取 (颜色明亮度)

更多的使用的时候,往往我们只需要指定背景色,不关心文字的颜色(能看清就行);于是在不同的背景色下面,我们都需要让文字颜色和背景色保持一定的对比度,好了直接看代码吧

$greyLevel = $r * .229 + $g * .587 + $b * .114;
if ($greyLevel >= 189) { // 192
    $fg = '#666666';
} else {
    $fg = '#ECF0F1';
}

字体选择的优化

全英文的情况下 Georgia 的展现效果比较不错,但是包含中文之后效果就大打折扣,所以这里有个小兼容

$fontFamily = 'Georgia.ttf';
// 如果包含中文
if (preg_match('/[\x{4e00}-\x{9fa5}]/u', $text)) $fontFamily = 'yahei_mono.ttf';

安全控制

由于图片的生成会消耗一定的内存,而且图片尺寸越大,耗的内存越多,所以这里对生成图片的尺寸做了1个限制,就是高宽都必须小于等于 2048,否则返回 404

搭建私有播放服务

背景

由于很多时候,视频资源下载很慢,需要用自己的电脑挂机;又或是国外的资源被墙,无法观看;所以需要一个可以挂机下载的服务器。

离线下载这步做到之后,又由于download到自己电脑上还需要一段时间,而且有些资源可能是不需要的, 所以又有了在线观看的需求。

使用到的软件/框架

  1. Scrapy
  2. MySQL
  3. Aria2
  4. Ffmpeg
  5. Nginx
  6. Laravel
  7. Videojs

流程图

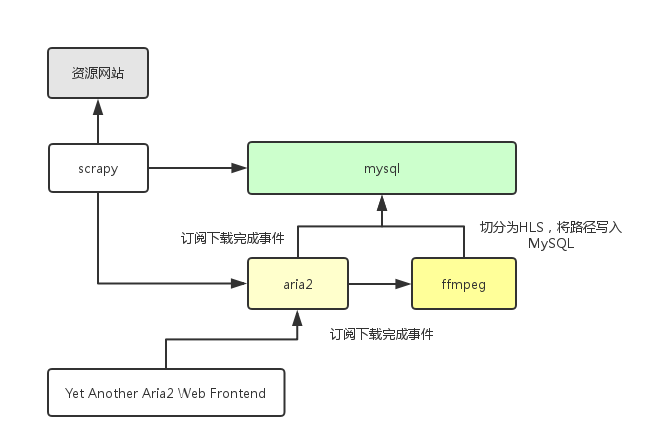
下载流程

downloader.png

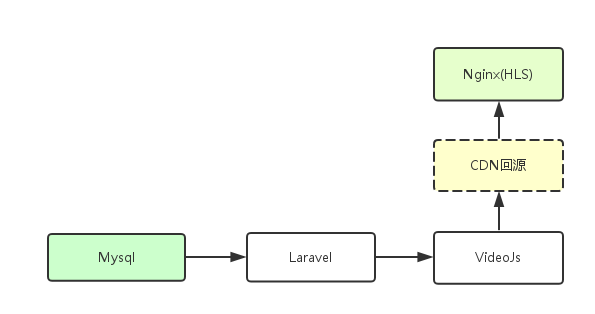
展示流程

player.png

痛点

其实正常的开发流程一般遵照网上的教程或者官方文档就可以很容易的解决;这边讲讲一些需要费一些精力才能解决的问题

被js加密过的下载地址

一般都是使用eval来执行加密过的字符串,只要先将eval里面的参数给解密出来,然后使用正则匹配解密之后的字符串里面的下载地址就可以了

p = re.compile(ur'eval\((.*)')
m = p.search(response.body)
if not m:
    print('---- not match ----')
    return
jsctx = PyV8.JSContext(PyV8.JSClass())
jsctx.enter()
jsctx.eval(r"var a = new String(" + m.group(1))
print(jsctx.locals.a)
content = jsctx.locals.a

p1 = re.compile('(http://[^"]+)')
m1 = p1.search(content)

if not m1:
    print('---- cannot find url in js content ----')
    return

videoUrl = m1.group(1)

python和aria2的交互

# encoding: utf-8
import xmlrpclib

class Pipeline(object):
    def __init__(self):
        self.s = xmlrpclib.ServerProxy('http://localhost:6800/rpc')

    def init_hook(self):
        self.s.aria2.onDownloadStart(self.onDownloadStart)
        self.s.aria2.onDownloadError(self.onDownloadError)
        self.s.aria2.onDownloadComplete(self.onDownloadComplete)

    def onDownloadStart(self, event):
        pass

    def onDownloadError(self, event):
        pass

    def onDownloadComplete(self, event):
        pass

    def process_item(self, item, spider):
        # ...
        gid = self.s.aria2.addUri([item['video_url']], {"out": path})
        # ...

ffmpeg将mp4拆分为HLS

命令如下,注意替换<>之间的内容

ffmpeg -i <ccc.mp4> -vf scale=-2:360 -profile:v baseline -level 3.0 -start_number 0 -hls_time 10 -hls_list_size 0 -f hls <ccc.m3u8>

ffmpeg截取部分视频为gif

注意替换命令中的两个变量

ffmpeg -ss 00:00:10 -t 5 -i "$filename" -vf scale=360:-1 -b 2048k "$dirname".gif

videojs播放HLS

默认情况之下videojs是不支持播放HLS的,需要引入 videojs-contrib-hls.min.js

videojs.options.flash.swf = "/js/video-js/video-js.swf";
videojs('main_video').ready(function() {
  this.hotkeys({
    volumeStep: 0.1,
    seekStep: 5,
    enableMute: true,
    enableFullscreen: true,
    enableNumbers: true
  });
});