分类 Java 下的文章

Java RPC协议设计

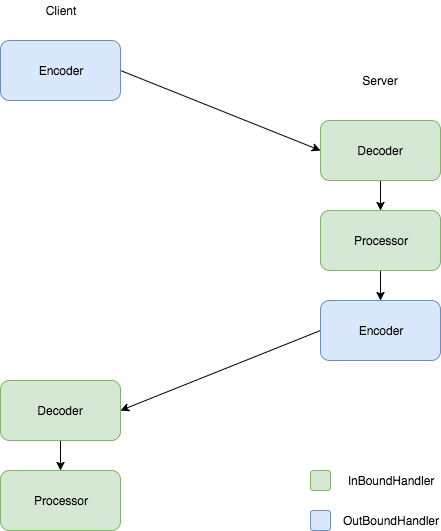
调用流程

rpc-protocol.png

motan的协议设计

包括 request 级别的 header 和 body,request 的 body 中又包含了 header 和 body; 其中 requestId, request/response 的标记是冗余的
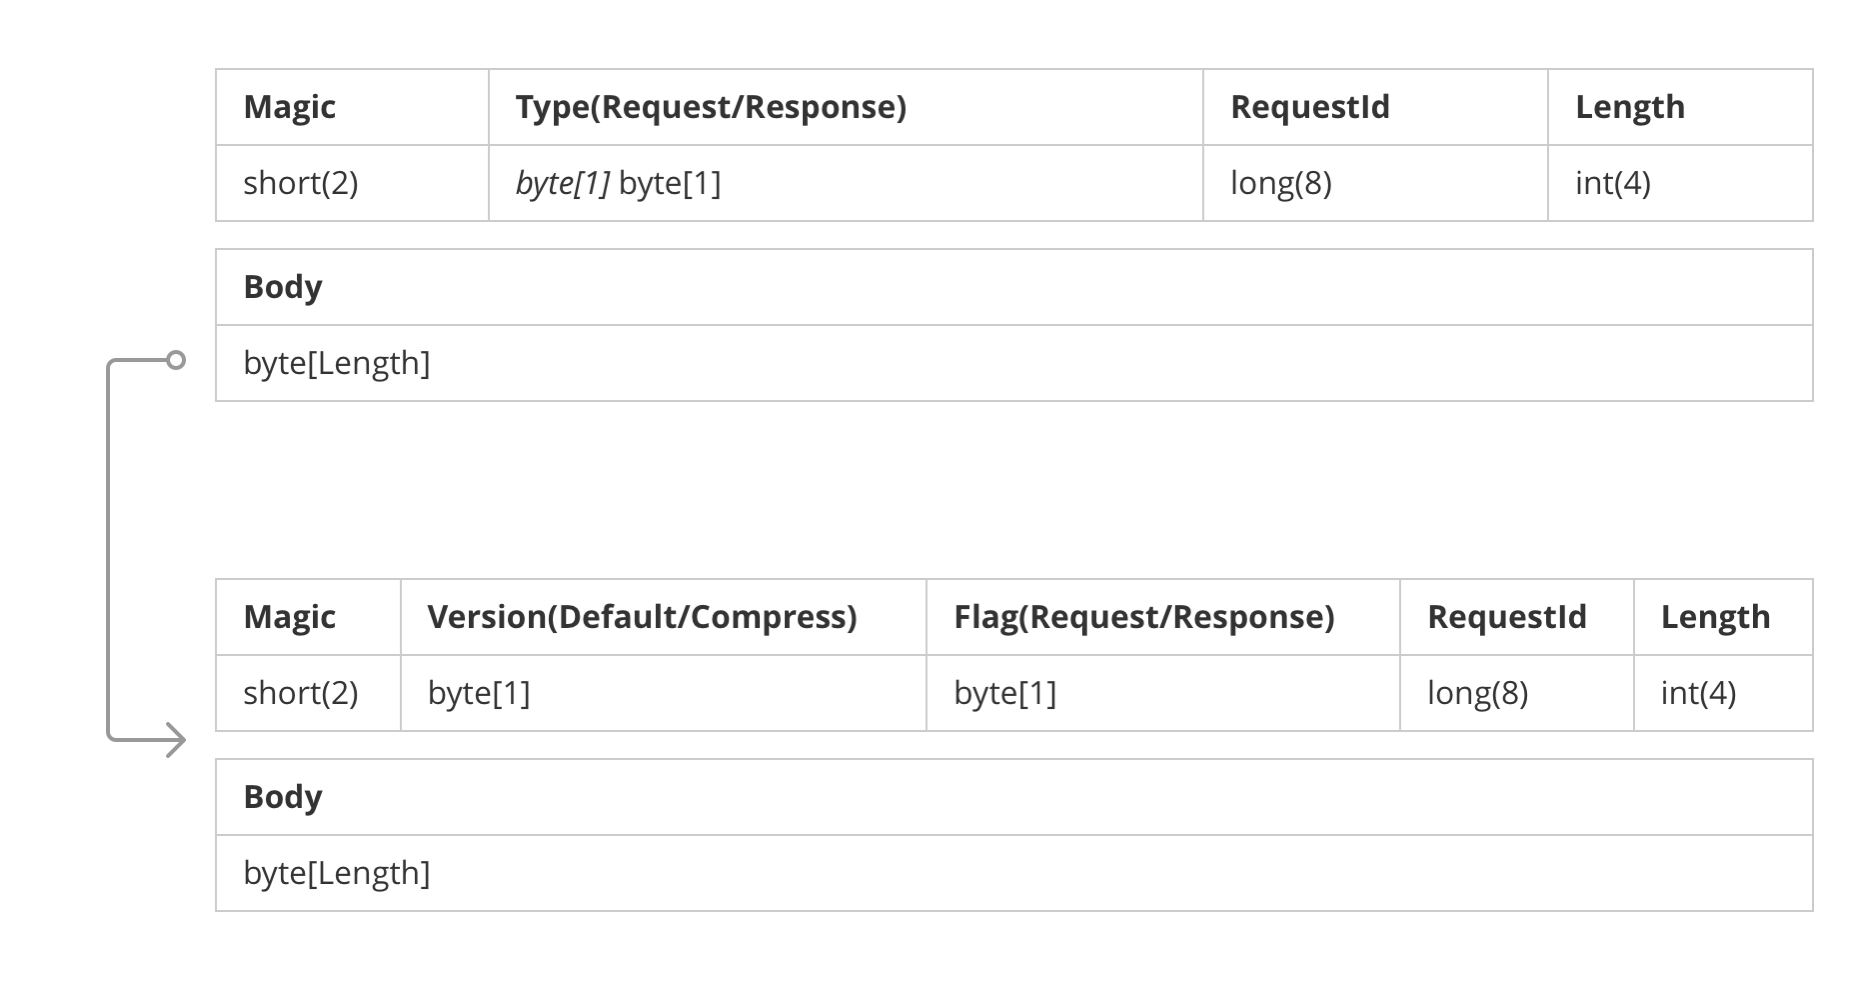
motan-protocol.png

dubbo的协议设计

2017-05-02_15-04-12.png

Server参数的优化

bootstrap.option(ChannelOption.SO_BACKLOG, 128); // 3次握手连接队列
bootstrap.childOption(ChannelOption.SO_KEEPALIVE, true); // 默认false
bootstrap.childOption(ChannelOption.TCP_NODELAY, true);

Decoder

1387967596_4585.png

public class MessageDecoder extends ByteToMessageDecoder {

    @Override
    protected void decode(ChannelHandlerContext channelHandlerContext, ByteBuf byteBuf, List<Object> list) throws Exception {
        if (byteBuf.readableBytes() <= MessageConstant.HEADER_LEN) {
            return;
        }
        byteBuf.markReaderIndex();

        short type = byteBuf.readShort();
        if (type != MessageConstant.MAGIC_TYPE) {
            byteBuf.resetReaderIndex();
            throw new Exception("error magic type");
        }
        byte messageType = (byte) byteBuf.readShort();
        long requestId = byteBuf.readLong();
        int dataLength = byteBuf.readInt();
        if (byteBuf.readableBytes() < dataLength) {
            byteBuf.resetReaderIndex();
            return;
        }

        byte[] data = new byte[dataLength];
        byteBuf.readBytes(data, 0, dataLength);
        // debug
        String r = new String(data, StandardCharsets.UTF_8);
        System.out.println(r);
        list.add(new Message(r));
    }

}

参考

Netty4学习笔记(4)-- ByteBuf和设计模式

fastjson对范型的封装

为什么要有范型的封装

比如现在需要直接返回http接口或者缓存中的值反序列化之后的对象;如果只是在具体业务代码中反序列化这个字符串的话,那很简单;但是,如果想把这个反序列化的逻辑封装到common包的一个方法中呢?貌似业务代码copy过来是做不到类型可自定义的;

类型封装是什么意思,看下fastjson的文档中的例子,应该就明白了

public static <K, V> Map<K, V> parseToMap(String json, 
                                            Class<K> keyType, 
                                            Class<V> valueType) {
     return JSON.parseObject(json, 
                            new TypeReference<Map<K, V>>(keyType, valueType) {
                            });
}

// 可以这样使用
String json = "{1:{name:\"ddd\"},2:{name:\"zzz\"}}";
Map<Integer, Model> map = parseToMap(json, Integer.class, Model.class);

怎么实现

首先来张图理解一下,ParameterizedType TypeVariable 分别是什么

type.png

看一下fastjson的实现 (省略不需要的代码)

int actualIndex = 0;
for (int i = 0; i < argTypes.length; ++i) {
    if (argTypes[i] instanceof TypeVariable) {
        argTypes[i] = actualTypeArguments[actualIndex++];
        if (actualIndex >= actualTypeArguments.length) {
            break;
        }
    }
}

使用入参中的实际class TypeT模板进行替换,然后通过ParameterizedType来返回

引用

  1. fastjson/wiki

Java RPC增加spring定义支持

<bean id="demoService" class="lu.tool.provider.DemoServiceImpl" />
<rpc:service interface="lu.tool.provider.DemoService" ref="demoService" />
 ^                 ^                                   ^
 |- xsd:element    |- xsd:attribute                    |- xsd:attribute

XML Schema Definition

由motan.xsd简化而来rpc.xsd

<?xml version="1.0" encoding="UTF-8"?>
<xsd:schema xmlns="http://tool.lu/schema/rpc"
            xmlns:xsd="http://www.w3.org/2001/XMLSchema"
            xmlns:tool="http://www.springframework.org/schema/tool"
            xmlns:beans="http://www.springframework.org/schema/beans"
            targetNamespace="http://tool.lu/schema/rpc">
    <xsd:import namespace="http://www.w3.org/XML/1998/namespace"/>
    <xsd:import namespace="http://www.springframework.org/schema/tool"/>
    <xsd:import namespace="http://www.springframework.org/schema/beans"/>

    <xsd:complexType name="abstractConfig">
        <xsd:choice minOccurs="0" maxOccurs="unbounded">
            <xsd:element ref="beans:property" minOccurs="0" maxOccurs="unbounded"/>
        </xsd:choice>
        <xsd:anyAttribute namespace="##other" processContents="lax"/>
    </xsd:complexType>

    <xsd:element name="service">
        <xsd:complexType>
            <xsd:complexContent>
                <xsd:extension base="abstractConfig">
                    <xsd:attribute name="interface" type="xsd:token">
                        <xsd:annotation>
                            <xsd:documentation>
                                <![CDATA[ interface. ]]>
                            </xsd:documentation>
                            <xsd:appinfo>
                                <tool:annotation>
                                    <tool:expected-type type="java.lang.Class"/>
                                </tool:annotation>
                            </xsd:appinfo>
                        </xsd:annotation>
                    </xsd:attribute>
                    <xsd:attribute name="ref" type="xsd:string" use="optional">
                        <xsd:annotation>
                            <xsd:documentation>
                                <![CDATA[ bean id ]]>
                            </xsd:documentation>
                        </xsd:annotation>
                    </xsd:attribute>
                </xsd:extension>
            </xsd:complexContent>
        </xsd:complexType>
    </xsd:element>
</xsd:schema>

NamespaceHandler

public class RpcNamespaceHandler extends NamespaceHandlerSupport {

    @Override
    public void init() {
        registerBeanDefinitionParser("service", new RpcBeanDefinitionParser(ServiceConfigBean.class));
    }
}

BeanDefinitionParser

未完待续...

public class RpcBeanDefinitionParser implements BeanDefinitionParser {

    private final Class<?> beanClass;

    public RpcBeanDefinitionParser(Class<?> beanClass) {
        this.beanClass = beanClass;
    }

    @Override
    public BeanDefinition parse(Element element, ParserContext parserContext) {
        // 具体逻辑
    }
}

Java RPC中的权重轮询

定义接口

public interface RoundRobin<T> {

    T nextData();

}

实现

算法来自nginx

public class WeightedRoundRobin<T> implements RoundRobin<T> {

    private List<Item<T>> items = new ArrayList<>();

    public WeightedRoundRobin(Map<T, Integer> datas) {
        List<Item<T>> initItems = datas.entrySet()
                .stream()
                .map(e -> new Item<>(e.getKey(), e.getValue()))
                .collect(Collectors.toList());
        items.addAll(initItems);
    }

    public T nextData() {
        Item<T> bestItem = null;
        int total = 0;
        for (Item<T> currentItem : items) {
            currentItem.currentWeight += currentItem.effectiveWeight;
            total += currentItem.effectiveWeight;
            if (currentItem.effectiveWeight < currentItem.weight) {
                currentItem.effectiveWeight++;
            }
            if (bestItem == null || currentItem.currentWeight > bestItem.currentWeight) {
                bestItem = currentItem;
            }
        }
        if (bestItem == null) {
            return null;
        }
        bestItem.currentWeight -= total;
        return bestItem.getData();
    }

    public List<Item<T>> getItems() {
        return items;
    }

    public void setItems(List<Item<T>> items) {
        this.items = items;
    }

    public static final class Item<T> {

        private T data;
        private int weight;
        private int effectiveWeight;
        private int currentWeight;

        public Item(T data, int weight) {
            this.data = data;
            this.weight = weight;
        }

        public T getData() {
            return data;
        }

        public void setData(T data) {
            this.data = data;
        }

        public int getWeight() {
            return weight;
        }

        public void setWeight(int weight) {
            this.weight = weight;
        }

        public int getEffectiveWeight() {
            return effectiveWeight;
        }

        public void setEffectiveWeight(int effectiveWeight) {
            this.effectiveWeight = effectiveWeight;
        }

        public int getCurrentWeight() {
            return currentWeight;
        }

        public void setCurrentWeight(int currentWeight) {
            this.currentWeight = currentWeight;
        }

        @Override
        public String toString() {
            return "Item{" +
                    "data=" + data +
                    ", weight=" + weight +
                    ", effectiveWeight=" + effectiveWeight +
                    ", currentWeight=" + currentWeight +
                    '}';
        }
    }

}

使用

        Map<Integer, Integer> testDatas = new HashMap<Integer, Integer>() {{
            put(1, 3); // 权重3
            put(2, 5); // 权重5
            put(3, 8); // 权重8
        }};
        WeightedRoundRobin<Integer> roundRobin = new WeightedRoundRobin<>(testDatas);

        for (int i = 0; i < 20; i++) {
            LOGGER.info("id: {}", roundRobin.nextData());
        }

Java RPC中的反射 (Server)

每次根据方法名来反射获取Method的成本太大,所以在bean初始化的时候,就将该服务下interface的方法都放到HashMap里面

用来测试的interface

public interface TestApi {

    List<Integer> listIds();
    long convertId(long id);

}

扫描interface的方法

    private <T> Map<String, Method> initMethodMap(Class<T> clz) {
        Map<String, Method> methodMap = new HashMap<>();
        Method[] methods = clz.getMethods();

        for (Method method : methods) {
            String methodDesc = ReflectUtil.getMethodDesc(method);
            methodMap.put(methodDesc, method);
        }
        return methodMap;
    }

参数desc获取

class ReflectUtil {

    private static final String PARAM_SPLIT = ",";
    private static final String EMPTY_PARAM = "void";

    public static String getMethodParamDesc(Method method) {
        if (method.getParameterTypes() == null || method.getParameterTypes().length == 0) {
            return EMPTY_PARAM;
        }

        StringBuilder builder = new StringBuilder();

        Class<?>[] clzs = method.getParameterTypes();

        for (Class<?> clz : clzs) {
            String className = getName(clz);
            builder.append(className).append(PARAM_SPLIT);
        }

        return builder.substring(0, builder.length() - 1);
    }

    private static String getName(Class<?> clz) {
        if (!clz.isArray()) {
            return clz.getName();
        }

        StringBuilder sb = new StringBuilder();
        sb.append(clz.getName());
        while (clz.isArray()) {
            sb.append("[]");
            clz = clz.getComponentType();
        }

        return sb.toString();
    }

}

注:代码摘自 weibo 的 rpc 框架 motan; 并有部分修改

Java RPC中的代理 (Client)

调用图

rpc.png

Client实现

远程接口定义

public interface XxxApi {
    boolean remoteMethod();
}

Proxy工厂

public final class ProxyFactory {

    @SuppressWarnings("unchecked")
    public <T> T getProxy(Class<T> clz, InvocationHandler invocationHandler) {
        return (T) Proxy.newProxyInstance(this.getClass().getClassLoader(), new Class[] {clz}, invocationHandler);
    }

}

函数返回值基本类型的默认值

public final class PrimitiveDefault {
    private static boolean defaultBoolean;
    private static char defaultChar;
    private static byte defaultByte;
    private static short defaultShort;
    private static int defaultInt;
    private static long defaultLong;
    private static float defaultFloat;
    private static double defaultDouble;
    private static Map<Class<?>, Object> primitiveValues = new HashMap<Class<?>, Object>();

    static {
        primitiveValues.put(boolean.class, defaultBoolean);
        primitiveValues.put(char.class, defaultChar);
        primitiveValues.put(byte.class, defaultByte);
        primitiveValues.put(short.class, defaultShort);
        primitiveValues.put(int.class, defaultInt);
        primitiveValues.put(long.class, defaultLong);
        primitiveValues.put(float.class, defaultFloat);
        primitiveValues.put(double.class, defaultDouble);
    }

    public static Object getDefaultReturnValue(Class<?> returnType) {
        return primitiveValues.get(returnType);
    }
}

Client调用

public final class Runner {

    private static final Logger logger = LoggerFactory.getLogger(Runner.class);

    public static void main(String[] ignore) {
        ProxyFactory proxyFactory = new ProxyFactory();

        XxxApi xxxApi = proxyFactory.getProxy(XxxApi.class, (proxy, method, args) -> {
            // 判断method是否定义过 todo
            logger.info("{} {}", method, args);
            // 产生1个默认值
            Class<?> returnType = method.getReturnType();
            if (returnType != null && returnType.isPrimitive()) {
                return PrimitiveDefault.getDefaultReturnValue(returnType);
            }
            return null;
        });

        xxxApi.remoteMethod();
    }

}

消费生产模式扫表

背景

有一批数据需要导入到ElasticSearch中,但是写ElasticSearch的速度比较慢,需要采用多线程的方式,但是在每个线程中都扫表,会产生重复的数据段,所以采用生产消费的模型来解决该问题 (为什么不直接选择线程池?线程池提交是异步的,一般table中的数据量都比较大,很容易塞爆内存)

流程图

produce-consume.png

  1. 由生产者进行扫表,每次取出一批的数据(如:500条)
  2. 将500条数据放入java的Queue中
  3. 多个生产者来消费这个Queue
  4. 当生产者结束扫表,或者外部中断扫表的时候,中断消费者

中断消费者的方式,往Queue中扔入一个毒药对象,当消费者获取到毒药对象时,停止消费,并将毒药对象塞回Queue,用于停止其他消费者

功能点

  1. 开始扫表
  2. 暂停扫表
  3. 结束扫表
  4. 数据扫表状态
  5. 恢复扫表(支持指定offset)

实现

Producer

public class Producer implements Runnable {

    private final SynchronousQueue<List<Long>> queue;

    private volatile boolean running = true;

    public Producer(SynchronousQueue<List<Long>> queue) {
        this.queue = queue;
    }

    @Override
    public void run() {
        long lastId = 0L;
        int batchSize = 500;
        while (running) {
            // select * from my_table where id > ${lastId} order by id asc limit ${batchSize};
            List<Long> ids = new ArrayList<>(); // 自行实现上面的查询
            if (CollectionUtils.isEmpty(ids)) {
                putQueueQuite(Context.poison);
                break;
            }
            putQueueQuite(ids);
            lastId = Collections.max(ids);
            if (ids.size() < batchSize) {
                putQueueQuite(Context.poison);
                break;
            }
        }
        // throw poison
    }

    private void putQueueQuite(List<Long> pill) {
        try {
            queue.put(pill);
        } catch (InterruptedException e) {
            // ignore
        }
    }

}

Consumer

public class Consumer implements Runnable {

    private final SynchronousQueue<List<Long>> queue;

    public Consumer(SynchronousQueue<List<Long>> queue) {
        this.queue = queue;
    }

    @Override
    public void run() {
        while (true) {
            try {
                List<Long> ids = queue.take();
                if (ids == Context.poison) {
                    queue.put(Context.poison);
                    break;
                }
                // do something
            } catch (InterruptedException e) {
                // ignore
            }
        }
    }
}

Context

public class Context {

    public static final List<Long> poison = new ArrayList<>();

}

Runner

public class Runner {
    public static void main(String[] args) {
        int maxThreads = 10;
        int consumerThreads = 3;
        ExecutorService executorService = Executors.newFixedThreadPool(maxThreads);
        SynchronousQueue<List<Long>> queue = new SynchronousQueue<>();
        executorService.submit(new Producer(queue));
        for (int i = 0; i < consumerThreads; i++) {
            executorService.submit(new Consumer(queue));
        }
    }
}

功能点的控制,自己实现就好了

Guava的Strings.repeat

如果要自己实现一个repeat的话,最容易想到的可能会这样(示例不考虑int溢出的情况):

public static String repeat(String string, int count) {
    int length = string.length() * count;
    StringBuilder sb = new StringBuilder(length);
    for (int i = 0; i < count; i++) {
        sb.append(string);
    }
    return sb.toString();
}

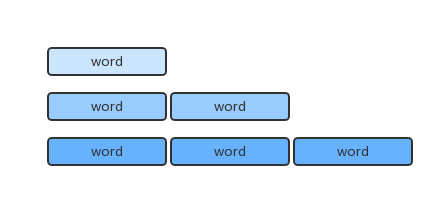
用图画出来应该是这个样子的:

guava-strings-repeat (1).png

看到guava的实现,在位运算的时候还是小愣了一下,性能是比上面的实现好多了:

public static String repeat(String string, int count) {
  // 先去掉检测相关的判断,只看核心的实现
  final int len = string.length();
  final long longSize = (long) len * (long) count;
  final int size = (int) longSize;

  final char[] array = new char[size];
  string.getChars(0, len, array, 0);
  int n;
  for (n = len; n < size - n; n <<= 1) {
    System.arraycopy(array, 0, array, n, n);
  }
  System.arraycopy(array, 0, array, n, size - n);
  return new String(array);
}

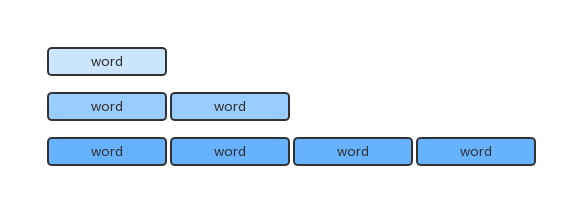
用图画出来是这个样子的:

guava-strings-repeat.png

重点是这段代码:

  for (n = len; n < size - n; n <<= 1) {
    System.arraycopy(array, 0, array, n, n);
  }
  System.arraycopy(array, 0, array, n, size - n);

看下php的内核实现,其实原理一样,就是把现有的字串翻倍,当 [达到一半的长度, count为偶数] 或者 [刚超过一半的长度时, count为奇数] 做最后一次连接,只是写法不太一样:

// sed -n '5012,5058p' /usr/local/src/php-7.0.9/ext/standard/string.c
PHP_FUNCTION(str_repeat)
{
    zend_string        *input_str;        /* Input string */
    zend_long         mult;            /* Multiplier */
    zend_string    *result;        /* Resulting string */
    size_t        result_len;        /* Length of the resulting string */

    if (zend_parse_parameters(ZEND_NUM_ARGS(), "Sl", &input_str, &mult) == FAILURE) {
        return;
    }

    if (mult < 0) {
        php_error_docref(NULL, E_WARNING, "Second argument has to be greater than or equal to 0");
        return;
    }

    /* Don't waste our time if it's empty */
    /* ... or if the multiplier is zero */
    if (ZSTR_LEN(input_str) == 0 || mult == 0)
        RETURN_EMPTY_STRING();

    /* Initialize the result string */
    result = zend_string_safe_alloc(ZSTR_LEN(input_str), mult, 0, 0);
    result_len = ZSTR_LEN(input_str) * mult;

    /* Heavy optimization for situations where input string is 1 byte long */
    if (ZSTR_LEN(input_str) == 1) {
        memset(ZSTR_VAL(result), *ZSTR_VAL(input_str), mult);
    } else {
        char *s, *e, *ee;
        ptrdiff_t l=0;
        memcpy(ZSTR_VAL(result), ZSTR_VAL(input_str), ZSTR_LEN(input_str));
        s = ZSTR_VAL(result);
        e = ZSTR_VAL(result) + ZSTR_LEN(input_str);
        ee = ZSTR_VAL(result) + result_len;

        while (e<ee) {
            l = (e-s) < (ee-e) ? (e-s) : (ee-e);
            memmove(e, s, l);
            e += l;
        }
    }

    ZSTR_VAL(result)[result_len] = '\0';

    RETURN_NEW_STR(result);
}

https://github.com/jonschlinkert/repeat-string/blob/master/index.js

媒体中心设计分享

更详细的内容可以查看文章结尾的PDF

媒体文件处理

magic bytes 校验
扩展名校验
文件名校验
mime校验
速率限制

图片的处理

  1. (水印颜色的优化) 颜色深浅的判断
  2. 图片中心的判断
  3. 颜色色差的聚类

音频的处理

视频的处理

http api跨域

iframe

同源策略,document.domain = tool.lu

jsonp

这种跨域实际上是在页面中动态插入一个 <script> 标签,然后在被加载的脚本中执行当前网页里的函数;显而易见,只支持GET请求。

ajax2

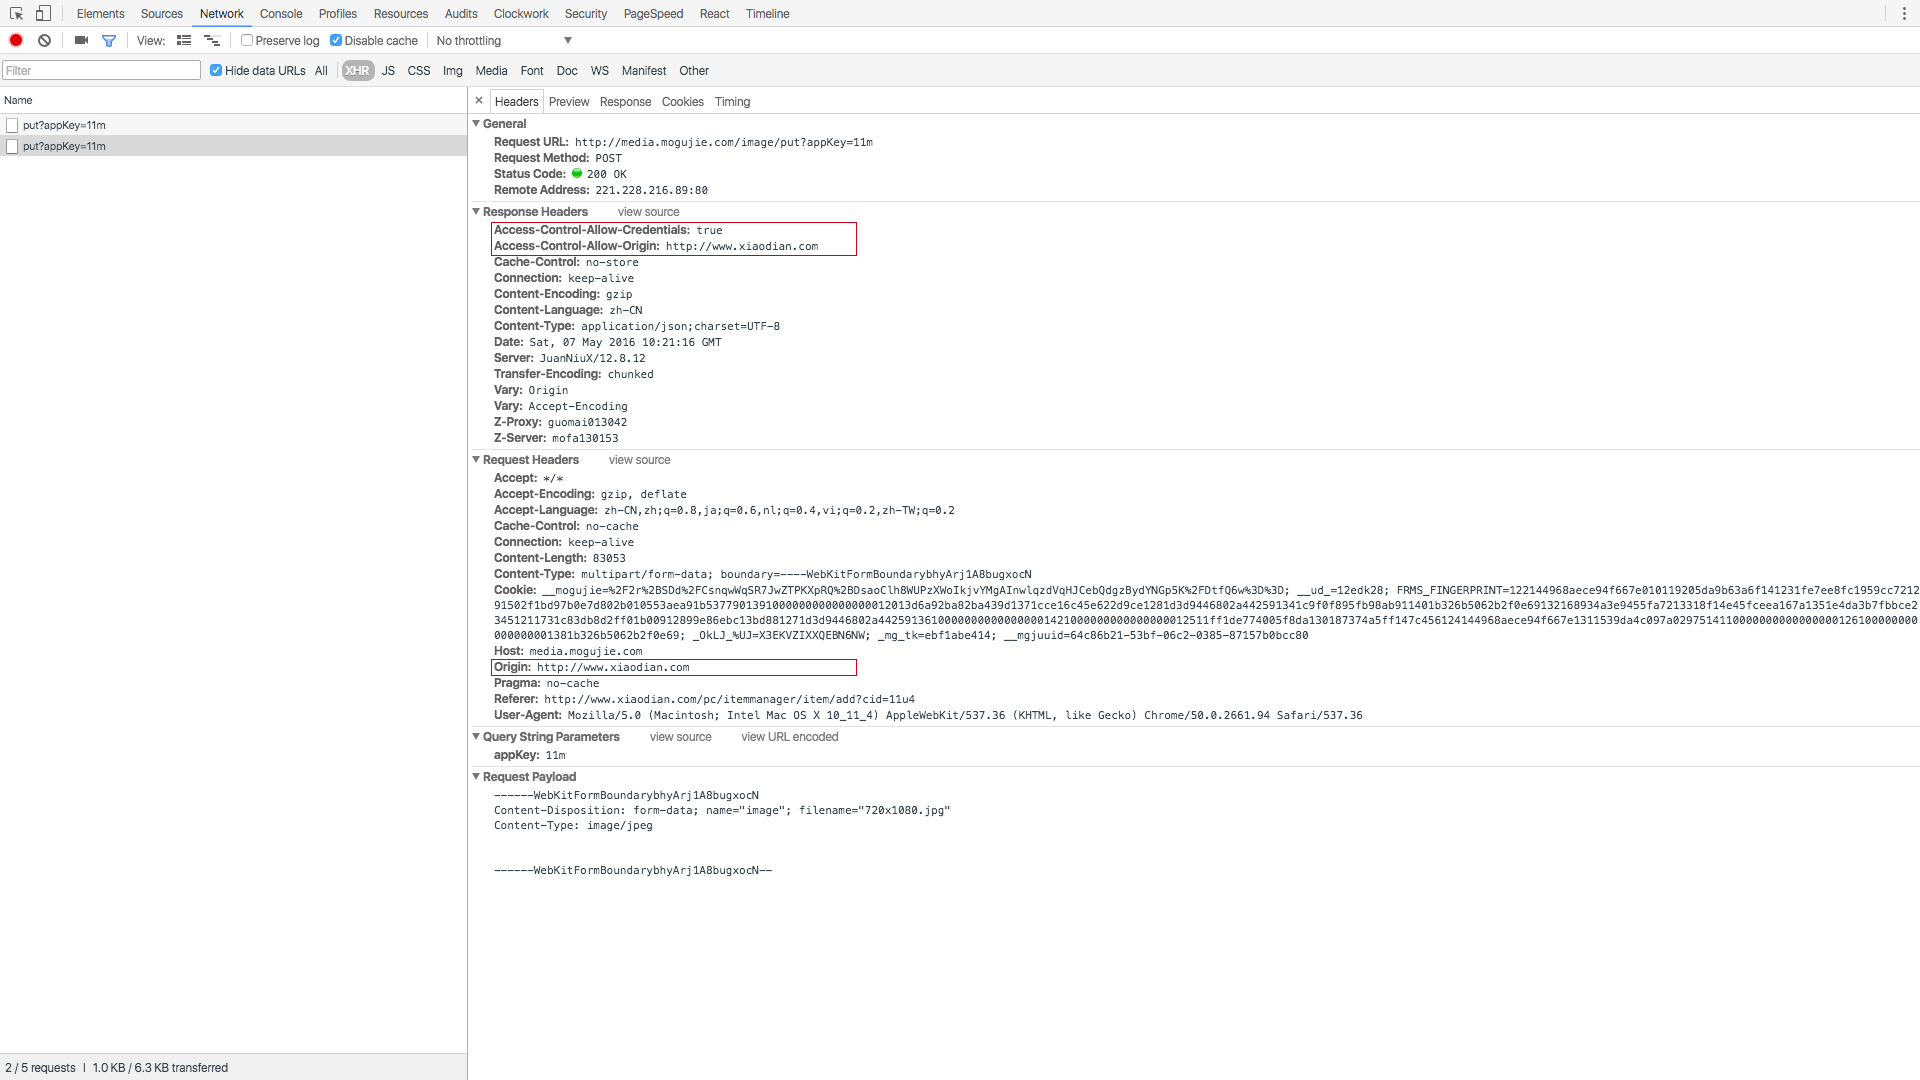
HTTP access control (CORS) - Cross-Origin Resource Sharing

  1. 简单请求
  2. 预检请求

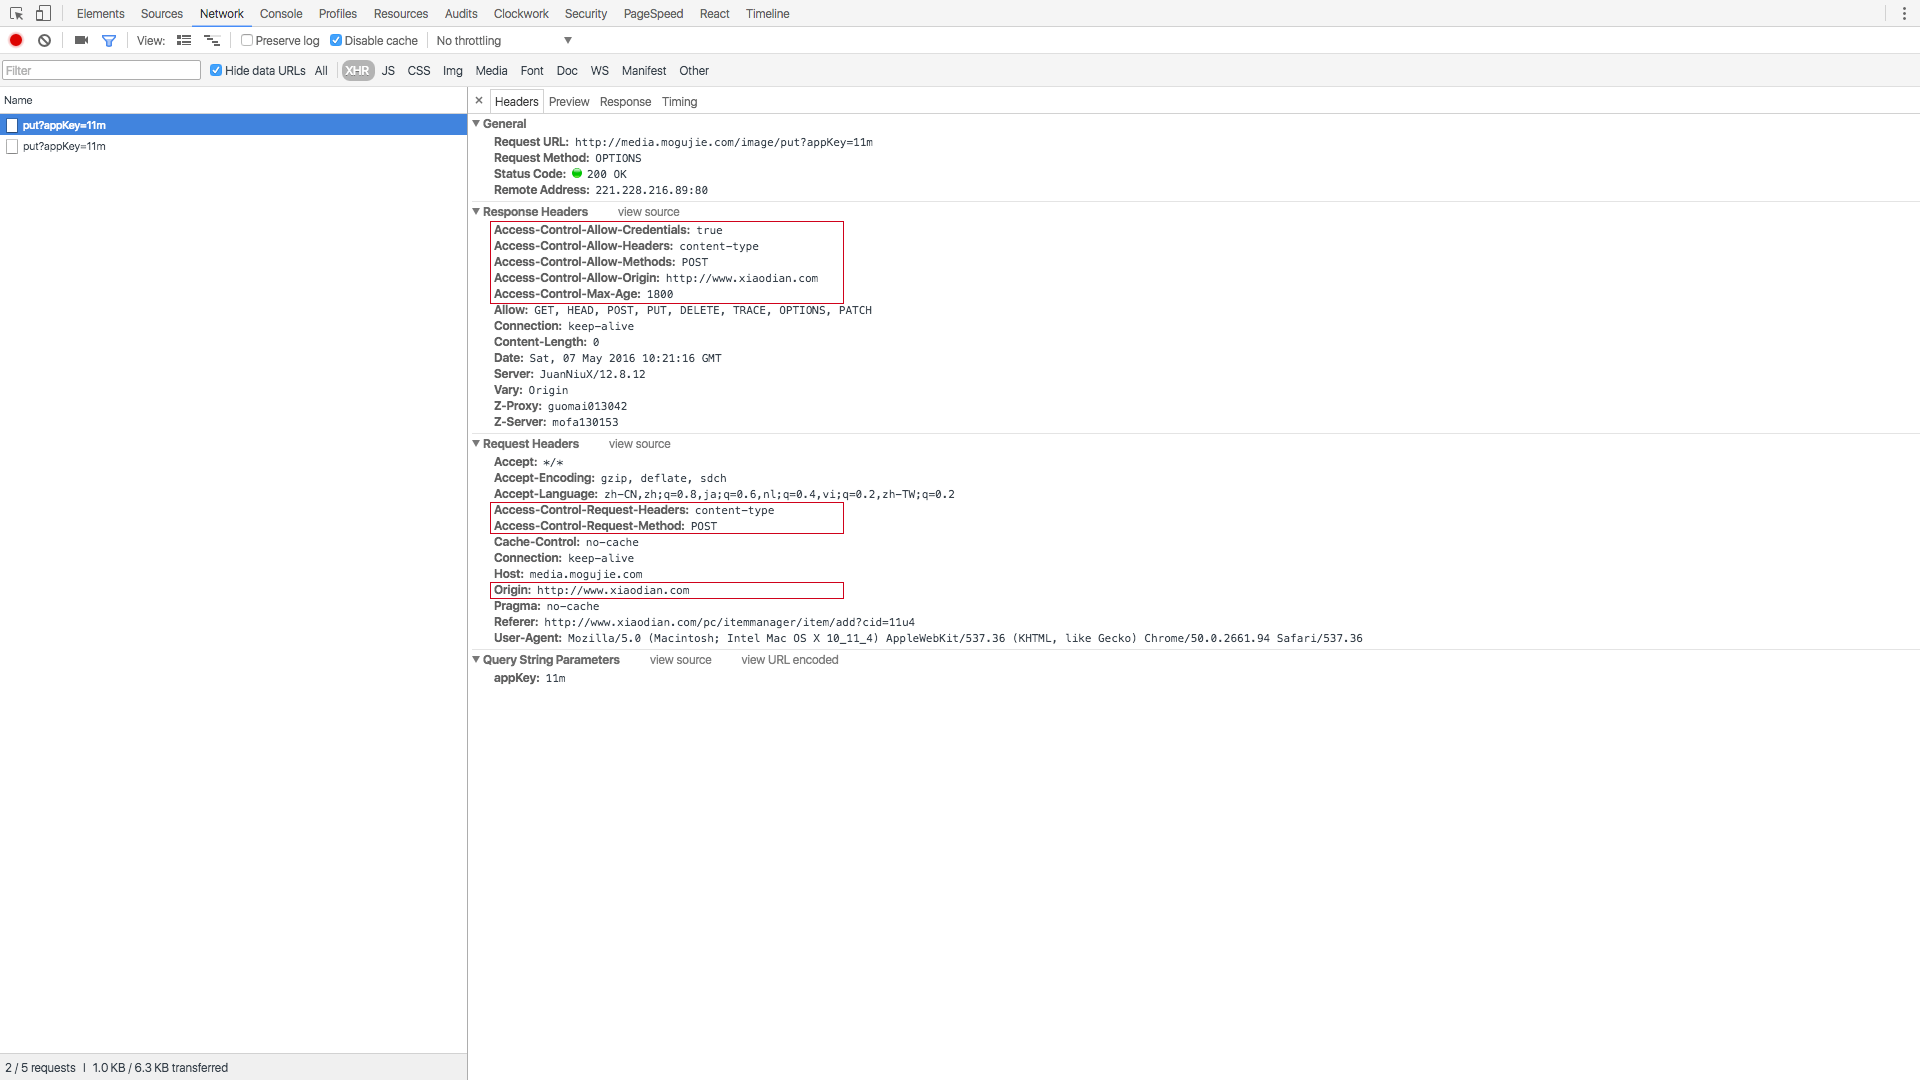
http返回头

Access-Control-Allow-Origin: <origin> | *
Access-Control-Expose-Headers: X-My-Custom-Header, X-Another-Custom-Header
Access-Control-Max-Age: <delta-seconds>
Access-Control-Allow-Credentials: true | false
Access-Control-Allow-Methods: <method>[, <method>]*
Access-Control-Allow-Headers: <field-name>[, <field-name>]*
static const auto maxPreflightCacheTimeout = std::chrono::seconds(600);  

http请求头

Origin: <origin>
Access-Control-Request-Method: <method>
Access-Control-Request-Headers: <field-name>[, <field-name>]*

默认情况下 跨域XHR 是不会带上Cookie的,需要设置 withCredentials = true;

preflight.png
request.png

附件:mediacenter.pdf

使用javassist修改idea mybatis插件

反编译查看源码

# cd ~/Library/Application Support/IntelliJIdea15/mybatis_plus/lib/
# cd ~/Library/Application Support/IntelliJIdea2016.2/mybatis_plus/lib/
# cd ~/Library/Application Support/IntelliJIdea2016.3/mybatis_plus/lib/
cd ~/Library/Application Support/IntelliJIdea2017.1/mybatis_plus/lib/

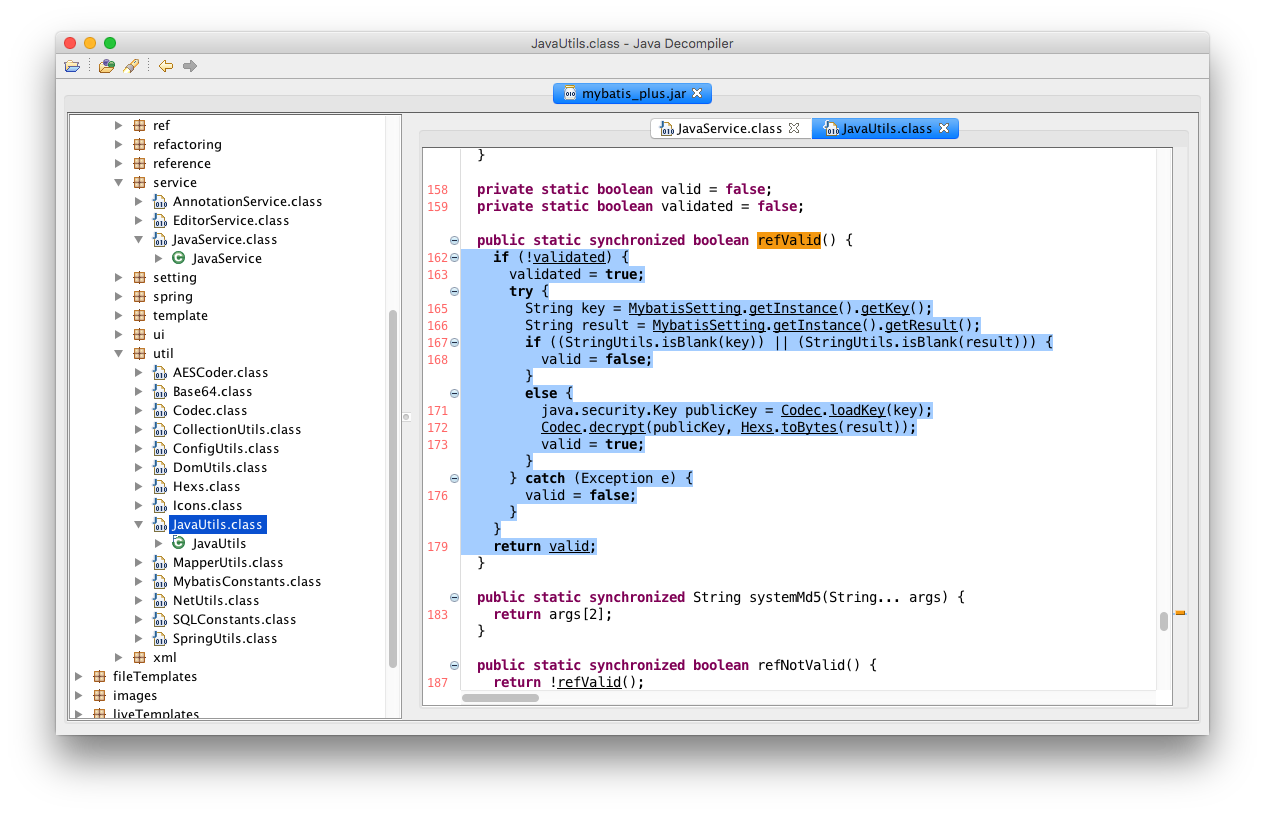
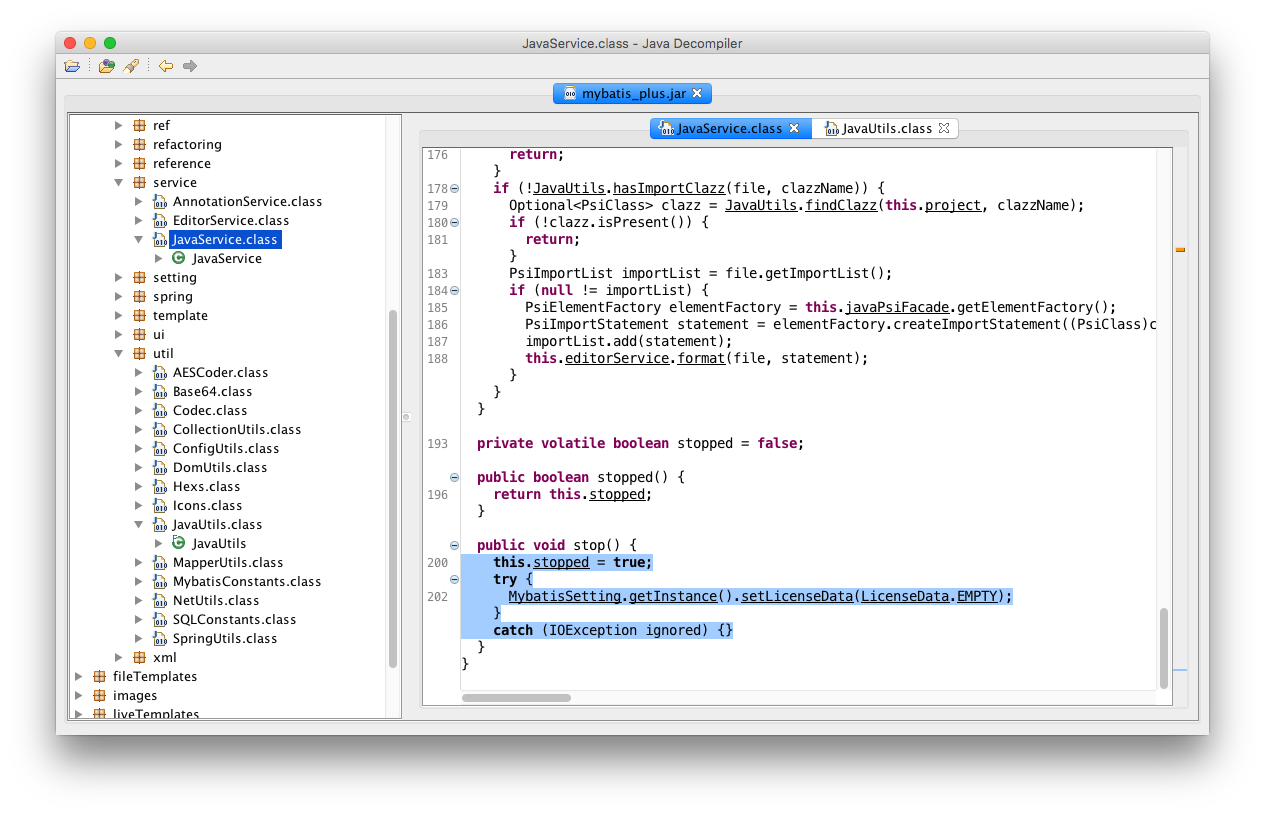
使用 JD-GUI 打开 mybatis_plus.jar,查看源码:

Screenshot 2016-03-05 at 12.19.56.png
Screenshot 2016-03-05 at 12.19.53.png

修改验证逻辑

使用javassist修改字节码

import javassist.*;

class MyBatisPlusCrack {

    public static void main(String[] args) throws Exception {
        ClassPool pool = ClassPool.getDefault();
        CtClass c = pool.get("com.seventh7.mybatis.util.JavaUtils");
        CtMethod m = c.getDeclaredMethod("refValid");
        m.setBody("{ validated = true; valid = true; return valid; }");
        c.writeFile();

        CtClass cc = pool.get("com.seventh7.mybatis.service.JavaService");
        CtMethod mm = cc.getDeclaredMethod("stop");
        mm.setBody("{ return; }");
        cc.writeFile();
    }

}
# 运行
javac -classpath ".:javassist.jar:mybatis_plus.jar" MyBatisPlusCrack.java
java -classpath ".:javassist.jar:mybatis_plus.jar" MyBatisPlusCrack

此时会在当前目录下生成修改过的两个类文件,使用压缩软件替换jar包中的这两个文件;重启idea。

jar uvf mybatis_plus.jar \
    com/seventh7/mybatis/service/JavaService.class \
    com/seventh7/mybatis/util/JavaUtils.class

在JAVA中实现PHP的gzuncompress

背景

在系统改造的时候,从php迁移到java;由于php中为了节省redis的内存,对缓存的数据做了 gzcompress 处理;为了能读取出数据,有两套方案:

  1. 刷数据,将redis中老的数据清理掉,去掉 gzcompress 的步骤(缺点:刷数据的时间,和读取代码上线的时间点无法吻合;数据的写入入口比较多,容易遗漏)
  2. java中读取的时候可以进行 gzuncompress

一些知识

知道这些知识候就能避免我在实现过程中遇到的很多问题。

PHP中的 gzcompress

This function compresses the given string using the ZLIB data format.
Note:
This is not the same as gzip compression, which includes some header data. See gzencode() for gzip compression.

一直以为 gzcompress 就是 gz 的压缩,php中使用的 zlib 来压缩,压缩完的结果中携带了头信息,直接使用 gz 解压是不认这种格式的。

JAVA中的 new String(byte[])

java.lang.StringCoding.StringDecoder 当在编码 byte[] 不能处理的时候会进行一些处理;所以说 (new String(compressedByte)).getBytes()compressedByte 并不一定会完全一样。

说到这里就可以看下 jedis 提供的接口了,刚开始我是使用的 String get(String key),于是由于上面的原因,当我用这个返回值 getBytes() 的时候就已经发生了变化。正确的使用方法应该是使用 byte[] get(byte[] key),由于比较繁琐,封装一下。

实现

    public static String get(Jedis jedis, String key) {
        byte[] byteKey = key.getBytes();
        byte[] element = jedis.get(byteKey);
        return new String(gzuncompress(element));
    }

    public static List<String> mget(Jedis jedis, List<String> keys) {
        byte[][] byteKeys = new byte[keys.size()][];
        for (int i = 0; i < keys.size(); i++) {
            byteKeys[i] = keys.get(i).getBytes();
        }
        List<byte[]> elements = jedis.mget(byteKeys);
        List<String> result = new ArrayList<>();
        for (byte[] element : elements) {
            result.add(new String(gzuncompress(element)));
        }
        return result;
    }

    public static byte[] gzuncompress(byte[] data) {
        byte[] unCompressed = null;
        ByteArrayOutputStream bos = new ByteArrayOutputStream(data.length);
        Inflater deCompressor = new Inflater();
        try {
            deCompressor.setInput(data);
            final byte[] buf = new byte[1024];
            while (!deCompressor.finished()) {
                int count = deCompressor.inflate(buf);
                bos.write(buf, 0, count);
            }
            unCompressed = bos.toByteArray();
            bos.close();
        } catch (Exception e) {
            e.printStackTrace();
        } finally {
            deCompressor.end();
        }

        return unCompressed;
    }

JAVA WEB乱码解决

设置环境变量

export $LANG="UTF-8"

设置tomcat接收GET参数时候的编码 server.xml (tomcat中的配置文件)

<Connector
    ....
    URIEncoding="UTF-8">

设置接收POST参数时候的编码

web工程中web.xml的设置

必须要放在所有filter之前

    <filter>
        <filter-name>encodingFilter</filter-name>
        <filter-class>org.springframework.web.filter.CharacterEncodingFilter</filter-class>
        <init-param>
            <param-name>encoding</param-name>
            <param-value>UTF-8</param-value>
        </init-param>
    </filter>
    <filter-mapping>
        <filter-name>encodingFilter</filter-name>
        <url-pattern>/*</url-pattern>
    </filter-mapping>

对于读多写少的少量数据的缓存优化

前提:数据量比较少,并且读多写少,实时性要求不高的数据。

优点

  1. 访问本地cache节省了网络开销,减少中心cache集群(redis)的压力
  2. 正常的web机器内存利用率较低,减少web机内存资源的浪费

类库的选择

google guava cache

  1. LRU失效机制
  2. 流畅的api接口
  3. 使用内存缓存
  4. 配套stats接口

流程

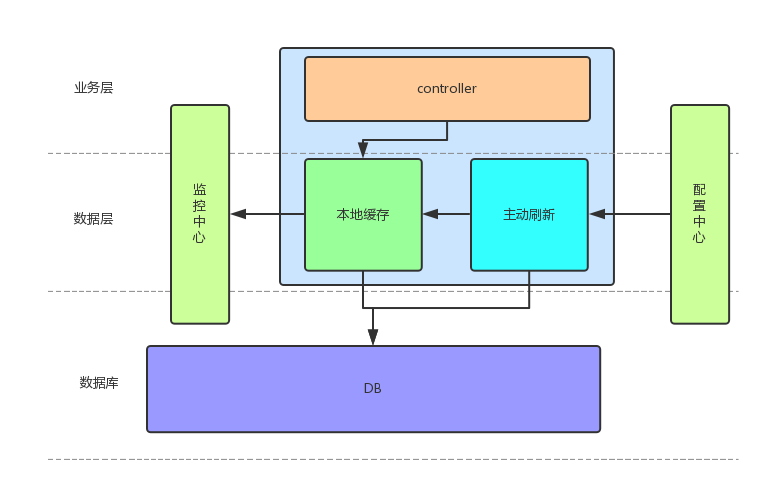
未命名文件.png

  1. [被动失效] controller层访问cache,若获取不到数据,从db中获取数据,并刷到cache
  2. [主动失效] 当db数据变更时,主动失效缓存;注意:这里cache是在每台web机器都有一份,所以每台机器都需要刷一遍;所以我们需要一个配置中心;在web机器监听配置中心的变化,然后刷新各自机器的cache
  3. 定时将本机的cache的 命中率,量 上报到监控系统

主动失效机制

  1. 实时性要求较高的可以订阅mysql的binlog
  2. 实时性要求不高的可以定时跑crontab

Spring RequestParam过于智能

POST到后端的数据是这样的

keywords[]: 关键词1,关键词2
keywords[]: 关键词3,关键词4
@RequestParam(value = "keywords[]") List<String> keywords;

然而经过Spring的RequestParam处理之后,却变成了 ["关键词1", "关键词2", "关键词3", "关键词4"];对于 Spring 这种过分聪明的行为我表示很呵呵~

防止这种解析的办法就是覆盖掉原有的converters;不使用英文逗号为分隔符。

<mvc:annotation-driven conversion-service="conversionService"/>

<bean id="conversionService" class="org.springframework.context.support.ConversionServiceFactoryBean">
    <property name="converters">
        <set>
            <bean class="lu.tool.util.StringToArrayConverter" />
        </set>
    </property>
</bean>
package lu.tool.console.util;

import org.springframework.core.convert.converter.Converter;
import org.springframework.util.StringUtils;

import java.util.Arrays;
import java.util.List;

/**
 * Created by xiaozi on 8/12/15.
 */
public class StringToArrayConverter implements Converter<String, List<String>>{
    @Override
    public List<String> convert(String source) {
        return Arrays.asList(StringUtils.delimitedListToStringArray(source, ";"));
    }
}