类unix系统上libcurl bug
超时设置小于1s时的bug
http://www.php.net/manual/zh/function.curl-setopt.php#104597
https://github.com/laruence/yar/issues/15#issuecomment-31091428
上面两个网址说的很明显,解决办法就是
curl_setopt($ch, CURLOPT_NOSIGNAL, 1);超时设置小于1s时的bug
http://www.php.net/manual/zh/function.curl-setopt.php#104597
https://github.com/laruence/yar/issues/15#issuecomment-31091428
上面两个网址说的很明显,解决办法就是
curl_setopt($ch, CURLOPT_NOSIGNAL, 1);small标签,word-break: break-all; 在chrome下面正常换行,而在ie下面不起作用
ie下的word-break: break-all; 貌似在block元素上才会起作用,加上display: block; 就可以了。
判断的三种方式:
//
//  main.m
//  learning
//
//  Created by xiaozi on 13-12-8.
//  Copyright (c) 2013年 xiaozi. All rights reserved.
//

#import <Foundation/Foundation.h>

int main(int argc, const char * argv[])
{

    @autoreleasepool {

        NSString* extsStr = @"php,js,py";
        NSArray* extsArr = [extsStr componentsSeparatedByString:@","];

        // 是否在数组中 {{{
        NSPredicate* rule1 = [NSPredicate predicateWithFormat:@"SELF IN %@", extsArr];
        BOOL result1 = [rule1 evaluateWithObject:@"txt"];
        NSLog(@"%d", result1);
        // }}}

        // {{{
        NSPredicate* rule2 = [NSPredicate predicateWithFormat:@"SELF CONTAINS %@", @"js"];

        // 数组包含
        BOOL result2 = [rule2 evaluateWithObject:extsArr];
        NSLog(@"%d", result2);
        // }}}

        // 数组过滤
        BOOL result3 = [[extsArr filteredArrayUsingPredicate:rule2] count];
        NSLog(@"%d", result3);

    }
    return 0;
}由于taobao提供了rest api,所以这次就不用scrapy了,改用unirest
pip install unirestunirest是异步请求的(多线程),所以提供一个callback,但是要是有额外的参数需要传入,用全局变量的话会产生问题。
具体的实现可以根据纯真IP数据库的IP段来查询,单台机器抓取的话估计2~3天的样子,下面是单个IP段抓取的实现代码:
# encoding: utf-8
import time, unirest

def pp(extra):
    # 其实这种做法和js很像,用一个闭包限制变量的作用域
    def p(resp):
        print(extra)
        # 在这里做数据的处理和储存
    return p

def main():
    r = ['192.9.201.0', '192.9.201.255'];
    unirest.get('http://ip.taobao.com/service/getIpInfo.php', headers = {}, params = {'ip': r[0]}, auth = (), callback = pp(r))
    # taobao访问限制:为了保障服务正常运行,每个用户的访问频率需小于10qps。
    time.sleep(.5)

if __name__ == '__main__':
main()例子:批量将文字题目生成为图片
artisan command:make QuestionCommand
# app/command/QuestionCommand.php生成php文件之后,首先需要修改name为你的命令
protected $name = 'question:gen';getArguments, getOptions 分别为获取参数和选项的值
getArguments // command arg1 arg2
getOptions // command --opt1=val1 --opt2=val2
fire // 执行命令的时候具体要做的事情
较为完整的例子
<?php

use Illuminate\Console\Command;
use Symfony\Component\Console\Input\InputOption;
use Symfony\Component\Console\Input\InputArgument;

class QuestionCommand extends Command {

    /**
     * The console command name.
     *
     * @var string
     */
    protected $name = 'question:gen';

    /**
     * The console command description.
     *
     * @var string
     */
    protected $description = '生成question图片';

    /**
     * Create a new command instance.
     *
     * @return void
     */
    public function __construct()
    {
        parent::__construct();
    }

    /**
     * Execute the console command.
     *
     * @return void
     */
    public function fire()
    {
        $questions = $this->option('all') ? Question::all() : Question::whereThumb(0)->get();
        // 初始化markdown解析引擎
        $ciconia = new Ciconia\Ciconia();
        $ciconia->addExtension(new Ciconia\Extension\Gfm\FencedCodeBlockExtension());
        $ciconia->addExtension(new Ciconia\Extension\Gfm\TaskListExtension());
        $ciconia->addExtension(new Ciconia\Extension\Gfm\InlineStyleExtension());
        $ciconia->addExtension(new Ciconia\Extension\Gfm\WhiteSpaceExtension());
        $ciconia->addExtension(new Ciconia\Extension\Gfm\TableExtension());
        foreach ($questions as $question) {
            $item = array(
                'id' => $question->id,
                'absPath' => public_path('upload/question/' . $question->id . '.png'),
                'relPath' => 'question/' . $question->id . '.png',
                'question' => $ciconia->render($question->question),
            );
            Queue::push('code2png', $item, 'code2png');
            $this->info('Question ' . $question->id . ' has been added to the queue.');
        }
    }

    /**
     * Get the console command arguments.
     *
     * @return array
     */
    protected function getArguments()
    {
        return array(
            // array('example', InputArgument::REQUIRED, 'An example argument.'),
        );
    }

    /**
     * Get the console command options.
     *
     * @return array
     */
    protected function getOptions()
    {
        return array(
            array('all', null, InputOption::VALUE_OPTIONAL, '全部重新生成', null),
        );
    }

}需要在app/start/artisan.php里面添加下面一行才会生效
// 4.0
$artisan->add(new QuestionCommand);
// 4.1
Artisan::add(new QuestionCommand);
命令行中这样执行
artisan question:gen --all=1如果要在Controller里面调用,可以这样
Artisan::call('question:gen', array('--all' => 1));再次验证时发现下面的代码有问题,有待修复
很多时候我们的网站的配置都是存在数据库里面的,这样后台也方便配置修改。而Laravel4默认的是将数组直接写在配置文件里面的。
Get Config from database 这个还不错,但是有个问题,就是不支持这样的$register = Config::get('site.register'); var_dump($register['invite']);类似于多级数组的意思
数据库里面直接这样写:
|       key       | value |
|-----------------|-------|
| register.invite |   1   |
我们改造一下
<?php
// app/config/site.php
class DBconfiguratorObject implements ArrayAccess, Serializable {
    protected $config = array();
    protected $table = null;

    private static $_instance = null;

    public static function instance($tableName = 'site'){
        if(self::$_instance === null){
            self::$_instance = new self($tableName);
        }
        return self::$_instance;
    }

    private function __construct($tableName = 'site'){
        $this->table = DB::table($tableName);
        $config = $this->table->lists('value', 'key');
        $this->config = array();
        foreach ($config as $key => $value) {
            array_set($this->config, $key, $value);
        }
    }

    public function offsetGet($key){
        // return $this->config[$key];
        return array_get($this->config, $key);
    }

    public function offsetSet($key, $value){
        if($this->offsetExists($key)){
            $this->table->where('key', $key)->update(array(
                'value' => $value
            ));
        } else {
            $this->table->insert(array(
                'key' => $key,
                'value' => $value
            ));
        }
        $this->config[$key] = $value;
    }

    public function offsetExists($key){
        return isset($this->config[$key]);
    }

    public function offsetUnset($key){
        unset($this->config[$key]);
        $this->table->where('key', $key)->delete();
    }

    public function serialize(){
        return serialize($this->config);
    }

    public function unserialize($serialized){
        $config = unserialize($serialized);
        foreach($config as $key => $value){
            $this[$key] = $value;
        }
    }

    public function toJson(){
        return json_encode($this->config);
    }
}

return DBconfiguratorObject::instance();因为用了laravel4的
Response::json(array())->setCallback('callback')然后始终报
The callback name is not valid.
然后单独写了个test.php文件测试该语句在不同的机器上测下来的结果不一样。
var_dump(preg_match('/^[$_\p{L}][$_\p{L}\p{Mn}\p{Mc}\p{Nd}\p{Pc}\x{200C}\x{200D}]*+$/u', 'sad'));本以为是系统哪边的设置的问题,于是将env和php -i的结果都比对了一遍,都一样。后来想到看一下pcre的版本是否一致pcre-config --version,结果都是6.6;最后没办法rmp -qa | grep pcre,好家伙最后的小版本不一样;再然后你懂的,升级了一下pcre就正常了。
首先,yum安装各种需要的东西,比如pidgin,以及后面需要用到的依赖包,其中dbus是用来通信的
yum install pidgin-devel finch screen dbus dbus-devel dbus-x11 libev-devel zlib-devel glibc-devel cmake sqlite-devel libcurl-devel其次,通过git clone pidgin-lwqq来进行编译,详细的见https://github.com/xiehuc/pidgin-lwqq,不过这里需要注意两点:
diff --git a/lib/login.c b/lib/login.c
index 8fe25c0..a1ae11b 100644
--- a/lib/login.c
+++ b/lib/login.c
@@ -141,6 +141,7 @@ static LwqqAsyncEvent* check_need_verify(LwqqClient *lc,const char* appid)
 static int request_captcha_back(LwqqHttpRequest* req,LwqqVerifyCode* code)
 {
     int err = 0;
+       FILE *captcha_fp;
     if(req->http_code!=200){
         err = -1;
         goto done;
@@ -148,6 +149,9 @@ static int request_captcha_back(LwqqHttpRequest* req,LwqqVerifyCode* code)
     LwqqClient* lc = req->lc;
     code->data = req->response;
     code->size = req->resp_len;
+       captcha_fp = fopen("/path/to/qqcaptcha.png", "wb");
+       fwrite(code->data, code->size, 1, captcha_fp);
+       fclose(captcha_fp);
     req->response = NULL;
     lwqq_call_action(lc,need_verify2)(lc,code);
 done:
然后,编译好之后,就可以先试试登录了,直接敲入finch试试,目测就能看到登录界面了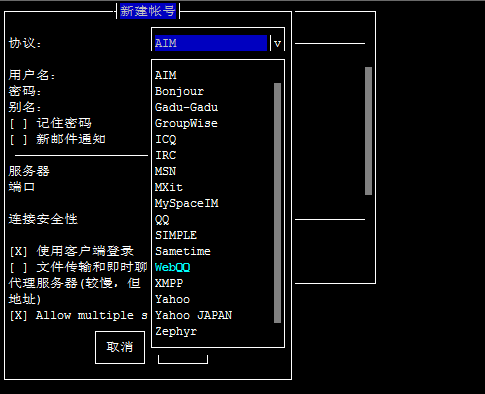
选择webqq进行登录,使用快捷键还是很方便的,不会使用可以man一下
下面就是机器人部分了,pidgin支持dbus通信,于是我们可以用利用dbus的接口来监听qq的消息,并作出回应,抑或是主动发出消息。要使用dbus,那么finch需要运行在screen下,这也是前面安装screen的原因,简单点,在命令行里敲入
dbus-launch screen即可启动dbus,并进入screen,然后在screen下运行finch即可。友情提示,某些terminal里,screen下的finch排版混乱,至今没找到解决方案。另外,screen的使用方法可以man一下,你的通信脚本也必须运行在screen里。
dbus通信可以用多个语言实现,c、python、php等等都可以,个人熟悉php,因此使用php进行编写机器人脚本。首先安装php扩展dbus:
pecl install dbus-0.1.1装完记得在php.ini里加入dbus的配置
[dbus]
extension=dbus.so网上能找到很多示例代码,比如PHP官网就有很多example:传送门在此
下面贴个简单自动重复消息的机器人代码
<?php

Robot::getInstance()->run(200);
/**
 * class Robot
 * @author Baiqiang Dong<qiyuuu@gmail.com>
 */
class Robot {

    protected $interface = 'im.pidgin.purple.PurpleInterface';
    protected $signals = array(
        'ReceivedImMsg',
        'ReceivedChatMsg',
    );

    private static $_instance;
    private $_dbus;
    private $_proxy;

    public static function getInstance() {
        if (self::$_instance === null) {
            self::$_instance = new self();
        }
        return self::$_instance;
    }

    private function __construct() {
        //connect to dbus
        $this->_dbus = new IDBus(DBus::BUS_SESSION);
        $this->_proxy = $this->_dbus->createProxy(
            'im.pidgin.purple.PurpleService',
            '/im/pidgin/purple/PurpleObject',
            'im.pidgin.purple.PurpleInterface'
        );
        //listen to specified signals
        foreach ($this->signals as $signal) {
            $this->_dbus->addSignalReceiver(array($this, lcfirst($signal)), $this->interface, $signal);
        }
    }

    public function receivedImMsg($signal) {
        $this->responseMessage($signal);
    }

    public function receivedChatMsg($signal) {
        $this->responseMessage($signal);
    }

    public function responseMessage($signal) {
        list($receiver, $sender, $message, $conversation, $flags) = $signal->getData()->getData();
        //send what you received
        $this->sendMessage($conversation, $message, $sender);
    }

    public function sendMessage($conversation, $message) {
        $proxy = $this->_proxy;
        try {
            $type = $proxy->PurpleConversationGetType($conversation);
            switch ($type) {
                //im
                case 1:
                    $im = $proxy->PurpleConvIm($conversation);
                    $proxy->PurpleConvImSend($im, $message);
                    break;
                //chat
                case 2:
                    $chat = $proxy->PurpleConvChat($conversation);
                    $proxy->PurpleConvChatSend($chat, $message);
                    break;

                default:
                    # code...
                    break;
            }
        } catch (Exception $e) {
            echo $e->getMessage(), "\n";
            return false;
        }
        return true;
    }

    public function run($time = 1000) {
        $this->_dbus->mainLoop($time);
    }

}

/**
 * extend the DBus class to implement methods like mainLoop and addSignalReceiver
 */
class IDBus extends DBus {
    private $_signalReceivers = array();

    public function __construct($type) {
        parent::__construct($type);
    }

    public function addSignalReceiver($callback, $interface, $signal) {
        if (!is_callable($callback)) {
            return;
        }
        if (!isset($this->_signalReceivers[$interface])) {
            $this->addWatch($interface);
        }
        $this->_signalReceivers[$interface][$signal] = $callback;
    }

    public function mainLoop($time) {
        while (true) {
            $signal = parent::waitLoop($time);
            $called = false;
            if ($signal instanceof DbusSignal) {
                foreach ($this->_signalReceivers as $interface=>$callbacks) {
                    foreach ($callbacks as $method=>$callback) {
                        if ($signal->matches($interface, $method) && is_callable($callback)) {
                            $called = call_user_func($callback, $signal);
                            //break to main loop if callback return true
                            if ($called) {
                                break 2;
                            }
                        }
                    }
                }
            }
        }
        return $signal;
    }
}<video src="http://type.so/usr/uploads/2013/10/1770439643.flv";>codemirror.flv</video>
Editor.on("change", function (Editor, changes) {
    while (changes) {
        Editor1.replaceRange(changes.text.join("\n"), changes.from, changes.to);
        changes = changes.next;
    }
});
changes.next 不是每次change事件都会有
这里有个矛盾的地方,就是 php是作为Apache的一个模块来运行的,所以一旦重启Apache,在Apache停掉的时候,php调用的shell命令就不会继续执行了;也就是说,只能关闭Apache,不能启动Apache。
我想到的办法就是将命令交给其他程序去运行,于是就想到了at命令。man at只看到at -f [file] now从文件读取,但是我就一个命令,不想再生成一个文件,然后就想到了管道,试一下,成功了。
echo 'sudo service httpd restart' | at now注:at命令,apache用户需要有登录权限(/etc/passwd)
<time datetime="2013-11-03">2013-11-03 修改</time>
不知为何用apache去启动的服务,在apache服务退出的时候会接管apache的端口
效果

代码:
l = text.sourceText.length
ti = time - thisLayer.inPoint
t = ti * effect('speed')('滑块') - effect('speed')('滑块') * effect('startAt')('滑块');
cursor = Math.round(ti % 1) || (t < l && t > 0) ? '|' : '';
substr(0, t) + cursor;直接git clone下来的代码,貌似和glib2的版本不太匹配。于是我是下的他的一个tag,然后编译的。
wget https://github.com/fontforge/fontforge/archive/v20120731-b.tar.gz
./configure --without-libzmq --without-x --without-iconv --disable-python-scripting --disable-python-extension我在编译pdf2htmlex的时候遇到了下面的错误
Linking CXX executable pdf2htmlEX
/usr/local/lib/libfontforge.so: undefined reference to `PyTuple_SetItem'
/usr/local/lib/libfontforge.so: undefined reference to `PyObject_SelfIter'
修改一下link.txt就可以了
vim CMakeFiles/pdf2htmlEX.dir/link.txt
# 加上一个编译参数 -lpython2.6查看opcode的扩展安装方法:《编译php vld扩展》
opcode的对照表 opcode的对照表
换行的ascii是10,换算成16进制就是A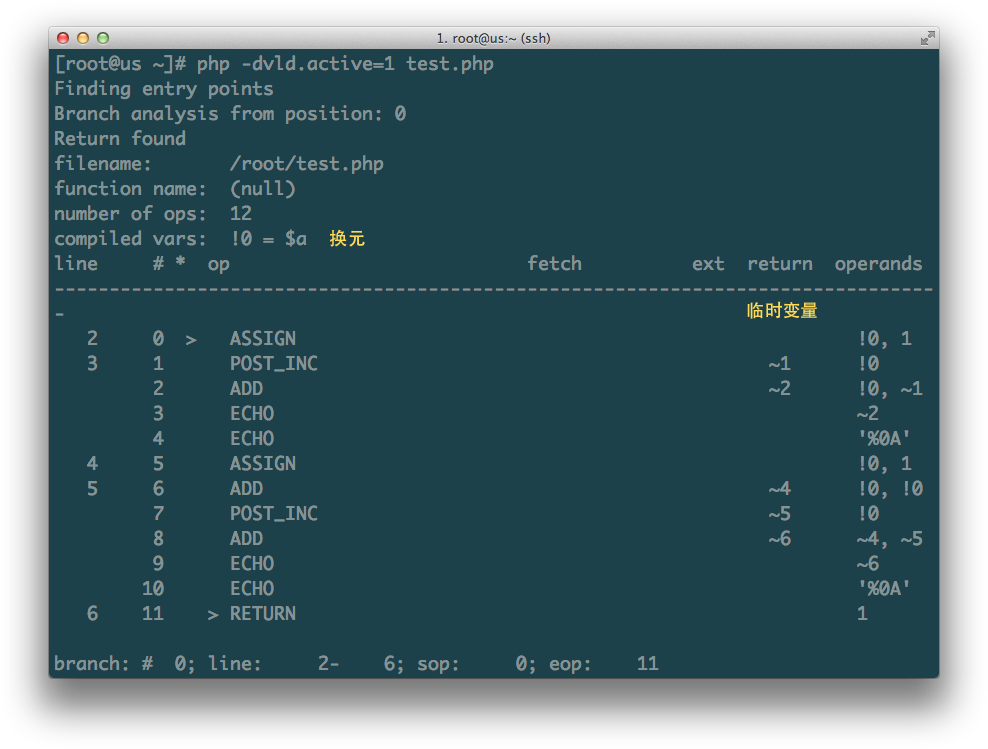
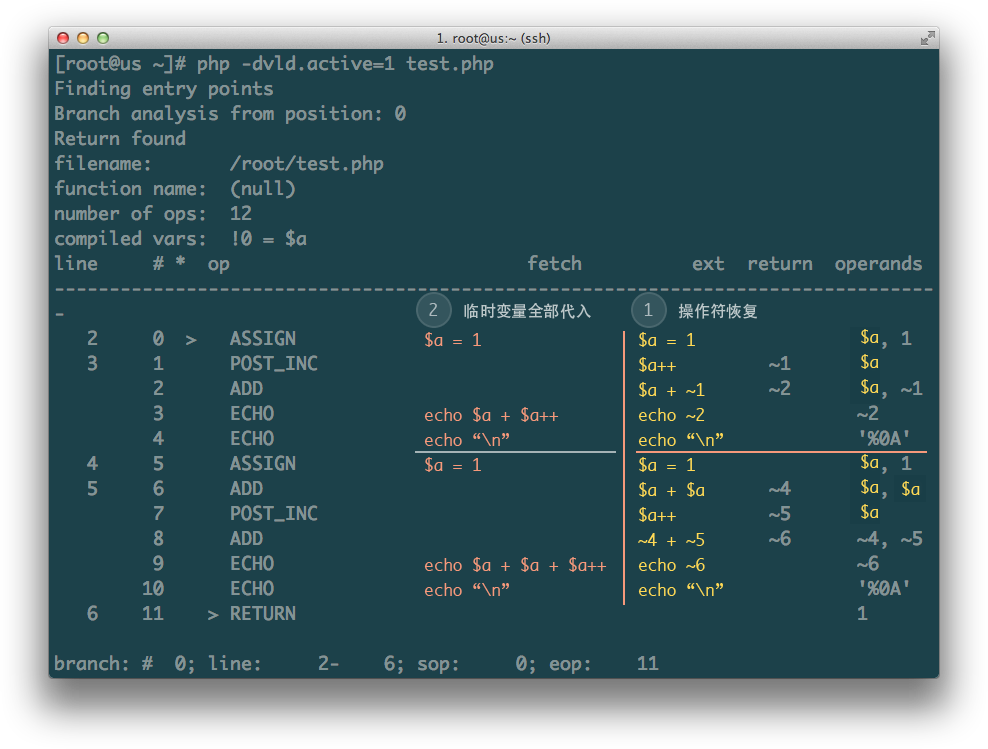
<?php
$a = 1;
echo $a + $a++;
echo "\n";
$a = 1;
echo $a + $a + $a++;
echo "\n";</code></pre><p><a href="http://type.so/usr/uploads/2013/10/1563209402.png" title="3.png"><img src="http://type.so/usr/uploads/2013/10/1563209402.png" alt="3.png" /></a></p>wget http://pecl.php.net/get/vld-0.12.0.tgz
tar zxf vld-0.12.0.tgz
phpize
./configure
make && make install
# vim /usr/local/php/etc/php.ini
# extension=vld.so
# 查看扩展是否已经加载
php -m | grep vld
# 试一试
php -dvld.active=1 test.php