mac上nasm汇编helloworld

osx 10.9上自带的nasm版本比较低,然后不能编译64位的程序。

www.nasm.us直接下载最新的版本;路径加入系统的PATH环境变量里面就好了。

mac上面的gcc编译.o文件的时候默认的入口是_main,而使用ld命令时,默认的是start

SECTION .data

msg: db "hello xiaozi!", 0x0a
len: equ $-msg

SECTION .text
global _main

kernel:
    syscall
    ret

_main:
    mov rax,0x2000004
    mov rdi,1
    mov rsi,msg
    mov rdx,len
    call kernel

    mov rax,0x2000001
    mov rdi,0
    call kernel
nasm -f macho64 -o asm1.o asm1.asm
ld -o asm1 -e _main asm1.o
./asm1

[SysStatus app] 模拟monitorplus状态栏

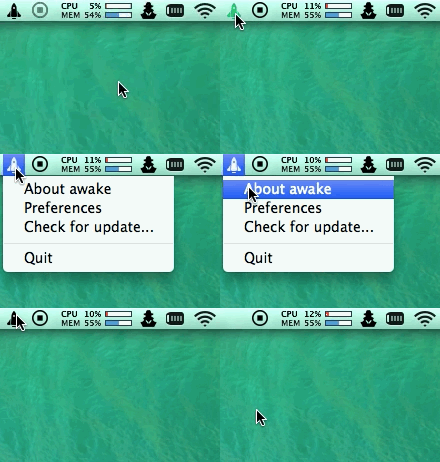
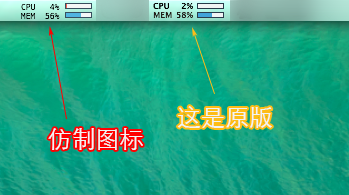
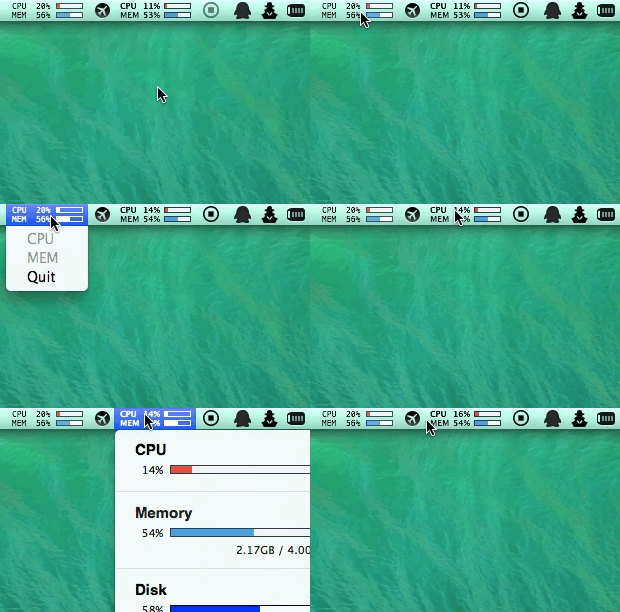
首先看效果:

screenshot2-1.png
2014-02-24 14_03_06.gif

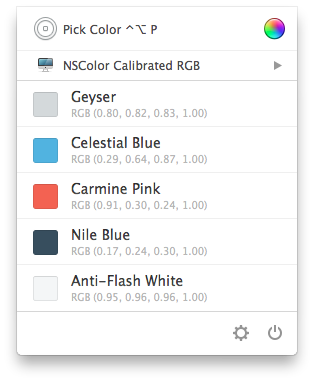
下面是所用到的颜色:

screenshot1.png

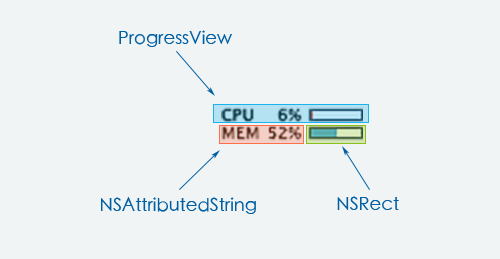
分析:

detail.png

代码

因为是demo,所以很多地方的代码组织不完善。

//
//  StatusItemView.h
//  SysStatus
//
//  Created by xiaozi on 14-2-23.
//  Copyright (c) 2014年 xiaozi. All rights reserved.
//

#import <Cocoa/Cocoa.h>
#import "ProgressView.h"

@interface StatusItemView : NSControl <NSMenuDelegate> {
    NSStatusItem *_statusItem;
    BOOL _isHighlighted;
    NSDictionary *_data;
    SEL _action;
    id __unsafe_unretained _target;
    ProgressView *_cpuView;
    ProgressView *_memView;
}

@property (nonatomic, readonly) NSStatusItem *statusItem;
@property (nonatomic, setter = setHighlighted:) BOOL isHighlighted;
@property (nonatomic) NSDictionary *data;
@property (nonatomic) SEL action;
@property (nonatomic, unsafe_unretained) id target;

- (id) initWithStatusItem: (NSStatusItem *)statusItem;

@end
//
//  StatusItemView.m
//  SysStatus
//
//  Created by xiaozi on 14-2-23.
//  Copyright (c) 2014年 xiaozi. All rights reserved.
//

#import "StatusItemView.h"
#import "ProgressView.h"

@implementation StatusItemView

- (id) initWithStatusItem: (NSStatusItem *)statusItem
{
    self = [super init];
    if (self) {
        // Initialization code here.
        _statusItem = statusItem;
        _cpuView = [[ProgressView alloc] initWithFrame: NSMakeRect(0, 10, 82, 11)];
        [_cpuView setBarColor:[NSColor colorWithCalibratedRed:0.91 green:0.3 blue:0.24 alpha:1]];
        [_cpuView setData:[NSDictionary dictionaryWithObjectsAndKeys:@"CPU %3d%%", @"label", [NSNumber numberWithInt: 0], @"value", nil]];
        _memView = [[ProgressView alloc] initWithFrame: NSMakeRect(0, 1, 82, 11)];
        [_memView setBarColor:[NSColor colorWithCalibratedRed:0.29 green:0.64 blue:0.87 alpha:1]];
        [_memView setData:[NSDictionary dictionaryWithObjectsAndKeys:@"MEM %3d%%", @"label", [NSNumber numberWithInt: 0], @"value", nil]];
        [self addSubview:_cpuView];
        [self addSubview:_memView];
    }
    return self;
}

- (void) setData: (NSDictionary *)data
{
    [_cpuView setData:[NSDictionary dictionaryWithObjectsAndKeys:@"CPU %3d%%", @"label", [data objectForKey: @"cpu"], @"value", nil]];
    [_memView setData:[NSDictionary dictionaryWithObjectsAndKeys:@"MEM %3d%%", @"label", [data objectForKey: @"mem"], @"value", nil]];
}

- (void) setHighlighted: (BOOL) highlighted
{
    if (_isHighlighted == highlighted) return;
    _isHighlighted = highlighted;
    [_cpuView setHighlighted: highlighted];
    [_memView setHighlighted: highlighted];
    [self setNeedsDisplay: YES];
}

- (void) setMenu:(NSMenu *)menu
{
    [menu setDelegate: self];
    [super setMenu: menu];
}

- (void)mouseDown:(NSEvent *)theEvent
{
    [_statusItem popUpStatusItemMenu: [super menu]];
    [NSApp sendAction:_action to:_target from:self];
}

- (void)menuWillOpen:(NSMenu *)menu {
    [self setHighlighted:YES];
    [self setNeedsDisplay:YES];
}

- (void)menuDidClose:(NSMenu *)menu {
    [self setHighlighted:NO];
    [self setNeedsDisplay:YES];
}

- (void)drawRect:(NSRect)dirtyRect
{
    [_statusItem drawStatusBarBackgroundInRect:dirtyRect withHighlight: _isHighlighted];

}

@end
//
//  ProgressView.m
//  SysStatus
//
//  Created by xiaozi on 14-2-24.
//  Copyright (c) 2014年 xiaozi. All rights reserved.
//

#import "ProgressView.h"

@implementation ProgressView

- (id)initWithFrame:(NSRect)frame
{
    self = [super initWithFrame:frame];
    if (self) {
        // Initialization code here.
        _data = [NSDictionary dictionaryWithObjectsAndKeys:@"LAB %3d%%", @"label", [NSNumber numberWithInt: 50], @"value", nil];
        _barColor = [NSColor colorWithCalibratedRed:0.91 green:0.3 blue:0.24 alpha:1];
    }
    return self;
}

- (void) setHighlighted:(BOOL)highlighted
{
    if (_highlighted == highlighted) return;
    _highlighted = highlighted;
    [self setNeedsDisplay: YES];
}

-(void) setData:(NSDictionary *)data
{
    _data = data;
    [self setNeedsDisplay: YES];
}

- (void)drawRect:(NSRect)dirtyRect
{
    NSColor *fontColor,*barBorderColor,*barIndicatorColor,*barBgColor;
    if (_highlighted) {
        fontColor = [NSColor whiteColor];
        barBorderColor = [NSColor whiteColor];
        barIndicatorColor = [NSColor whiteColor];
        barBgColor = [NSColor clearColor];
    } else {
        fontColor = [NSColor blackColor];
        barBorderColor = [NSColor colorWithCalibratedRed:0.17 green:0.24 blue:0.3 alpha:1];
        barIndicatorColor = _barColor;
        barBgColor = [NSColor colorWithCalibratedRed:0.95 green:0.96 blue:0.96 alpha:1];
    }
    NSDictionary *attributes = [NSDictionary dictionaryWithObjectsAndKeys:[NSFont fontWithName:@"Menlo" size: 8], NSFontAttributeName, fontColor, NSForegroundColorAttributeName, nil];
    NSAttributedString * text=[[NSAttributedString alloc] initWithString:[NSString stringWithFormat: [_data valueForKey:@"label"], [[_data objectForKey: @"value"] integerValue]] attributes: attributes];
    [text drawAtPoint:NSMakePoint(6, 1)];
    
    NSRect bar = NSMakeRect(50.0f, 3, 27.0f, 6.0f);
    bar = NSInsetRect(bar, .5f, .5f);
    NSBezierPath *barView = [NSBezierPath bezierPathWithRect: bar];
    [barBgColor set];
    [barView fill];
    [barBorderColor set];
    [barView stroke];
    NSRect barIndicator = NSMakeRect(50.0f, 3, roundf(.27f * [[_data objectForKey: @"value"] integerValue]), 6.0f);
    barIndicator = NSInsetRect(barIndicator, 1, 1);
    [barIndicatorColor set];
    [NSBezierPath fillRect:barIndicator];
}

@end

使用方法

- (void)applicationDidFinishLaunching:(NSNotification *)aNotification
{
    // Insert code here to initialize your application
    NSStatusItem *statusItem = [[NSStatusBar systemStatusBar] statusItemWithLength:82];
    statusItemView = [[StatusItemView alloc] initWithStatusItem: statusItem];
    [statusItem setHighlightMode: YES];
    [statusItem setView: statusItemView];
    [statusItemView setMenu: _statusMenu];
    
    [NSTimer scheduledTimerWithTimeInterval:2
                                      target:self
                                    selector:@selector(updateInfo:)
                                    userInfo:nil
                                     repeats:YES];
}

- (void)updateInfo:(NSTimer *)timer
{
    int cpuUsage = (arc4random() % 20) + 2;
    int memUsage = (arc4random() % 10) + 50;
//    NSLog(@"%d, %d", cpuUsage, memUsage);
    NSDictionary *data = [NSDictionary dictionaryWithObjectsAndKeys:[NSNumber numberWithInt: cpuUsage], @"cpu", [NSNumber numberWithInt: memUsage], @"mem", nil];
    [statusItemView setData: data];
}

[awake app] 自定义StatusItemView

2014-02-23 16_43_29.gif

源码已经放在github

左击切换状态,右击显示菜单;但是NSStatusItem没有提供右键菜单,所以要定义自己的View;若果需要直接方便使用的话,有开源框架RHStatusItemView,引入项目中就可以用了。下面是我自己实现的:

//
//  StatusItemView.h
//  awake
//
//  Created by xiaozi on 14-2-21.
//  Copyright (c) 2014年 xiaozi. All rights reserved.
//

#import <Cocoa/Cocoa.h>

@interface StatusItemView : NSControl <NSMenuDelegate>{
    NSImage *_image;
    NSImage *_alternateImage;
    NSStatusItem *_statusItem;
    BOOL _isHighlighted;
    SEL _action;
    SEL _rightAction;
    id __unsafe_unretained _target;
}

@property (nonatomic, readonly) NSStatusItem *statusItem;
@property (nonatomic, strong) NSImage *image;
@property (nonatomic, strong) NSImage *alternateImage;
@property (nonatomic, setter = setHighlighted:) BOOL isHighlighted;
@property (nonatomic) SEL action;
@property (nonatomic) SEL rightAction;
@property (nonatomic, unsafe_unretained) id target;

- (id) initWithStatusItem: (NSStatusItem *) statusItem;

@end
//
//  StatusItemView.m
//  awake
//
//  Created by xiaozi on 14-2-21.
//  Copyright (c) 2014年 xiaozi. All rights reserved.
//

#import "StatusItemView.h"

@implementation StatusItemView

- (id)initWithFrame:(NSRect)frame
{
    self = [super initWithFrame:frame];
    if (self) {
        // Initialization code here.
    }
    return self;
}

- (void) drawRect:(NSRect)dirtyRect
{
    [_statusItem drawStatusBarBackgroundInRect:dirtyRect withHighlight:_isHighlighted];
    NSImage *icon = _isHighlighted ? _alternateImage : _image;
    NSSize iconSize = [icon size];
    NSRect bounds = [self bounds];
    
    CGFloat iconX = roundf((NSWidth(bounds) - iconSize.width) / 2);
    CGFloat iconY = roundf((NSHeight(bounds) - iconSize.height) / 2);
    NSPoint iconPoint = NSMakePoint(iconX, iconY);
    [icon drawAtPoint:iconPoint fromRect:bounds operation:NSCompositeSourceOver fraction:1.0];
}

- (id) initWithStatusItem: (NSStatusItem *) statusItem {
    CGFloat itemWidth = [statusItem length];
    CGFloat itemHeight = [[NSStatusBar systemStatusBar] thickness];
    NSRect itemRect = NSMakeRect(0.0, 0.0, itemWidth, itemHeight);
    self = [self initWithFrame:itemRect];
    if (self != nil)
    {
        _statusItem = statusItem;
        [_statusItem setView: self];
    }
    return self;
}

- (void)setMenu:(NSMenu *) menu {
    [menu setDelegate: self];
    [super setMenu: menu];
}

- (void)setHighlighted:(BOOL)newFlag
{
    if (_isHighlighted == newFlag) return;
    _isHighlighted = newFlag;
    [self setNeedsDisplay:YES];
}

- (void)mouseDown:(NSEvent *)theEvent
{
    [NSApp sendAction:_action to:_target from:self];
}

- (void)rightMouseDown:(NSEvent *)theEvent
{
    NSMenu *menu = [super menu];
    [_statusItem popUpStatusItemMenu:menu];
    [NSApp sendAction:_rightAction to:_target from:self];
}

- (void)menuWillOpen:(NSMenu *)menu {
    [self setHighlighted:YES];
    [self setNeedsDisplay:YES];
}

- (void)menuDidClose:(NSMenu *)menu {
    [self setHighlighted:NO];
    [self setNeedsDisplay:YES];
}

- (void)setImage:(NSImage *)newImage
{
    _image = newImage;
    [self setNeedsDisplay: YES];
}

- (void)setAlternateImage:(NSImage *)newImage
{
    _alternateImage = newImage;
    if (_isHighlighted)
        [self setNeedsDisplay:YES];
}

- (BOOL)isOpaque
{
    return YES;
}

@end

具体使用方法:

statusItem = [[NSStatusBar systemStatusBar] statusItemWithLength: 22.0];
[statusItem setHighlightMode:YES];
statusView = [[StatusItemView alloc] initWithStatusItem: statusItem];
[statusView setMenu: statusMenu];
// [statusItem setView: statusView];
[statusView setImage: [NSImage imageNamed:@"MenuIcon"]];
[statusView setAlternateImage: [NSImage imageNamed:@"MenuIconSelected"]];

[statusView setAction: @selector(clickStatusItem:)];

安装mailcatcher

安装rvm & ruby

\curl -sSL https://get.rvm.io | bash -s stable
rvm install 1.9
rvm use 1.9 --default

更改gem源

gem sources
gem sources -r https://rubygems.org/
gem sources -a http://ruby.taobao.org/

安装mailcatcher

gem install mailcatcher
mailcatcher --http-ip=0.0.0.0
# browser visit http://[ip]:1080/

配置php

# vim /usr/local/php/etc/php.ini
send_mail_path = /usr/bin/env catchmail
# service php-fpm restart

测试

# php -a
mail('245565986@qq.com', 'test email', 'email\'s content is written by xiaozi.');

vim 杂记

粘贴到vim中

直接insert模式下粘贴会有问题,如:自动的缩进,自动的注释。

可以使用

:r !cat
// 粘贴
// [ctrl] + [d]

在 mac 下,方便一点,可以使用

:r !pbpaste

多次块缩进

使用shift + v之后选择了多行,并且进行缩进>,但是可能需要缩进多次;需要用到重复上次命令的指令.

shift + v
shift + .
// 重复多少次就按多少次
.

C实现进度条

#include <stdio.h>

int main() {
    int pwidth = 75;
    int i, j;
    for (i = 0; i < pwidth; i++) {
        // 构建进度条
        printf("%3d%% [", i * 100 / pwidth);
        for (j = 0; j <= i; j++)
            putchar('=');
        for (; j < pwidth; j++)
            putchar(' ');
        putchar(']');
        fflush(stdout);
        sleep(1);
        // 把刚才输出的都擦掉,用\r会有问题。
        for (j = 0; j < pwidth + 7; j++)
            putchar('\b');
    }
    putchar('\n');
    return 0;
}

02-19,补充:


Terminal Control Escape Sequences 找到

Erase End of Line <ESC>[K

  • Erases from the current cursor position to the end of the current line.

Erase Start of Line <ESC>[1K

  • Erases from the current cursor position to the start of the current line.

Erase Line <ESC>[2K

  • Erases the entire current line.

Erase Down <ESC>[J

  • Erases the screen from the current line down to the bottom of the screen.

Erase Up <ESC>[1J

  • Erases the screen from the current line up to the top of the screen.

Erase Screen <ESC>[2J

  • Erases the screen with the background colour and moves the cursor to _home_.

若是tty的话,可以这样:

printf("\r\x1b[K%3d%% [", i * 100 / pwidth);

使用homebrew安装axel

brew install axel

安装说是证书错误,然后就用Safari打开链接,信任了一下网址的证书,再次执行brew install,报SHA1不一样,继续用浏览器打开,结果发现页面不对,官网的下载地址失效了?无奈中是用google找到了axel的一个下载地址,macports的;

cd /Library/Caches/Homebrew
# http://distfiles.macports.org/axel/axel-2.4.tar.bz2
# 文件下载到该目录
brew install -vd axel

至此,安装成功!

02-19,注:

貌似使用pstree查看axel -n10的时候并没有使用多线程;于是就删除了他,换成了aria2

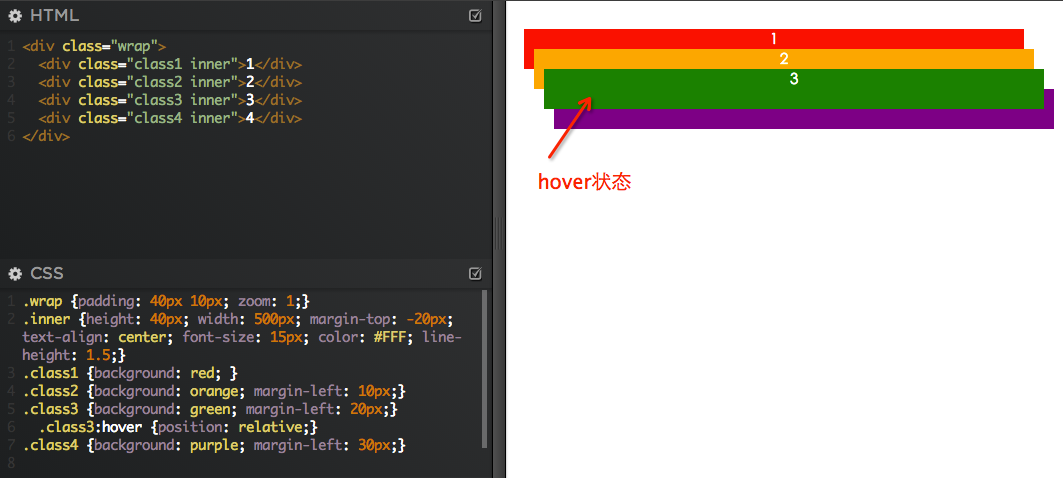
不设置z-index时的显示层级

本文的由来,在看 一淘九宫格的面试题 这篇文章的时候,发现 雨夜带刀 的实现方案没有使用z-index实现了层级的更改效果,于是便产生了好奇;问过几个前端,无果;经过一番google之后,得以下文档:

Standard blocks (DIV #5) in the normal flow, without any positioning property, are always rendered before positioned elements, and appear below them, even if they come later in the HTML hierarchy.


Positioned elements without z-index applied or z-index: 0 are on a higher stacking level than non-positioned elements.

大概意思是:
没有指定z-index的时候,定位元素要晚于非定位元素渲染,这样使得定位元素拥有更高的显示层级。

QQ20140128-1.png

参考:

jQuery-pjax的坑

白话解释:利用ajax进行页面的局部刷新,并可以实现浏览器前进后退 的一个库

bower install jquery-pjax -S --allow-root

使用

官方文档上是这样写的:

$(document.body).pjax("a.btn", ".container");

神马?没搞定?

QQ20140119-1.png

额!确实没搞定,于是第一个想到的就是google。无奈转载太多,而且提供的demo没有一个正常工作的(PS:鄙视转载无验证)。

根据上图中提示的代码位置,找到了locationReplace,在根据xhr请求被cancel,定位到代码223行,输出错误为timeout,找至196行,发现插件的默认值中根本就没有timeout选项,于是设置超时10s就解决这个问题了:

$(document.body).pjax("a.btn", ".container", {timeout: 10000});

PS:不知官方文档使用方法为何没有提及,不知我国人写出demo之后有无测试过

理解Laravel Eloquent的cache

Eloquent::remember

// 从数据库中取出前5个用户,并缓存结果。
User::remember(10)->take(5)->get();
// 下面这句会缓存posts么?
User::with(array('posts'))->remember(10)->take(5)->get();

先找一下remember在哪定义的!

remember 方法的定义

# grep -nC1 "Eloquent" app/config/app.php
150-        'DB'              => 'Illuminate\Support\Facades\DB',
151:        'Eloquent'        => 'Illuminate\Database\Eloquent\Model',
152-        'Event'           => 'Illuminate\Support\Facades\Event',
# grep -nC3 "function remember(" vendor/laravel/framework/src/Illuminate/Database/Query/Builder.php
1086-     * @param  string  $key
1087-     * @return \Illuminate\Database\Query\Builder|static
1088-     */
1089:    public function remember($minutes, $key = null)
1090-    {
1091-        list($this->cacheMinutes, $this->cacheKey) = array($minutes, $key);
1092-

这里EloquentModel的一个别名,而Model中并没有定义remember方法,而是用了装饰者设计模式通过__call魔术方法调用了Builder的方法。其实他是在内部实例化Builder的,有点“反向代理”的意思。

Builder在调用remember的时候做了个标记,在get的时候对这个标记作了判断,对查询结果做了缓存的写入和读取。这就不难理解remember方法只会对单个query查询结果进行缓存。

回头看

User::with(array('posts'))->remember(10)->take(5)->get();

使用with只是将1 + 5 * 1次query,优化成了1 + 1次;而不是想象中的一次缓存该条语句产生的所有query的结果。

缓存关联Model

User::with(array('posts' => function ($query)
    {
        return $query->remember(10);
    }))->remember(10)->take(5)->get();

当然,在定义model relation的时候也可以将 remember() 跟在后面,但我不认为这是一个好的方法。

function posts()
{
    return $this->hasMany('Post')->remember(10);
}

vagrant的坑

vagrant project和 虚拟机 关系丢失

额,这个问题不知道怎么产生的,但它确实出现了。解决办法:

VBoxManage list vms
# "vagrant_default_1389674864" {aea24237-3b9e-45b2-8593-59e2b63b34b8}
# 修改id文件
vim .vagrant/machines/default/virtualbox/id
# 或者直接
echo 'aea24237-3b9e-45b2-8593-59e2b63b34b8' > .vagrant/machines/default/virtualbox/id

vagrant 共享目录的权限

#...
config.vm.synced_folder "/Applications/MAMP/htdocs/plus.tool.lu", "/var/www/html"
#...

好吧,在虚拟机里面chmod -R 777 /var/www/html没用,google之后发现,需要在Vagrantfile里面设置。Vagrant Synced Folders Permissions

# ...
config.vm.synced_folder "/Applications/MAMP/htdocs/plus.tool.lu", "/var/www/html",
    id: "vagrant-root",
    owner: "nobody",
    group: "nobody",
    mount_options: ["dmode=775,fmode=664"]
# ...

[scrapy] laracasts爬虫

购买了1个月的laracasts.com的帐号,又怕有的时候没时间看,所以就都抓取下来。

  1. 将标题,描述都保存到mysql数据库
  2. 将视频下载到本地
CREATE TABLE `laracasts_lessons` (
  `id` int(11) unsigned NOT NULL AUTO_INCREMENT,
  `title` varchar(255) NOT NULL DEFAULT '',
  `downlink` varchar(255) NOT NULL DEFAULT '',
  `description` text NOT NULL,
  `path` varchar(255) NOT NULL DEFAULT '',
  PRIMARY KEY (`id`)
) ENGINE=MyISAM DEFAULT CHARSET=utf8;

这里说一下流程,代码就不贴出来了,有需要的可以下载附件。请先修改文件内的数据库用户名密码,和laracasts的账户,再执行./laracasts.sh

登录 -> 遍历列表页面 -> 遍历课程页面 -> 获取信息 -> 下载视频 -> 保存到MySQL

laracasts.zip

在项目中使用gulp

安装gulp

npm install gulp -g
npm install gulp gulp-coffee gulp-concat --save-dev

配置

我的js第三方库是使用bower来管理的,.bowerrc

{
    "directory": "public/js/vendor"
}

gulp这样配置,暂时只用了coffee的编译,没有使用js的合并和混淆

var gulp = require('gulp');
var coffee = require('gulp-coffee');
var concat = require('gulp-concat');
var uglify = require('gulp-uglify');
var rename = require('gulp-rename');

gulp.task('coffee', function () {
    gulp.src(['./public/js/**/*.coffee', '!./public/js/vendor/**'])
        .pipe(coffee())
        .pipe(gulp.dest('./public/js/'));
});

gulp.task('scripts', function () {
    gulp.src(['./public/js/**/*.js', '!./public/js/vendor/**'])
        .pipe(concat('all.js'))
        .pipe(gulp.dest('./public/dist'))
        .pipe(rename('all.min.js'))
        .pipe(uglify())
        .pipe(gulp.dest('./public/dist'));
});

gulp.task('default', function() {
    gulp.run('coffee');
    // gulp.run('scripts');
    gulp.watch(['./public/js/**/*.coffee', '!./public/js/vendor/**'], function () {
        gulp.run('coffee');
    });
    if (0) {
        gulp.watch(['./public/js/**/*.js', '!./public/js/vendor/**'], function () {
            gulp.run('scripts');
        });
    }
});

[Laravel4] 增加自定义的function

vendor/laravel/framework/src/Illuminate/Support/helpers.php Laravel4这个自带的function很不错,但是有的时候想扩展自己的方法;问题是该在哪边require进去。

建立一个文件app/Service/helpers.php,所有的自定义方法就写在这个里面了;然后修改composer.json,在autoload里面加上该文件,再执行composer du就可以了

{
    "autoload": {
        // ...
        "files": ["app/Service/helpers.php"]
    }
}